How to Schedule Hyflex Classes
Hyflex classes allow students to choose whether to attend the class in person or by participating remotely. These classes are scheduled as two sections that are combined to allow students to choose which section (and mode of instruction) they'd like to register for.
To schedule a hyflex class, you’ll need to:
- Create the face-to-face section of the class
- Create the synchronous online section of the class
- Combine the sections
- Schedule the meeting pattern
First, you’ll need to create the face-to-face section of the class. When you create the face-to-face and online sections, do not assign meeting patterns or facilities.
- In the Student Administration system, select Main Menu > Curriculum Management > Schedule of Classes > Maintain Schedule of Classes.
- Search for the course you want to schedule.
- Select the plus (+) button to add a new section.

- Assign the Section Number and copy this number to the Associated Class Number field.
- Leave the Instruction Mode as the default, P (Face to Face - On Campus).
- Do not enter the meeting pattern yet. You’ll schedule the meeting pattern after creating and combining the two sections.
- In the Enrollment Cntrl (Enrollment Control) tab, set the Enrollment Capacity. (This is the capacity for the face-to-face section of the class.)
- In the Notes tab, select the magnifying glass for the Note Nbr (Note Number) field and select 0310 (Face-to-Face On-Campus Instr.).

- Select Save. Note the 5-digit class number that was assigned when you saved this section.

Create the synchronous online section of the class that will be associated with the face-to-face section.
- Select the plus (+) button to add a new section.
- Assign the Section Number and copy this number to the Associated Class Number field.
- For the Instruction Mode, select 06 (Synch. Online - Meet Times).
- In the Enrollment Control tab, set the Enrollment Capacity. (This is the capacity for the online part of section class.)
- In the Notes tab, select the magnifying glass for the Note Nbr (Note Number) field and select 0312 (Hyflex/Synchronous Online).

- Select Save. Note the 5-digit class number for this section.

Once you’ve created both sections, you’ll combine them so that they’re associated with each other as two different modes of instruction for the same class.
- In the Main Menu, select Curriculum Management > Combined Sections > Combined Sections Table.
- Search for the term and then select the session. All currently scheduled combined sections for the selected term and session will be listed in this table.
- Select the plus (+) button to add a new blank row.
- In the Description column, enter the department prefix, the catalog number, and the two section numbers (for example, “ACCT 201 13/14”).
- The Short Description will automatically appear once you save the new row.
- At the end of the table, select Save.
- Then, select the View Combined Sections link in the row you just created.

- In the Combination Type dropdown menu, select Within Subject.
- Under Linked Classes, enter the face-to-face section's 5-digit class number and then select the Tab key. The rest of the class information will automatically appear.
- Select the plus (+) button to add a new blank row.
- Enter the online section’s 5-digit class number and then select the Tab key again.

- In the Enrollment Capacity field, enter the combined enrollment capacity. Enter the combined Wait List Capacity too.
- Select Save to finish combining the sections.
After the two sections are combined into one class, you can schedule the day(s) and time(s) the class will meet. This step is completed after creating and combining the two sections because the face-to-face and online students will have the same meeting pattern, even though the of mode of instruction is different.
- In the Main Menu, select Curriculum Management > Schedule of Classes > Schedule Class Meetings.
- Search for the course. Then, select the face-to-face class section from the list.
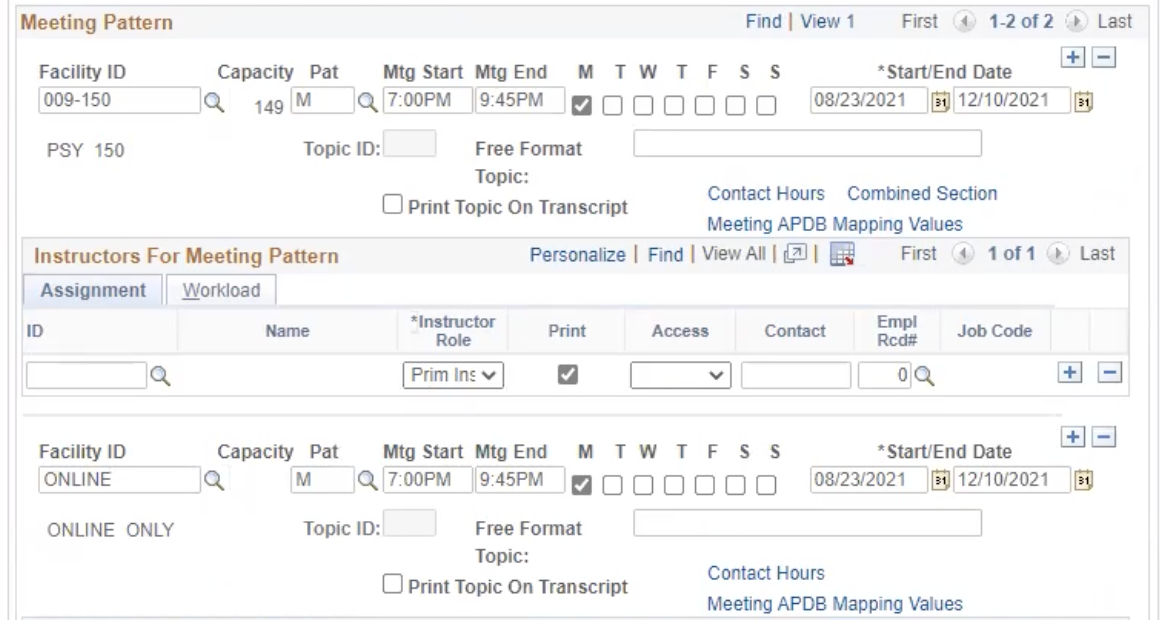
- Enter the meeting pattern and Facility ID for the class.
- Select Save.
- Select the plus (+) button to create a meeting pattern for the online class section.
- Select View All to display both the face-to-face class section and the online class section.
- Enter the identical meeting pattern from the face-to-face class section.
- For the Facility ID, you’ll need to set the facility for this section to ONLINE.

- Select Save to finish scheduling the hyflex class.
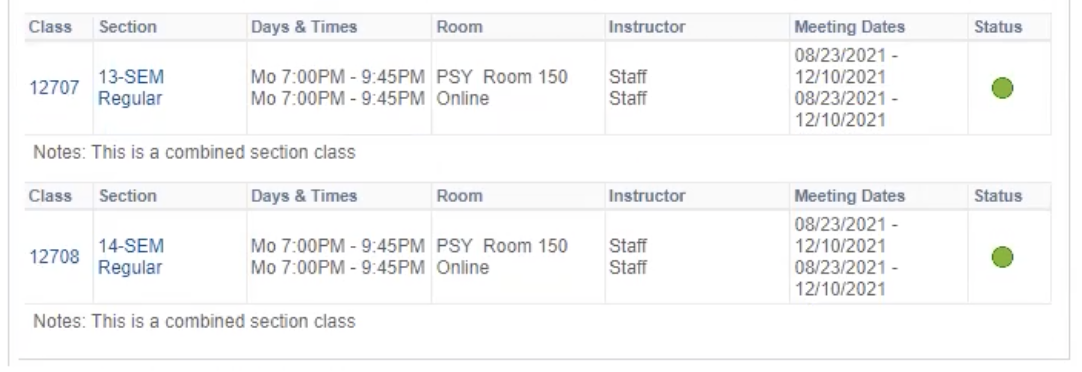
- You can review your scheduled hyflex class in the Schedule of Classes.


