Training and Support
Curriculog is an electronic process for curriculum proposal submission, review and approval. For additional support, please contact catalog@csulb.edu.
Training Videos (2024-25 Cycle)
Quick Guides
- Login and Access Curriculog from this link.
- Chrome and Firefox are the recommended browsers. Users of Internet Explorer (all current versions) may run into some complications while interacting with Curriculog's forms.
The User Dashboard is the home page for all users of the system. When you log into the system, the first page you will see is User Dashboard.
Across the top of the page, you will find a toolbar to access Proposals, Agendas, Accounts, and Reports Modules.

The left pane will update based on the Tab selected.
If tasks are waiting to be completed, or if any of those tasks are marked as urgent, clickable links will appear just under the “User Dashboard” header. In the upper right corner, there are options for your own user account listed below the drop-down menu, giving you options for “My Settings” (selecting My Settings will redirect you to the Accounts Module from the top menu) and “Logout.”
Following your name are “Help” and “Search” icons. Selecting “Help” will display a window featuring symbols and colors utilized in Curriculog.
The right pane will display “My Recent Notifications” and “My Upcoming Events”, and the option to view the Calendar.
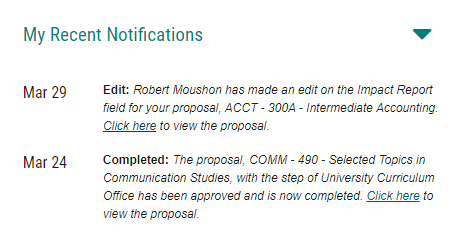
My Recent Notifications
Users will receive notifications for three purposes: system notifications, system-generated workflow notifications (tasks and status updates), and reminders (alerts and deadlines). The most recent five notifications sent to you will display and you may utilize the arrow in the upper right corner to scroll through previous notifications.
My Settings
To edit your settings, click your name in the upper right-hand corner of the screen and then "My Settings". On the resulting screen click your name again. On this resulting screen you'll see your SSO login information, your roles and responsibilities and be able to update your email notification settings. If you have any questions or if you need to alter your roles/permissions, please discuss with your college curriculum coordinator.
When you log in, you will be in the Proposals Module by default. Proposals are the various types of forms that route through the review and approval process.

Selecting "New Proposal" allows you to create a new proposal. There are four tabs available for listing the approval processes you may choose from to create a new proposal:
- All Processes – Lists all approval processes available for use
- Courses – Processes created pertaining to courses
- Programs – Processes created pertaining to programs, minors, and certificates
- Others – Processes created pertaining to other actions, (new subjects)
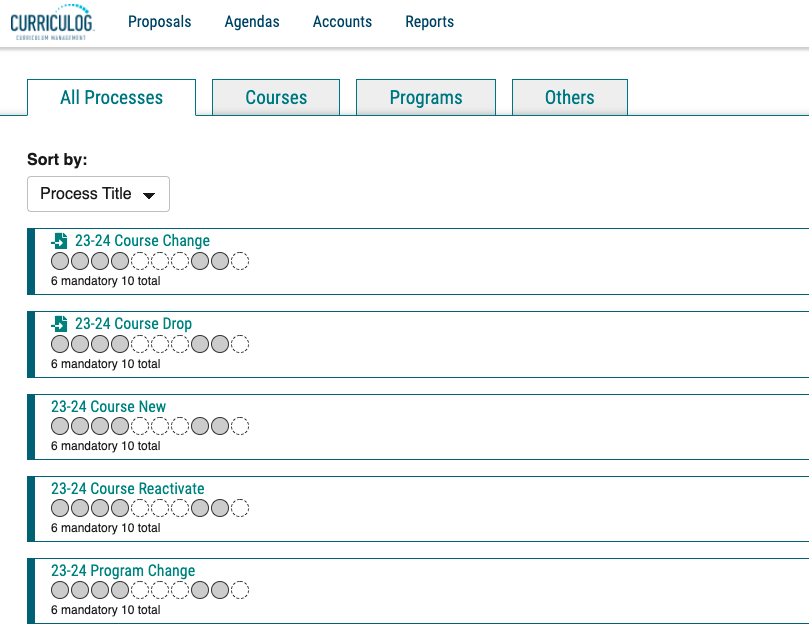
Proposal Forms
Directions for filling out the forms may vary depending upon the type of proposal you’re creating. Instructions for each of the proposal types follows and it is recommended to turn on the help text when viewing a form, using the "i" icon, to receive additional information.

Fields
Please note that all fields with an asterisk (*) are required. You will not be able to launch the proposal without completing the required fields.
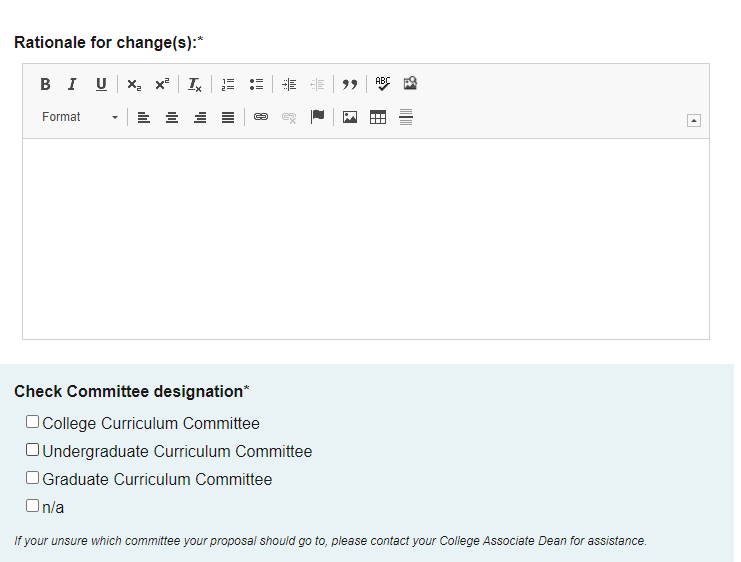
Any field that has “Select an option” in the field denotes that the field is a drop-down menu, while any field that is blank denotes a free-form text field and you are required to type text directly into the field. If a field is not required and does not apply to your course or program, you may leave it blank or in the cases of a drop-down menu, you are not required to make a selection.
You will find directions at the top of the forms that will guide you in filling out your proposals. Additionally, to populate the Approvers for your steps or to retain work if you need to navigate away, click the “Save All Changes” button either at the bottom of the form or in the upper left corner.
As you work, fields in the form will be highlighted blue to indicate that there are unsaved changes. If you navigate away from the proposal before saving your changes, the edits will be lost.
When you attempt to navigate away from a page with unsaved changes, you will be prompted with a warning that unsaved changes will be lost. The appearance and text of the prompt will vary depending on your browser. If you choose to leave, you will lose all changes, but if you choose to stay on the page, the prompt will be closed and you will be able to save your changes.
Course Proposals
There are four types of course proposals that you can process through the system:
New Courses
When completing a Proposal for a New Course, you will need to fill in all required fields, which are indicated by an asterisk next to the field name. Each of the fields are ideally self-explanatory and generally follow the previously used Course Proposal Form or CPF.
Attaching Files
Files, including syllabi, can be uploaded into the Curriculog system at the time of proposal creation. Files are uploaded using the icon right hand menu.
Launching a Form
Once you have reached the end of the form, you will need to launch the proposal. To launch it, you will need to click the "Validate and Launch Proposal" button. It should be stuck at the bottom of the proposal, but is also available by scrolling to the top of the form.

If you have missed any required fields, the proposal will be unable to launch. All required fields that were left blank will now be indicated with text that reads, “This field is required.” Once the proposal has been launched, it will move onto the next step in the process. That step will involve the originator, the user creating this form, approving their initial form. To approve, click the "Decision" button from the right-hand menu and select "Approve" from the resulting pane.
Doing this will move the form to the next step in the process.
Course Change Forms - Revisions to existing course curriculum
When you are creating a proposal for a course that already exists – you will need to choose the appropriate level course revision form (undergrad/grad). You will need to begin by importing the existing catalog information. Start by selecting the course change proposal.
This will open a pop-up window to the right. You will use this search window to locate your specific course information. Fill in the required field-Prefix, Code (code refers to course number) and the Catalog Year the course proposal pertains to.
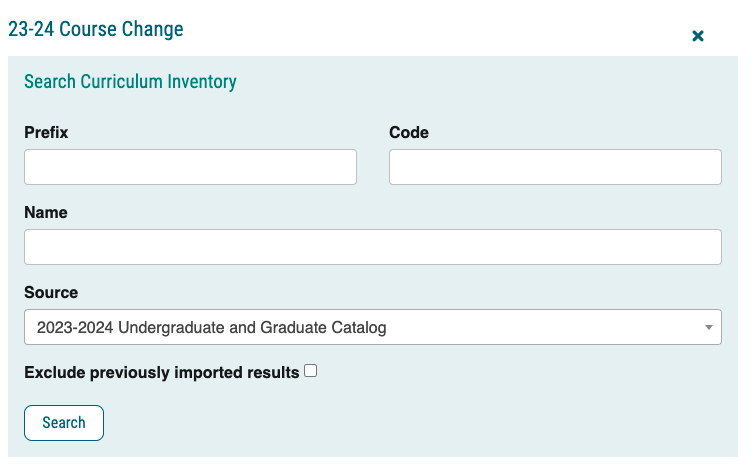
Once you have entered the filter information, click “Search.”
Note: you cannot perform partial searches. For example, if the title of a course is ‘Principles of Accounting’, searching for the word ‘Principles’ will not yield any results. You would need to search for the entire title of the course.
The system should return course results for you to choose from.
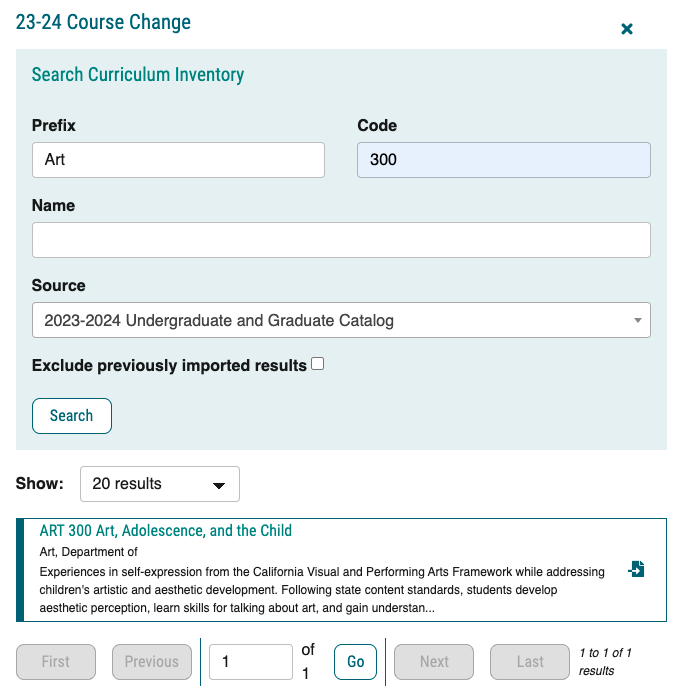
From the search results, you will receive a preview of the course information. To select the course, click on the required import icon to the right of the preview. This will bring you to the details of the course.
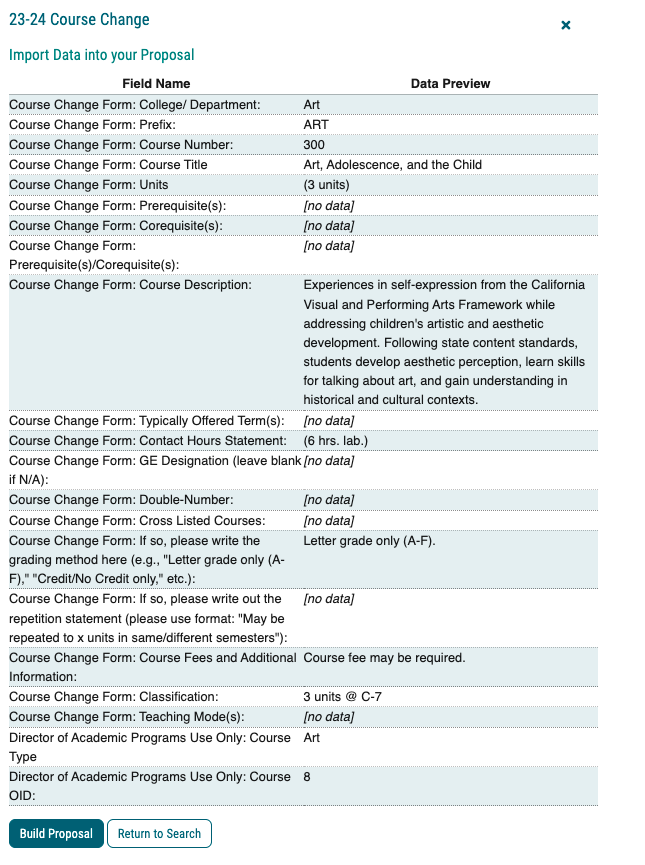
If your search doesn’t return the course you’re looking for, click on the "Return to Search" button.
Once you find your course, click the "Build Proposal" button. Your page will refresh and the course data will be imported into your proposal form, you will need to complete the rest of the form. Be sure to follow the instructions given in the proposal form.
You will need to fill out the initiating faculty and course revision information section. You may check as many boxes in the ‘Change(s) being proposed’ field as are necessary. You will also need to fill out the Rationale section. We're looking for a concise description of why you're making the proposed change, and a short, bulletpoint list of each change being made to the text so we can compare with the input on the form.
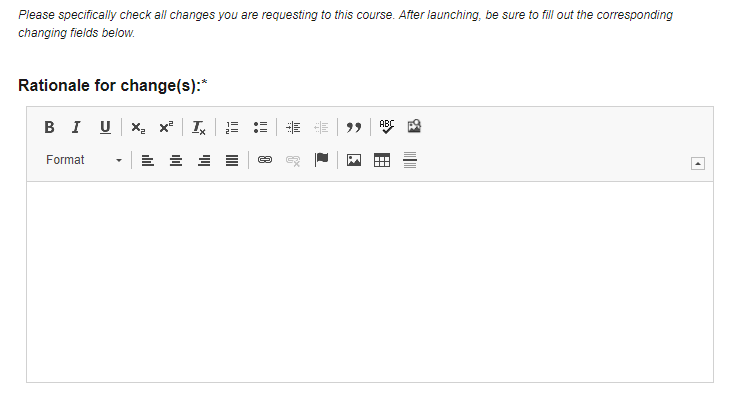
All revised course proposals must have an Impact Report. This will alert you to any potential issues that may require a consultation with another department or school.
To run an impact report, click the "Import" button near the top of the form. This will bring you to the Impact Report window where you will need to choose the catalog you want the system to search. Choose the most recent option, even if it is in the future.
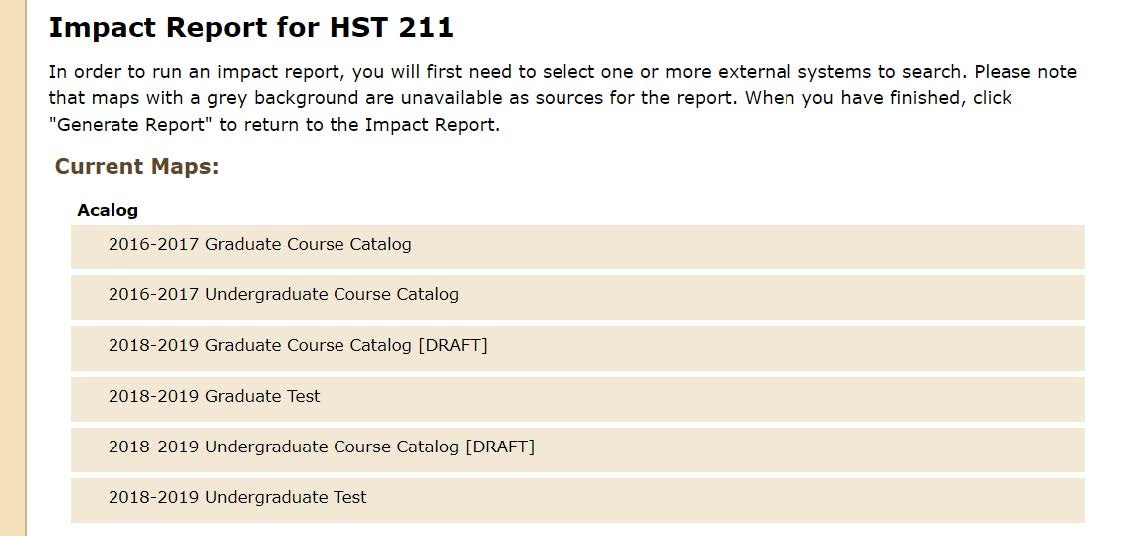
Once you choose the appropriate catalog to review, you will need to click the “Generate Report” button at the bottom of the window.

This will create the impact report for the course you’re revising. It will show you any courses connected to the course you’re working on and any program where your course is used.

The results of the Impact Report will need to be copied and pasted into the Impact Report Results field on the proposal form. If there are no impacts found, the system will give you a message stating that this and you should copy and paste that message into the results field to indicate that a report was run.
The system will also show any cross-listed courses that are impacted by the course you’re revising. If there are courses and programs listed within your purview in this impact report, you'll want to consider if an additional change form is necessary for those areas. If the impacted course or program is outside your department, please contact their team to let them know of the change that may affect their curriculum.
Once you have reached the end of the form, you will need to launch the proposal. To launch it, you will need to click the "Validate and Launch Proposal" button. It should be stuck at the bottom of the proposal, but is also available by scrolling to the top of the form.

If you have missed any required fields, the proposal will be unable to launch. All required fields that were left blank will now be indicated with text that reads, “This field is required.” Once the proposal has been launched, it will move onto the next step in the process. That step will involve the originator, the user creating this form, approving their initial form. To approve, click the "Decision" button from the right-hand menu and select "Approve" from the resulting pane.
Doing this will move the form to the next step in the process.
Approval Roles
Once you have completed your modifications, you will need to enter a decision to advance the Proposal to the next step in the Process. To provide a decision, select the “Decisions” Tab from the Proposal Toolbox.
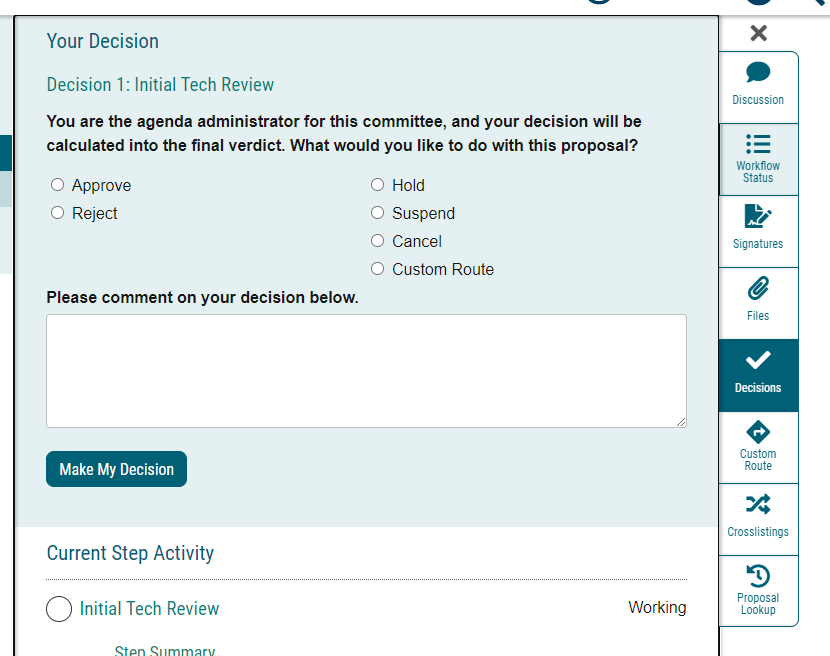
If you select “Approve” and then "Make My Decision", the Proposal will advance to the next step. Entering a comment is optional when selecting Approve, however, all other options will require a comment be entered.
Additional options may include “Hold”, “Suspend”, “Cancel”, and “Custom Route.” If you select one of these options, a request will be sent to the Administrator to approve or reject your request.
The definition of each option is listed below:
- Hold - Submits a request for the Proposal to not advance in the approval process. The request is sent to the Administrator, who will approve or reject the request. The users on the step will be able to continue to work on the Proposal, however, it will not advance in the workflow until the hold is removed. This would typically be used to ask for additional time for revisions on a Proposal when a deadline is approaching, as the item will not trigger the deadline when it has been placed on hold. Only an Administrator can lift the hold on a Proposal.
- Cancel - Submits a request to cancel the Proposal and delete it from Curriculog. The request is sent to the Administrator who will approve or reject the request. If the Administrator approves the cancel request, the Proposal will be referred back to the Originator. The Originator may then re-launch the Proposal or cancel it, which will delete the Proposal from Curriculog. If the Administrator rejects the cancel request, the Proposal will remain on the current step awaiting a decision.
-
Suspend - Submits a request for the Proposal to not advance in the approval process. Additionally, no work may be done on the Proposal and it will not advance in the workflow until the suspension is removed. The request is sent to the Administrator who will approve or reject the request. Additionally, the Administrator can remove a suspension placed on a Proposal.
-
Custom Route - A Custom Route is an additional ad hoc step outside the steps in the approval process. Custom Routes require Administrator approval. This will allow you to bring someone else into the Proposal that is not included within the current steps of the Proposal.
Agendas provide functionality to create a meeting agenda for discussing proposals that require an agenda as a part of the approval process. Only Agenda Administrators have the ability to create, edit, publish and make decisions upon an agenda. An Agenda Administrator will not have all of the rights and permissions that a System Administrator will have. Agenda Administrators will be able to create agendas and approve proposals on behalf of a committee; however, they will not have access to the Administrator Dashboard.
To start an agenda, navigate to the "Agendas" tab at the top.

Click the "New Agenda" button which will take you to the agenda proposal creation page.
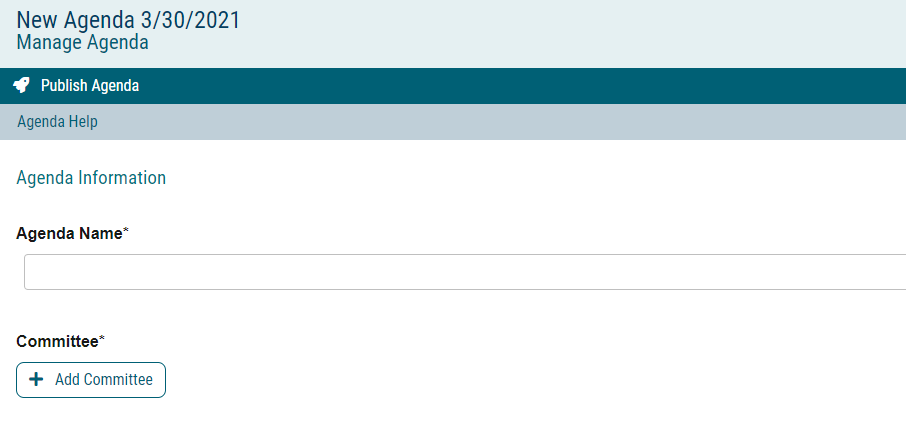
Provide a meeting name and choose the committee you'd like to take part. The notes field allows you to enter notes for this agenda.
Next, click on Add Proposals to add the proposals to the agenda for review. A dialog box will open displaying the eligible proposals.
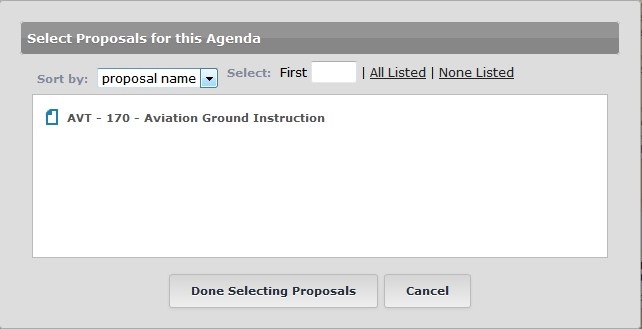
Select the proposals to add to the agenda and then click “Done Selecting Proposals”. The proposals will now appear in the Proposals section of the agenda. You may view the Proposal Summary or the Proposal utilizing the appropriate icon displayed when hovering over the proposal within the agenda.
Publishing the agenda will make the agenda available to all participants on the step. To publish the agenda, navigate to the icon in the upper left. You may also print an agenda utilizing the print icon in the upper right.
Note: Once an agenda is published, you may unpublish it as long as no decisions have been made on the agenda.
Manage Agenda
To make changes to an unpublished agenda, click the “Edit Agenda” icon. You will be able to associate a specific committee with the agenda, enter notes and edit the proposals included in the agenda. If you’ve completed your work with the agenda and would like to publish it, click “Publish Agenda”. Agenda Administrators (typically the committee chair(s)) may make their decisions on behalf of the committee on the proposal or directly from the agenda. To make a decision directly from the agenda, navigate to the Agendas Module and select the edit icon to edit the agenda.

The agenda will display in the right pane. Agenda Administrators may select a decision from the decision drop-down menu. Decisions other than approve and reject will redirect you back to the proposal for action.
Committee members will receive notification when a proposal reaches a committee step. They may submit their opinion on each individual proposal. When all proposals on an agenda have a decision, the agenda may be archived by the Agenda Administrator. A message will display in a pop-up window asking if you would like to archive the agenda. You may archive the agenda by selecting the option in the message or simply navigate to the archive agenda icon in the upper left of the agenda and the agenda will be archived.
To edit your settings, click your name in the upper right-hand corner of the screen and then "My Settings". On the resulting screen click your name again. On this resulting screen you'll see your SSO login information, your roles and responsibilities and be able to update your email notification settings. If you have any questions or if you need to alter your roles/permissions, please discuss with your college curriculum coordinator.
- Roles and Committees
- Below the Personal Information section of the Account Summary, you will see Roles and Committees listed. From the user area you will not be able to add or edit your roles and committees.
- If you need to change your roles and committees assignments, please send a request to your college curriculum coordinator.
- Notifications
- The system can become quite email heavy. This is where you can edit those settings.
The Reports Module allows select users to generate reports on proposal activity within Curriculog. The reports available are determined by the Administrator.
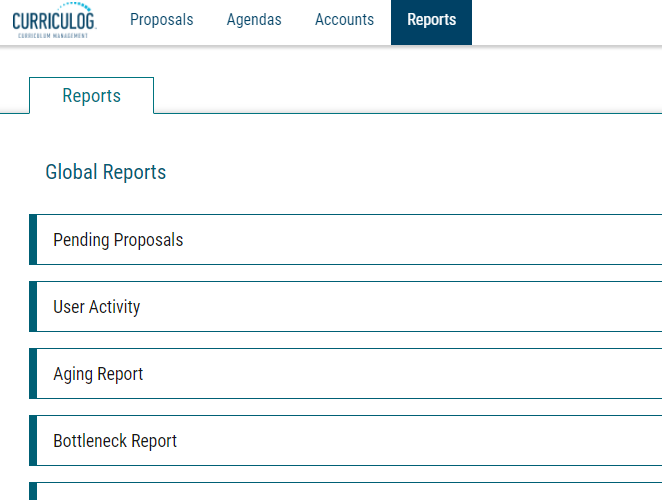
Contact catalog@csulb.edu if you are requesting any curricular reports (either those in regards to Curriculog, or for active course information in Peoplesoft).
How to Login and Update Your Notifications (2022-23)
Choosing the Correct Form (2022-23)
Starting a Proposal (2022-23)
Editing an Existing Program (2022-23)
Making Decisions on Proposals (2022-23)
Running an Impact Report (2022-23)
How to Login, Update Your Password and Update Communication Preferences (2021-22)
The below video is a little out-of-date, as shortly after publishing we transitioned to CSULB Single Sign On. Information regarding login/password changing can be ignored (a new video will be drafted for the next cycle).
Choosing the Correct Form (2021-22)
Starting a Proposal (2021-22)
Editing an Existing Program (2021-22)
Making Decisions on Proposals (2021-22)
Using Meeting Agendas in Curriculog (2021-22)
Running an Impact Report (2021-22)
Administrative/General (2019-20)
Originating Proposals (2019-20)
Reviewers/Approvers (2019-20)
Special Issues (2019-20)


