Using MyCSULB Admissions
Welcome Newly-Admitted Students! Refer to the tutorials below to learn how to navigate MyCSULB Student Center. Once you login to the Single-Sign On Portal, you will be able to view test scores, accept your admission offer, and pay your enrollment deposit, and more.
New to MyCSULB Student Center? Watch the video tour, "Navigating MyCSULB Student Center."
Select a feature below to learn more:
Most tutorials highlight the Desktop experience. Menus may shift to the bottom of your screen when using a mobile device.
Step 1: View the Admissions panel after logging in to MyCSULB Student Center. Select “Admissions Inquiry” to view your admission information for the most recent application term(s).
Step 2: Review the Admission Application Information. If you have more than one active application on file, select the term you would like to view.
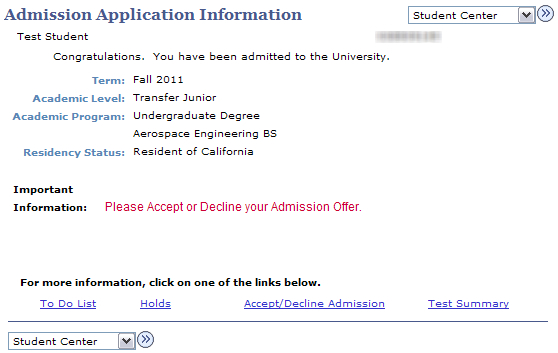
Step 3: Additional menu options will connect you to other areas of your Student Center in MyCSULB.
- The “To Do List” link connects you to a “To Do List” page that indicates if you have any documents (i.e., official transcripts) that need to be submitted to the University.
- The “Holds” link connects you to the “Your Holds” page where you can select the hyperlink for each of the Hold(s) and view detailed information about the specific hold(s), including who to contact and instructions for removing the hold(s).
- The "Accept/Decline Admission" link will take you to the page where you can choose to accept or decline admission to CSULB. (Note: This link will not be displayed after you have accepted or declined admission.)
- The "Test Summary" link takes you to a page that displays the results for all standardized tests that the University has on file for you.
You have the ability to view test scores recorded on your CSULB record in your MyCSULB Student Center. Some of the Test Scores you may see are: SAT, ACT, AP, IB, WPE, GRE, GMAT, and TOEFL.
Step 1: Select “View Test Scores” from the right-side menu featured in the Admissions panel of the Student Center.
Step 2: You have the option of sorting the test scores listed by any of the column headers, such as Test ID, Description, Score, Test Date, Data Source, or Date Loaded.

- Test ID – Indicates the type of test reported.
- Description – Indicates the component of the reported test.
- Score – Indicates the individual’s score for the test or component of the test taken.
- Test Date – Indicates the date that the test was taken.
Data Source – Indicates the source that provided CSULB with the test results.
Note: “SLF” stands for “self-reported” and indicates that the results were reported by the student, and therefore, are unofficial until an official testing source validates the test results.
- Date Loaded –Indicates the date that the test scores were entered into the system.
Step 1: Select “Accept/Decline” from the right-side menu featured in the Admissions panel of your Student Center or select the “Accept/Decline” link from the My Applications display box.
Step 2: Review your admission offer. Select the “Next” button to proceed to accept or decline admission for the term of your application. If you do not wish to make a decision at this time, select the “Exit” button.
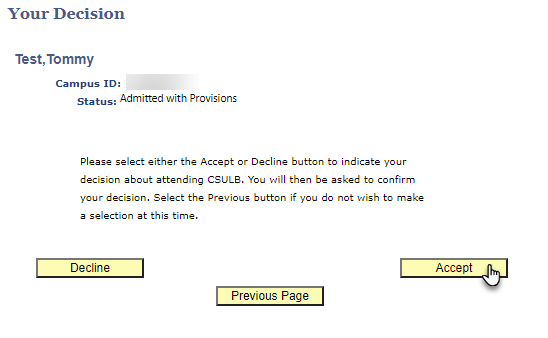
Step 3: Follow the on-screen instructions to indicate your admission decision for the term of your application. Select the “Accept” button if you have decided to attend CSULB. Select the “Decline” button if you have decided not to attend CSULB.

Note: If you have chosen to accept your admission, the system will determine whether you are required to pay the nonrefundable Enrollment Deposit of $150.00. If it is not required or if you qualify for a waiver, the system will notify you and allow you to proceed with confirming your acceptance. If you are required to pay the Enrollment Deposit, the system will give you the option to pay online. If you do not wish to make a decision at this time, select the “Exit” button.
Step 4: To continue to accept your admission and pay the nonrefundable Enrollment Deposit online via a credit card or e-check, select the “Pay Online Now” button.
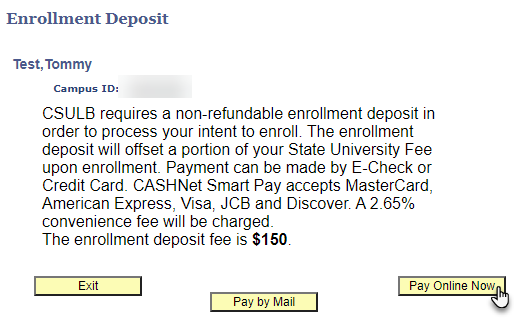
Step 5: Select the “Confirm Accept” button. If you do not wish to make a decision at this time, select the “Exit” button.
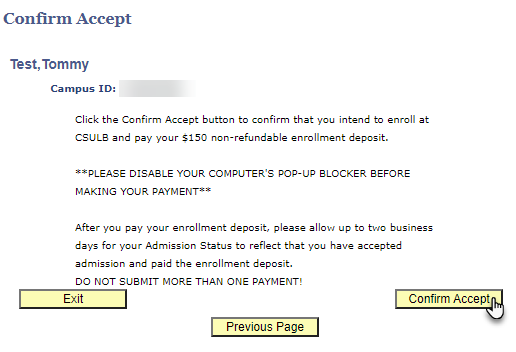
Step 6: If you wish to proceed with paying the nonrefundable $150.00 Enrollment Deposit, select the “Make a Payment” button. Select the “Cancel Payment” button if you do not want to proceed with the payment transaction at this time.
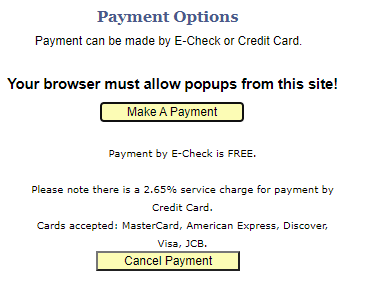
Step 7: You will be redirected to the CSULB payment website (CASHNet) to pay the nonrefundable $150.00 Enrollment Deposit.

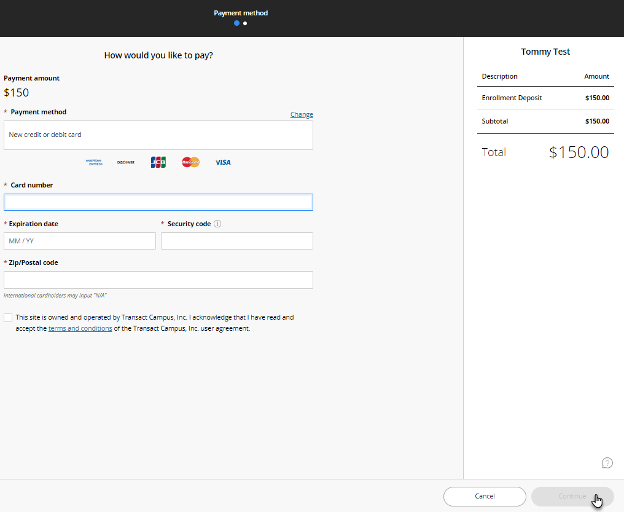
Step 8: Choose your method of payment. If you are paying by electronic check, enter your account information in the corresponding fields. When you have finished entering your payment information, select the "Continue" button.
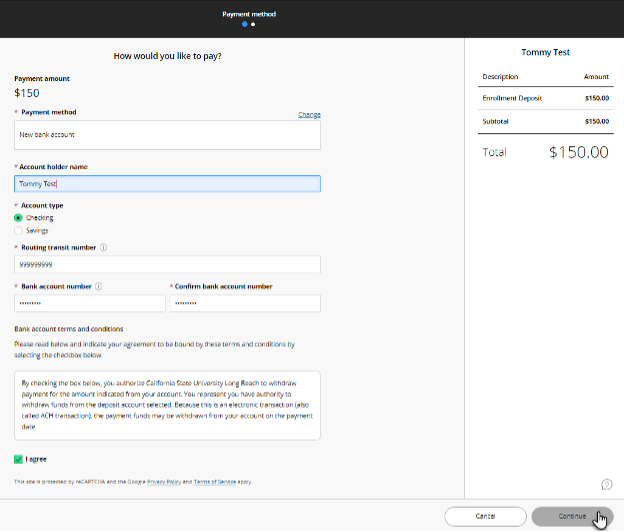
Step 9: If you are paying by credit card, enter your credit card details in the corresponding fields. When you have finished entering your payment information, select the "Continue" button.
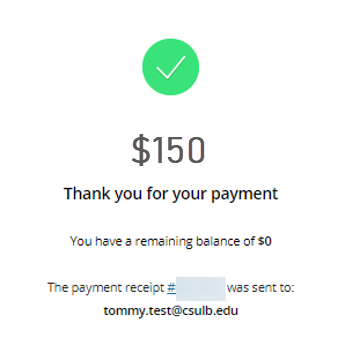
Step 10: Once the transaction is approved, “Thank you for your payment” with the remaining balance on your account will appear. You will also have a “Payment Receipt” number, which will be sent to your email address.
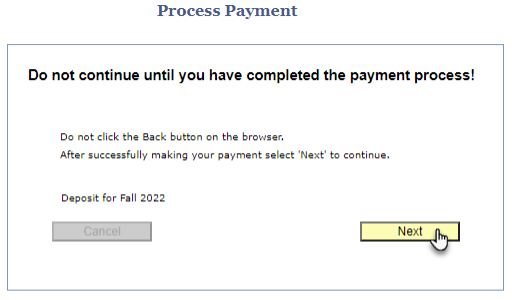
Step 11: Select the “Return to MyCSULB” button and close the CSULB payment website (CASHNet) window. Select the “Next” button.
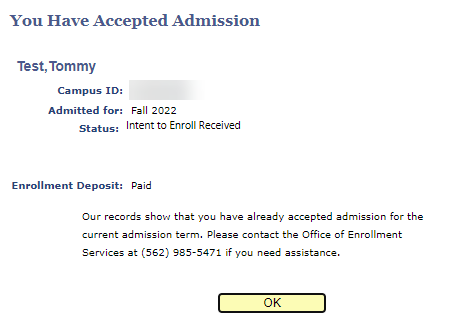
Step 12: You will receive a confirmation message indicating that you have successfully accepted your admission to the University and paid your nonrefundable Enrollment Deposit.
If your circumstances have changed and you would like to decline your admission offer after having already accepted the offer, please visit the Cancel Admission page. Please note, the Enrollment Deposit is nonrefundable, so if you request to cancel your admission once you have paid the Enrollment Deposit, it cannot be refunded.
As a new student, you’re required to attend Student Orientation, Advising, and Registration, otherwise known as SOAR. Follow the instructions below to sign up.
Before you can sign up for SOAR, make sure you have officially accepted your offer of admission. If you still need to complete this step, go to the “Accept/Decline” option in the Admissions section in your MyCSULB Student Center.
Step 1: Select SOAR Sign-Up within the Admissions panel of MyCSULB Student Center.
Step 2: The following screen will provide information about the SOAR Sign-Up process. If you are ready to sign up for SOAR, select the “Next” button. If you are not ready to sign up for SOAR at this time, select the “Exit” button.
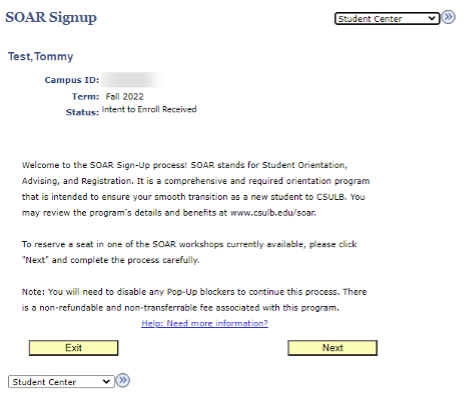
Note: If you need more information, select “Help: Need more information?” to visit the SOAR website. This will open in a new browser window.
Step 3: Choose the workshop dates that you wish to attend by selecting the “Select” button in the appropriate row. Please keep in mind that SOAR is a two-day experience where one day is your Orientation workshop and the second day is your Advising and Registration workshop. Be sure to pay special attention to both dates listed for each workshop, including the location for each. If a location is not listed, you will receive an email from your advising center with additional information.
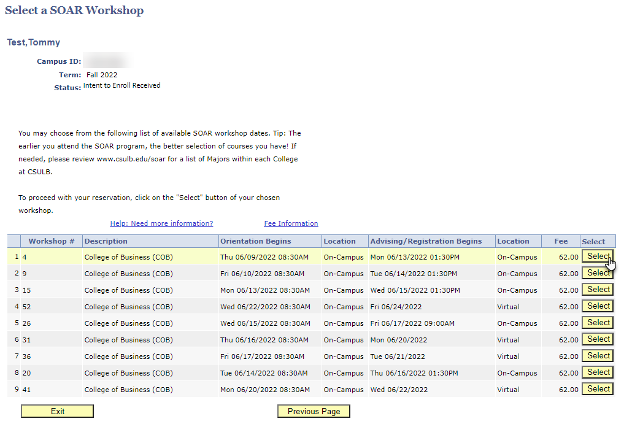
Note: Select “Fee Information” for an explanation of SOAR fees. Select “Help: Need more information?” visit the SOAR website.
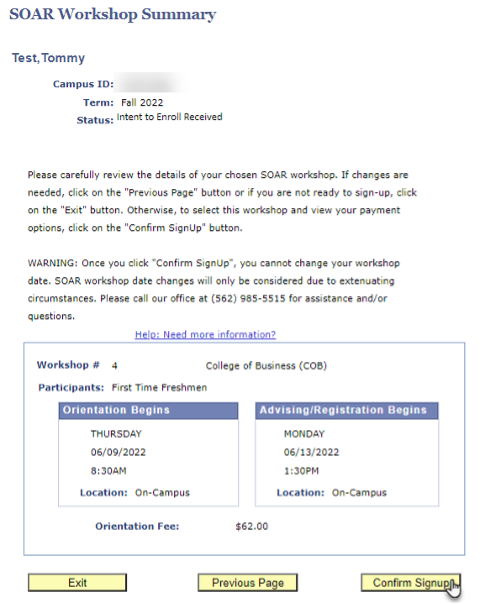
Step 4: Carefully review your workshop selections. Select the “Confirm Sign-Up” button to continue. If you would like to select different SOAR workshops, select the “Previous Page” button.
Once you select “Confirm Sign-Up,” you cannot change your SOAR workshop dates. SOAR workshop date changes will only be considered due to extenuating circumstances.
Step 5: You may choose to pay the SOAR fee online by selecting the “Pay Online Now” button. You will need to have your payment information readily available for the transaction. For instructions on how to pay your SOAR reservation by mail, select the “Pay By Mail” button.
Note: Your SOAR reservation is not confirmed until payment has been received.
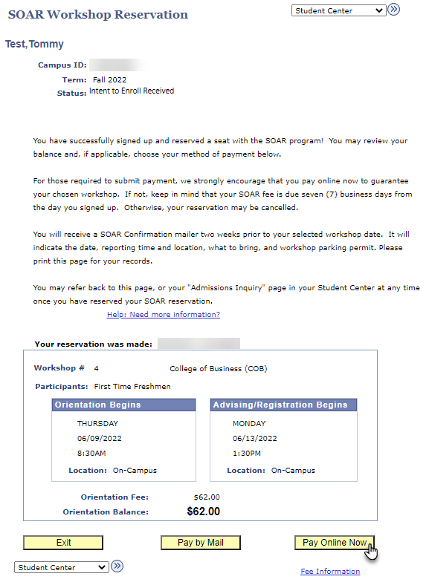
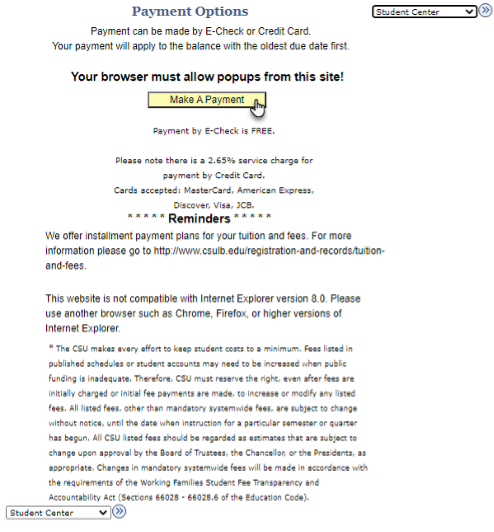
Step 6: Select the “Make a Payment” button on the following screen if you are ready to pay for your SOAR reservation.
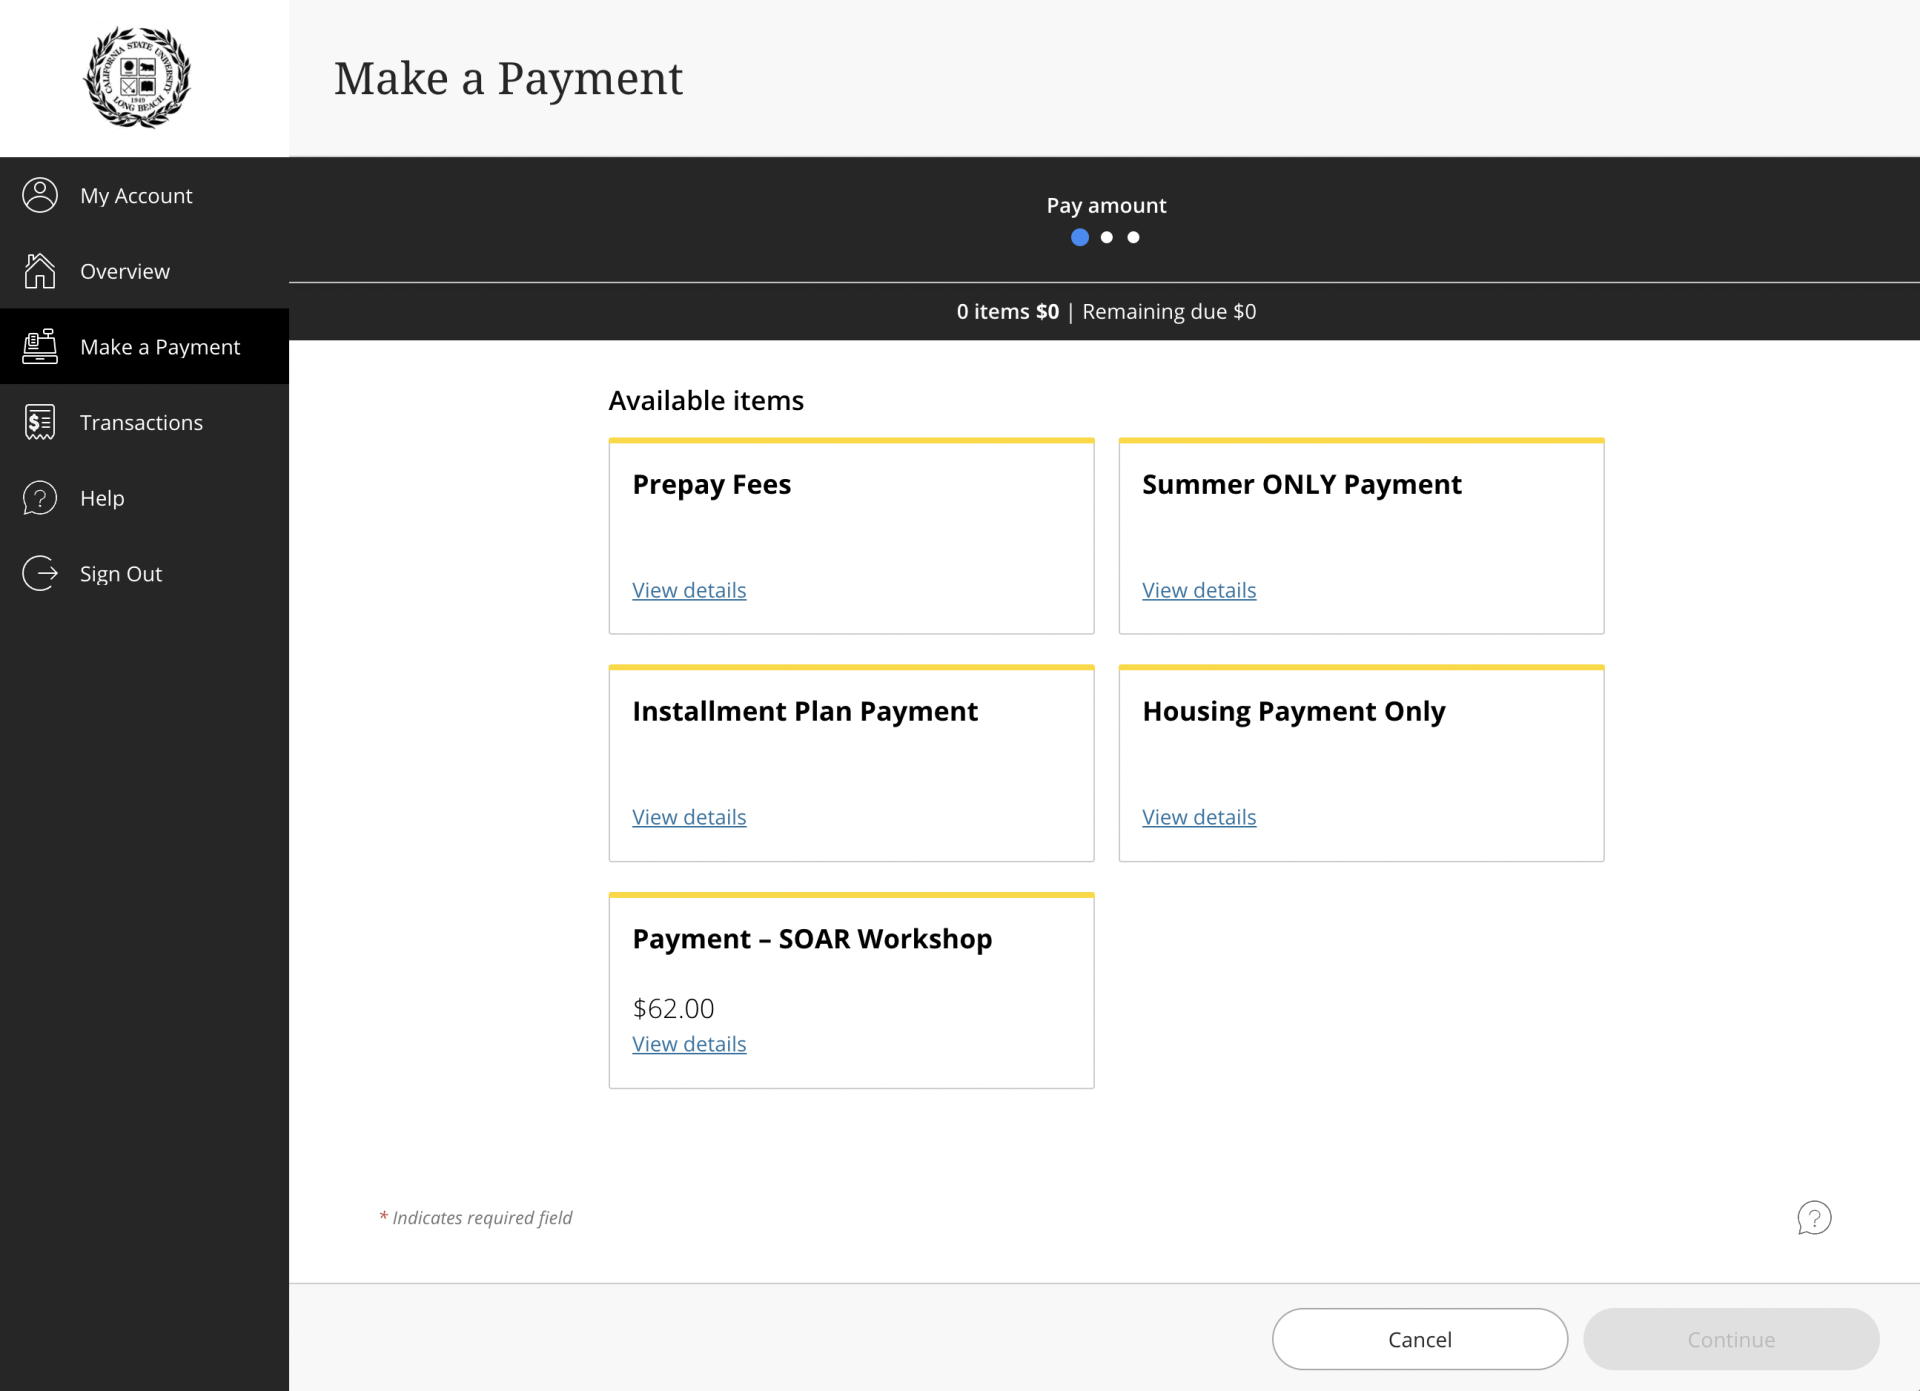
Step 7: Select “Make a Payment.” Then, choose “Payment - SOAR Workshop” in the “Available Items” list.
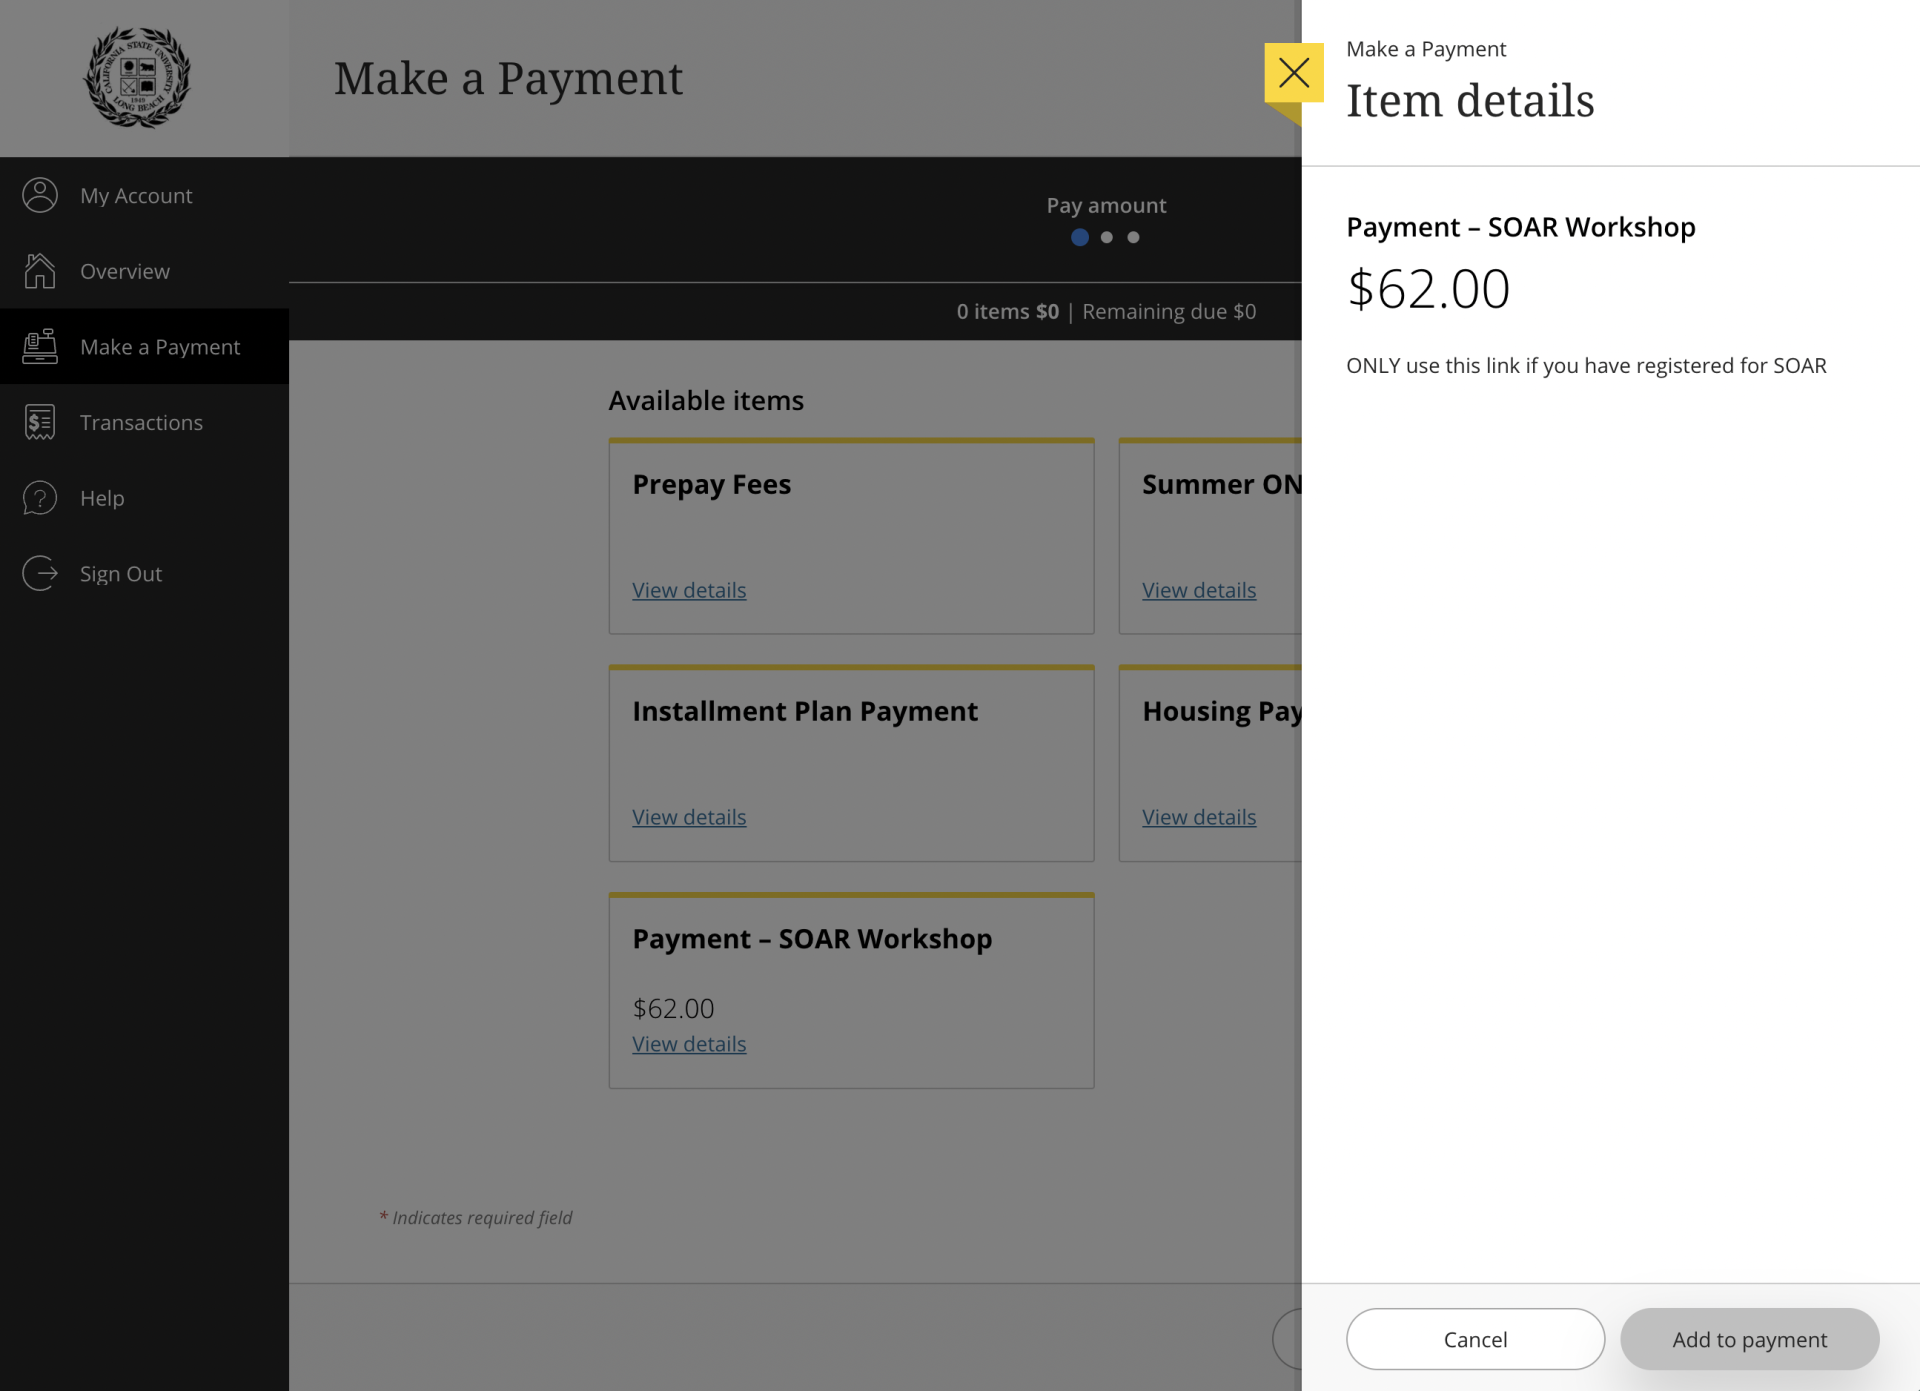
Step 8: Once selected, a window will open to the right of the screen. Select “Add to payment.”
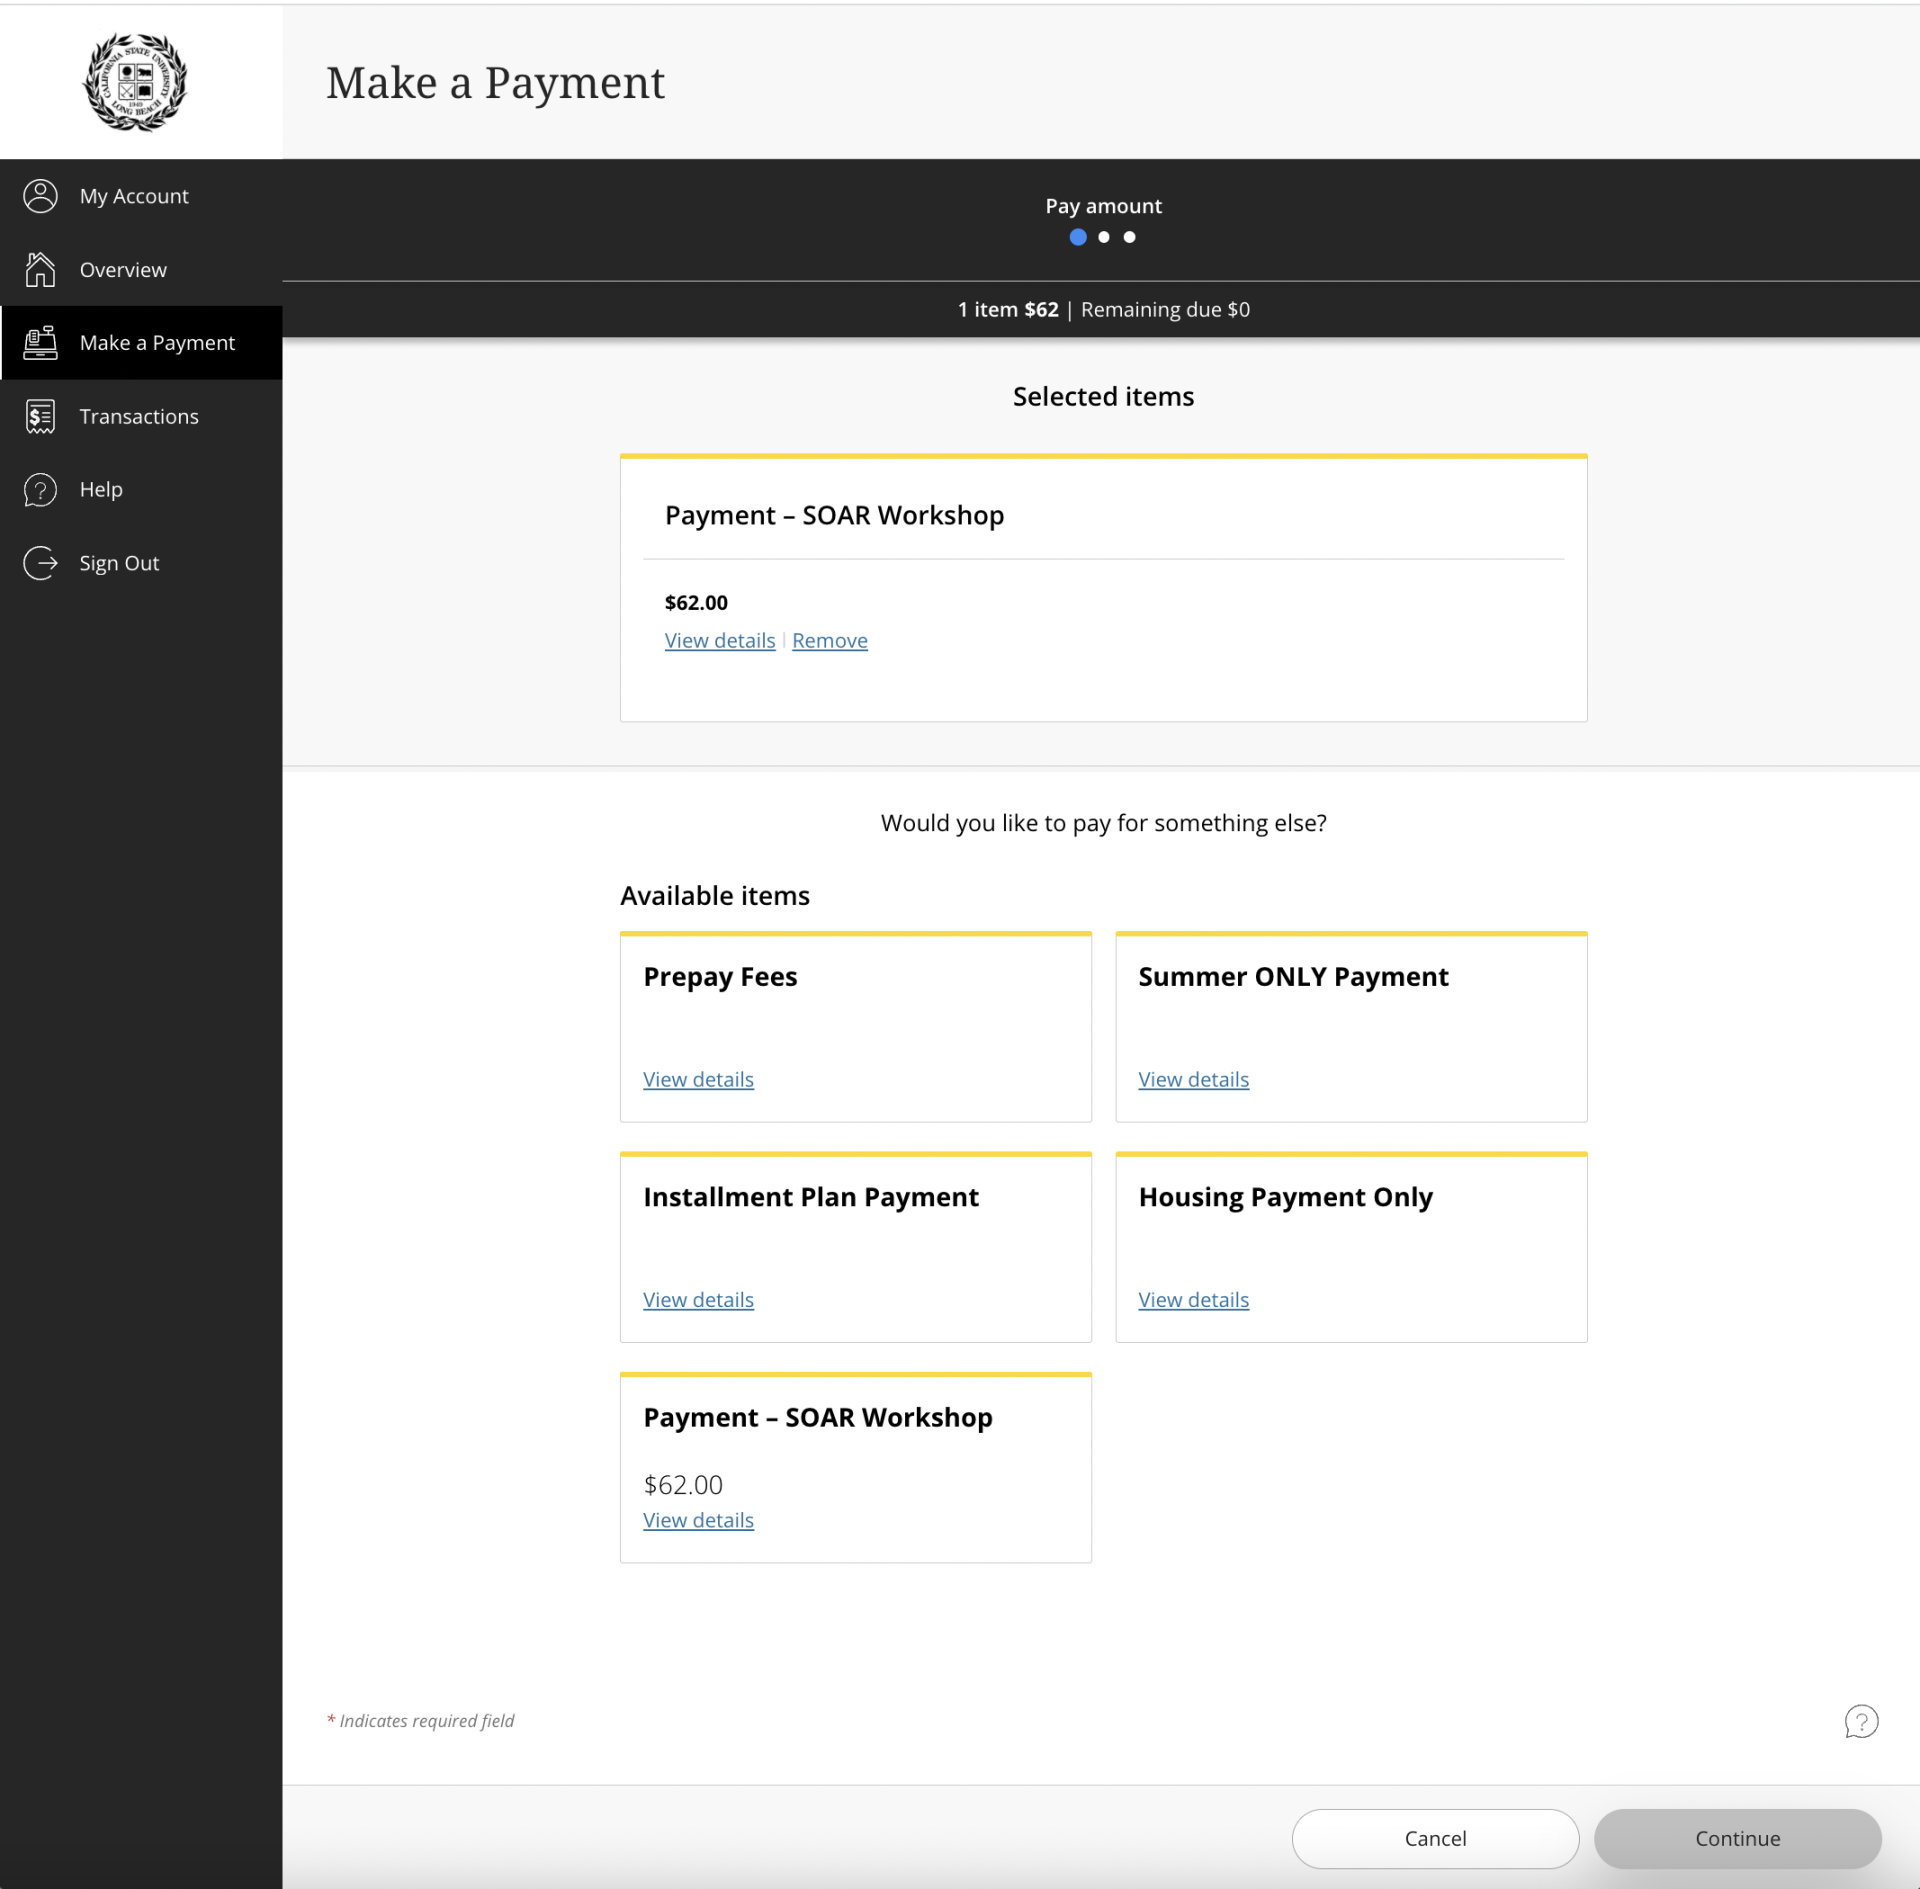
Step 9: Once you select “Add to payment”, select the “Continue” button.
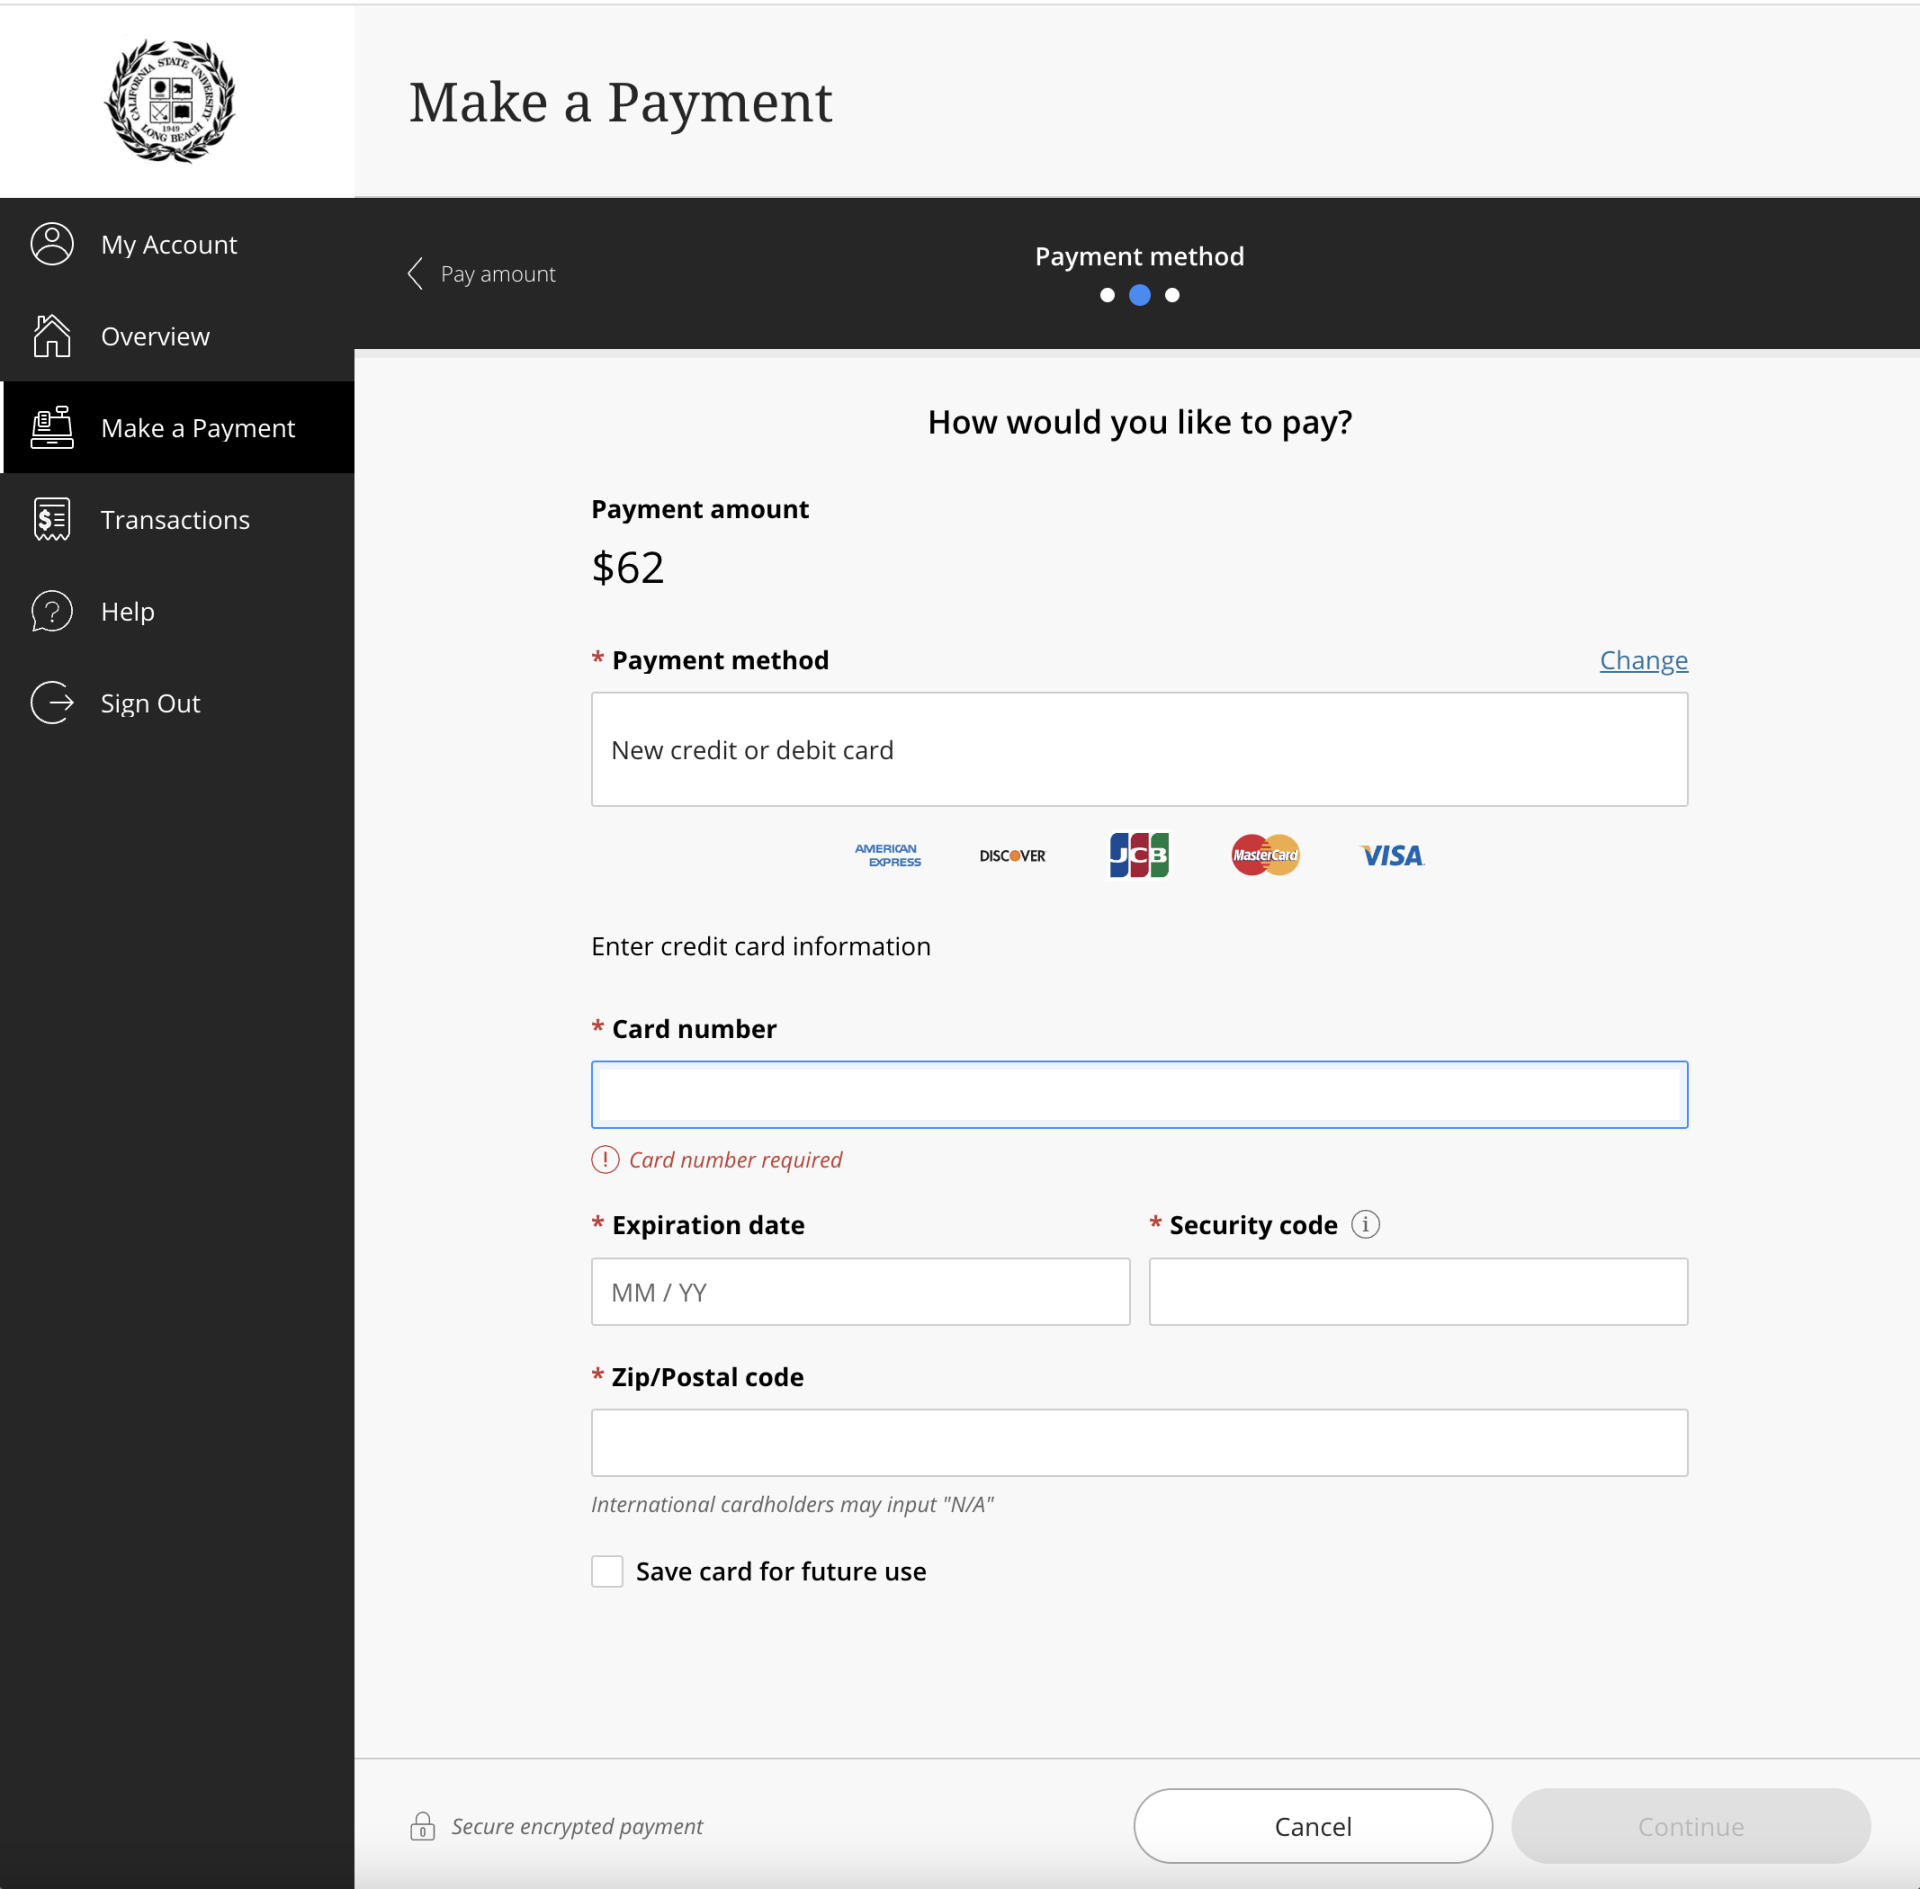
Step 10: Choose your method of payment and select the “Continue” button.
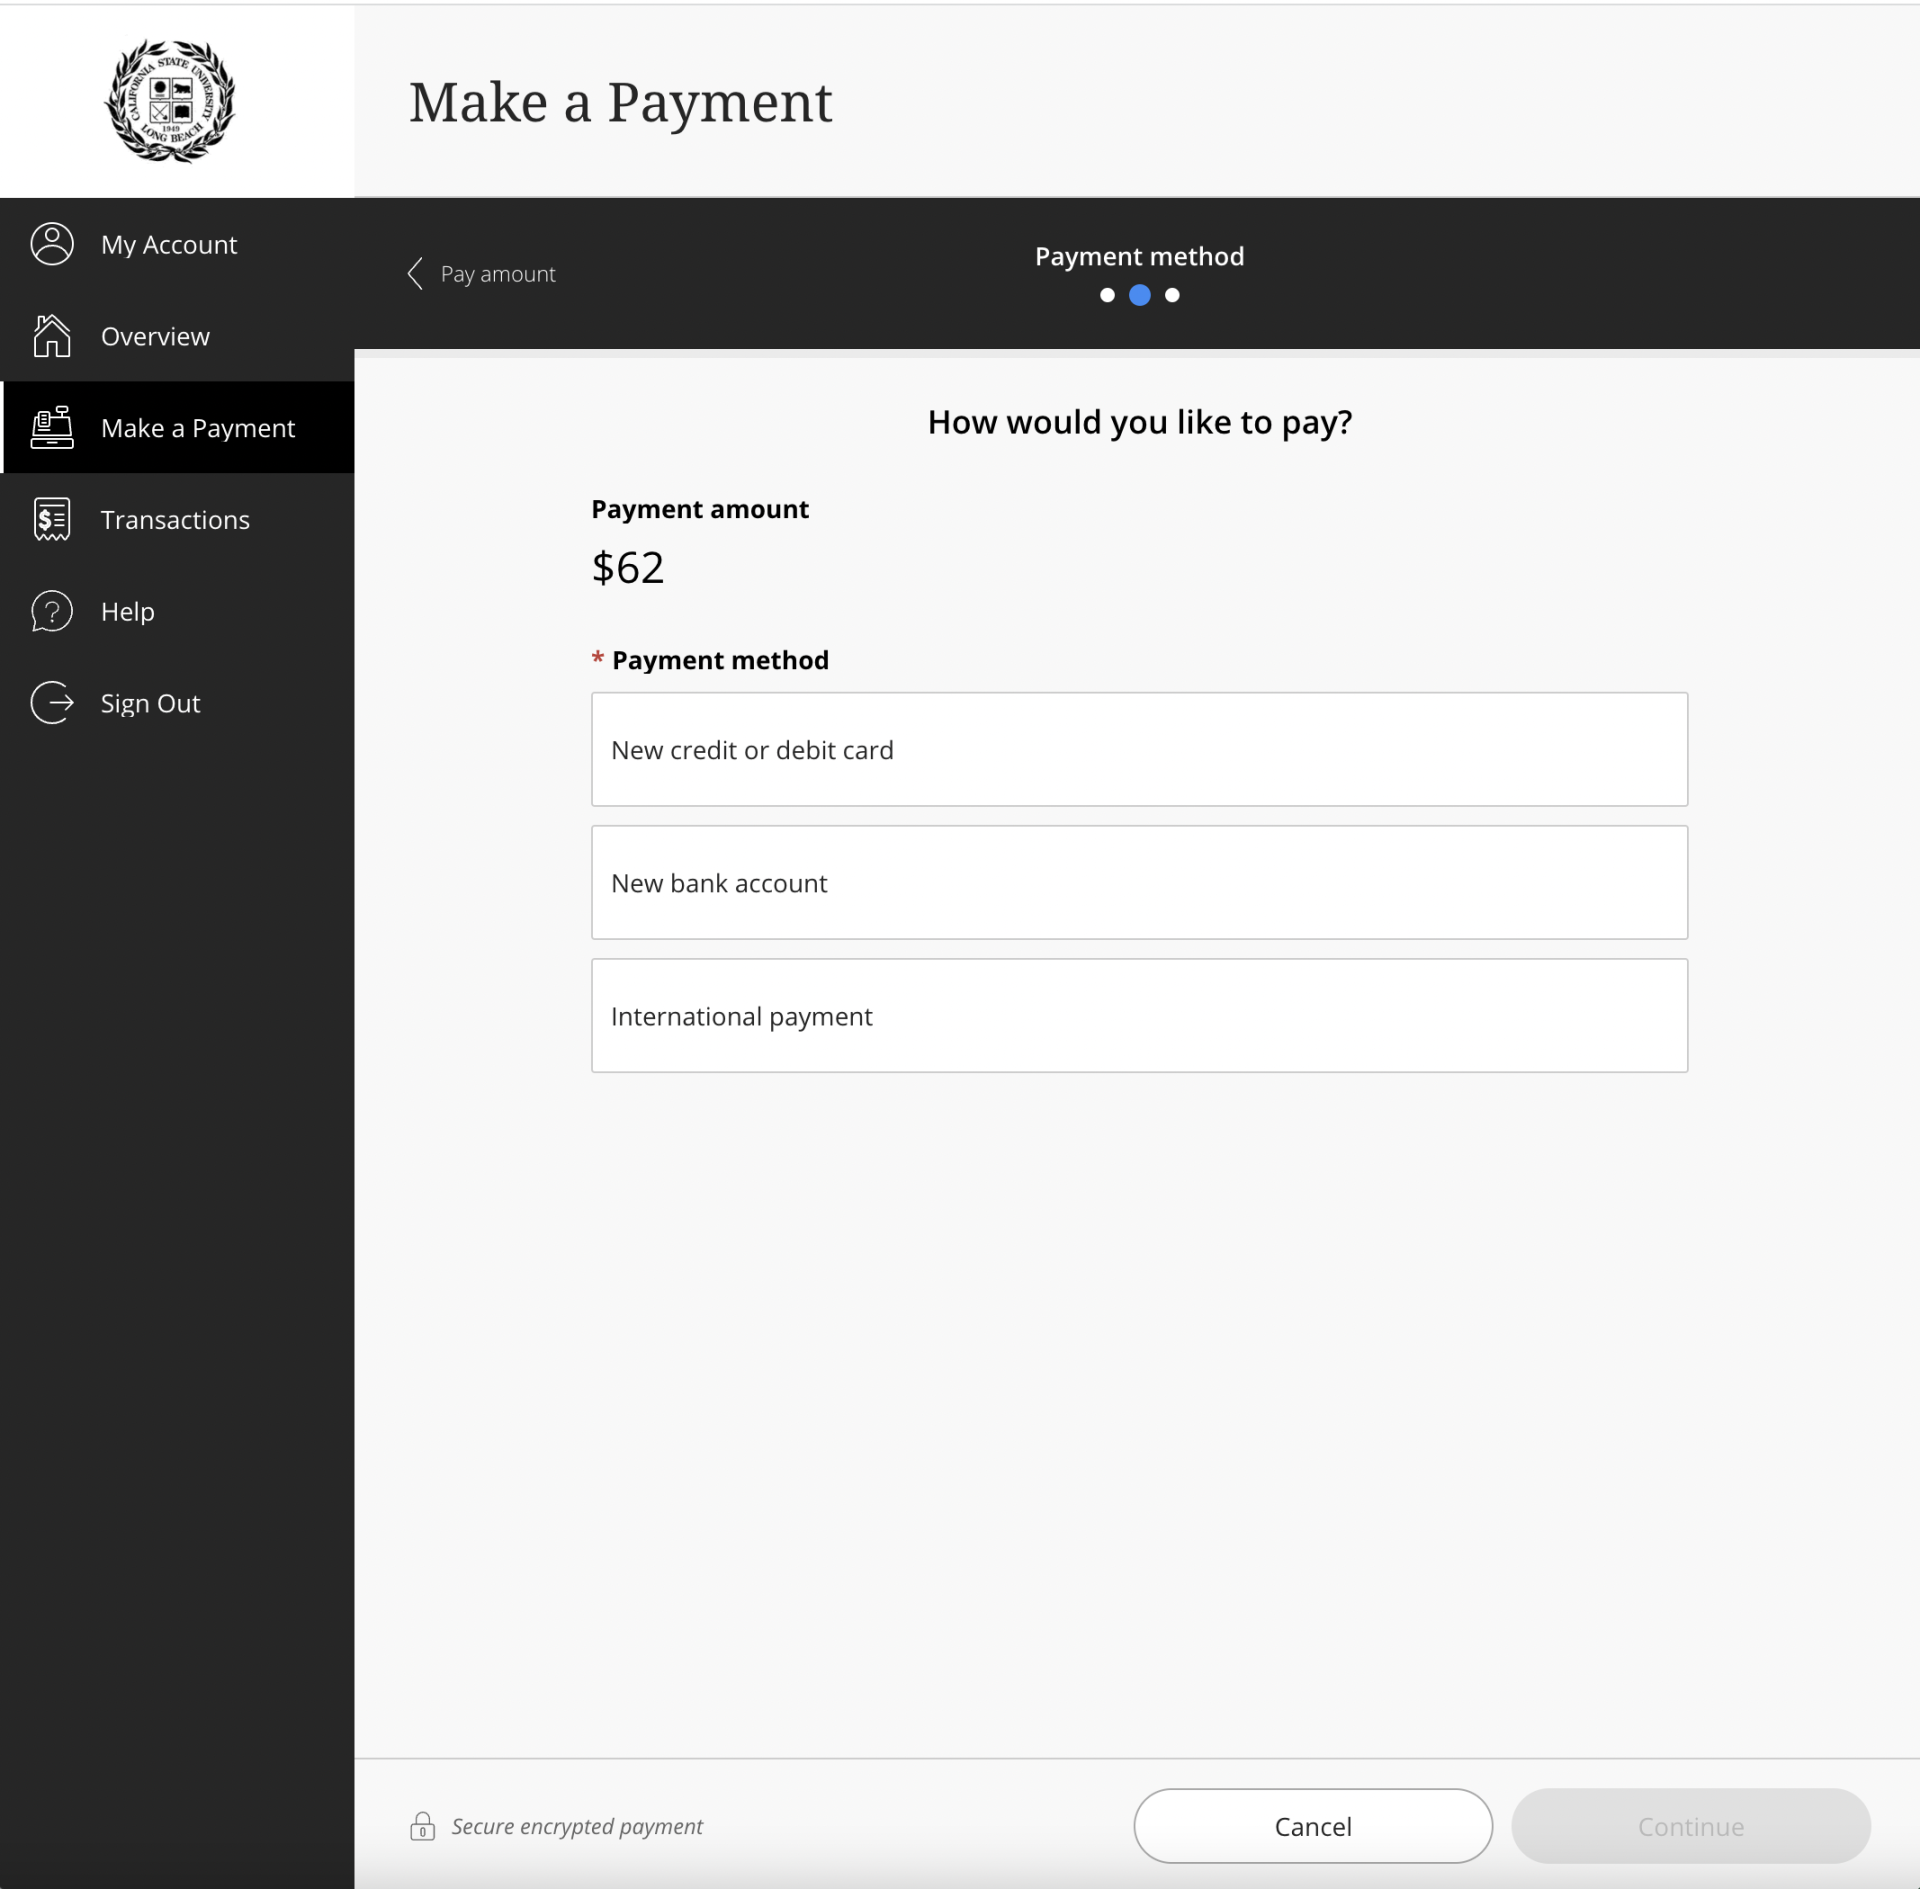
Step 11: If you are paying by electronic check, enter your checking account information in the corresponding fields. When you have finished entering your payment information, select the “Continue” button. If you need to go back to change the payment type, select “Change” next to the payment method.
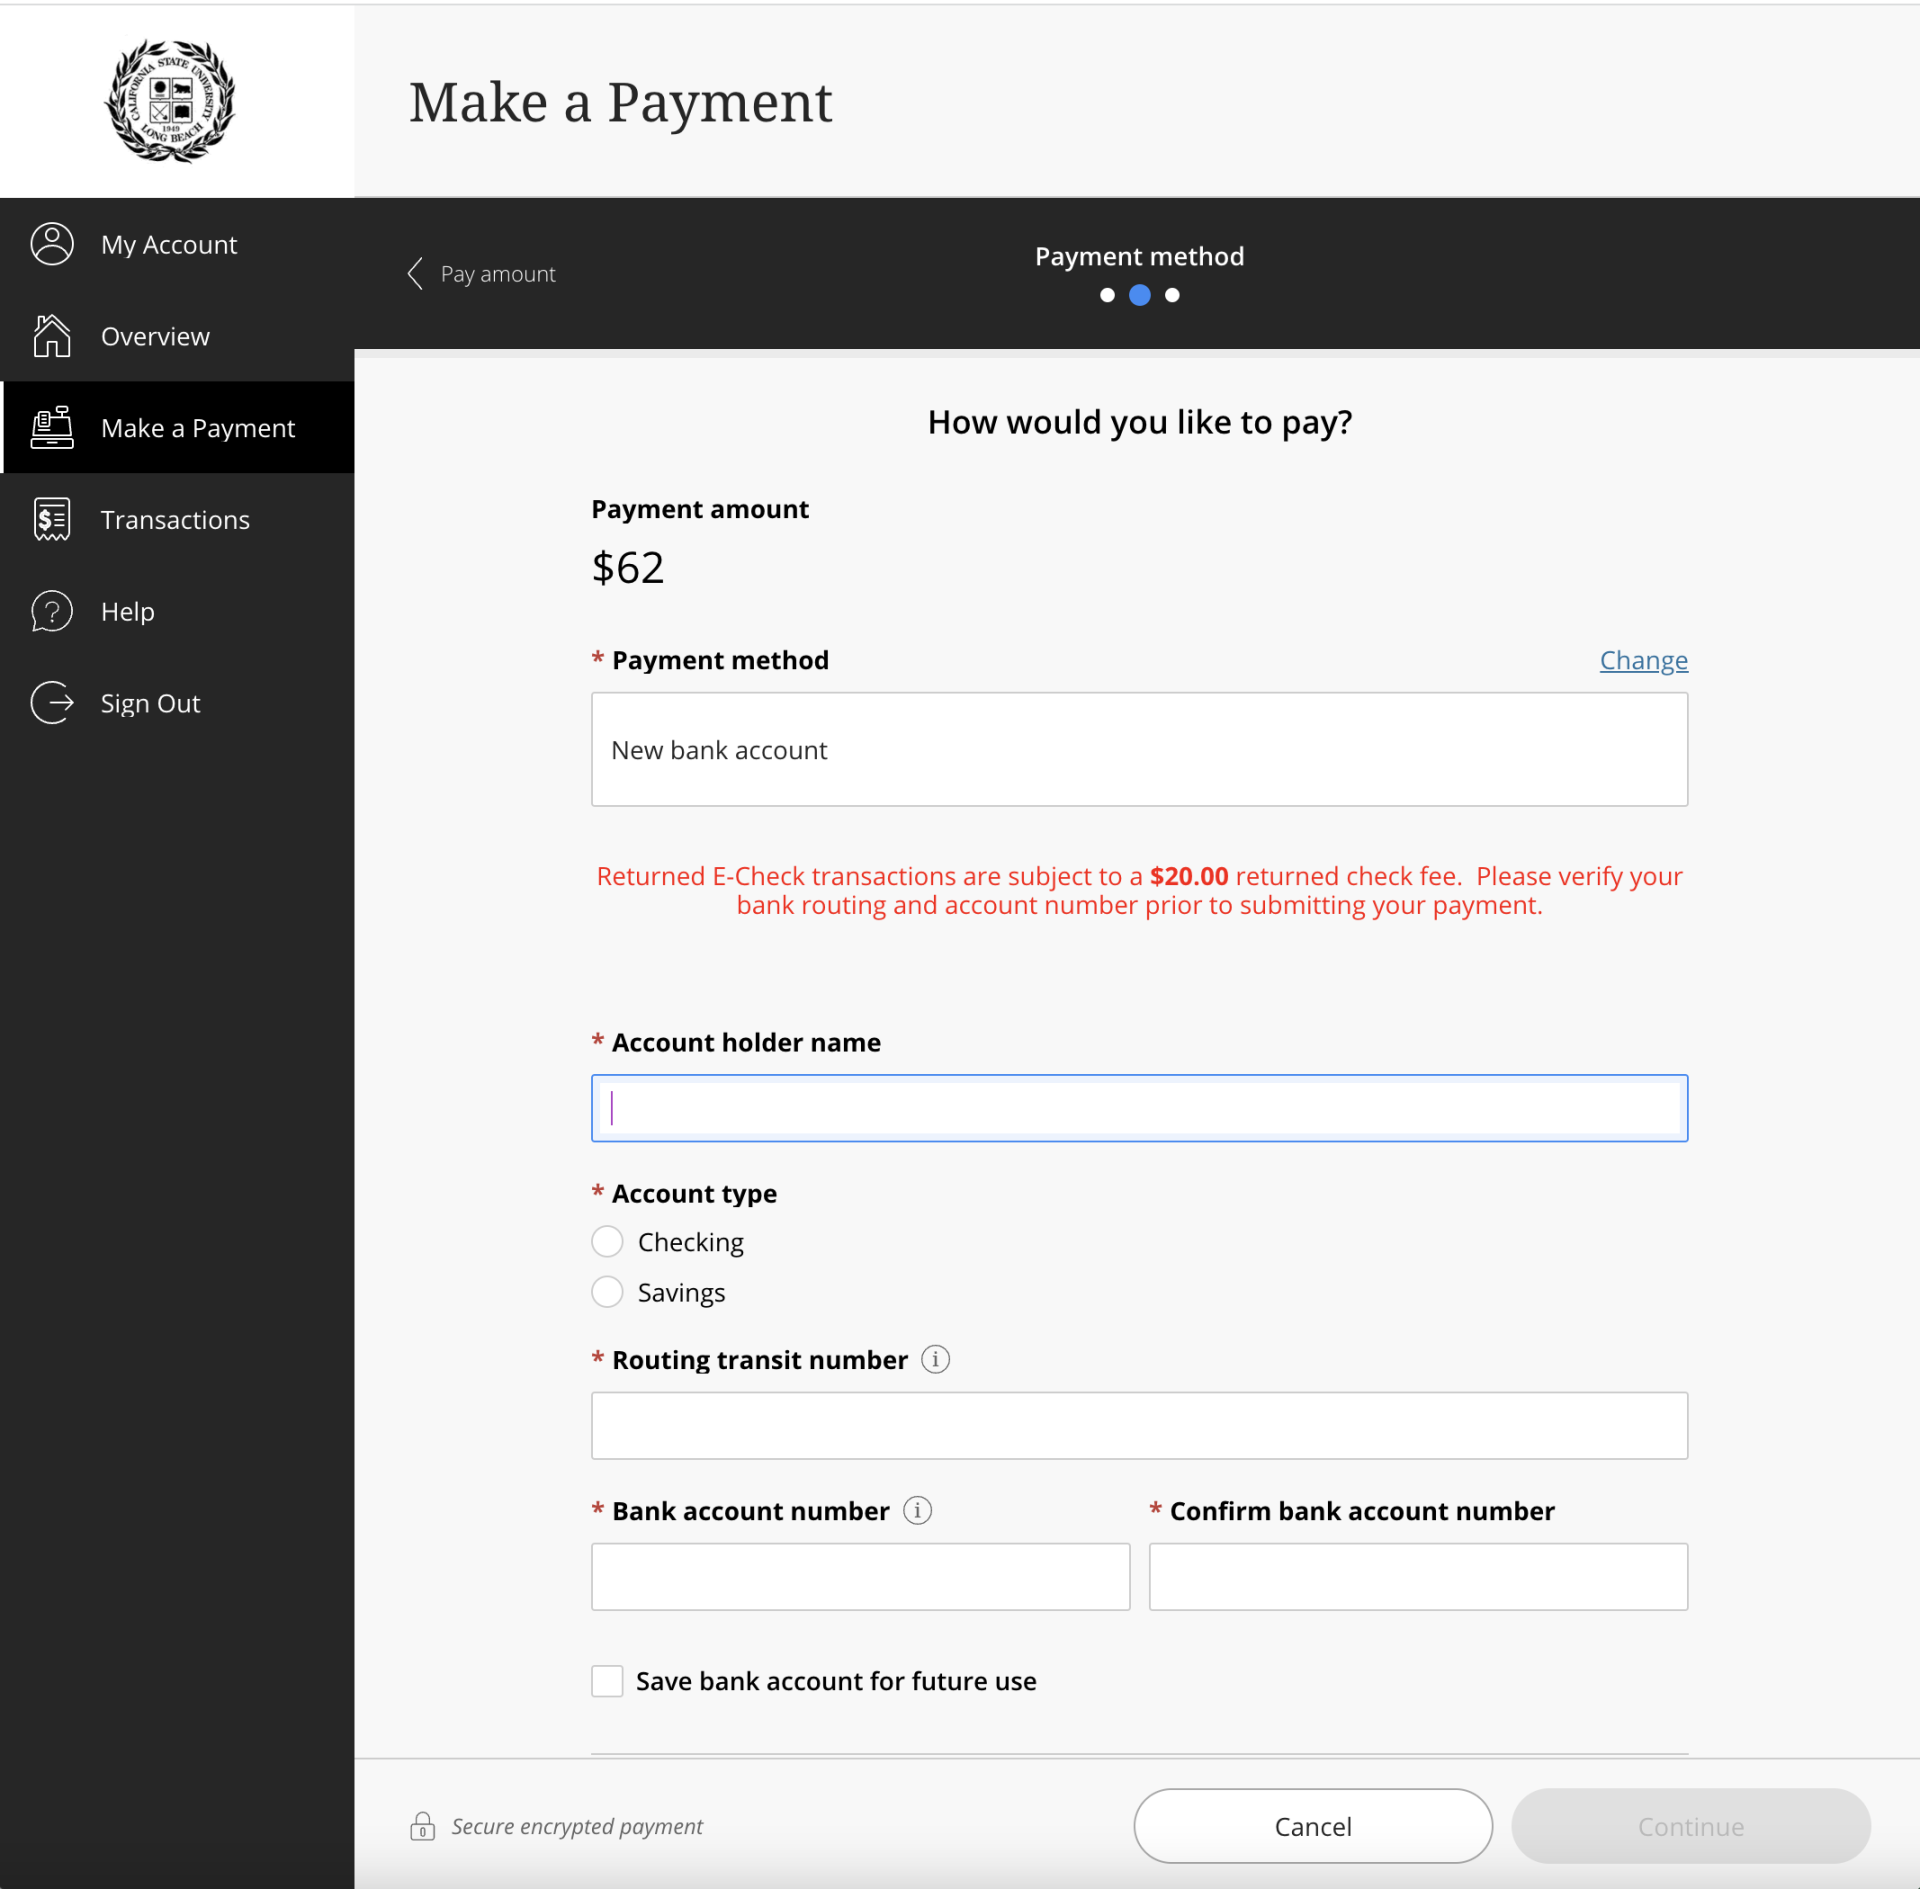
Step 12: If you are paying by credit card, enter your card information in the corresponding fields. When you have finished entering your payment information, select the “Continue” button.
Step 13: Confirm the information that you entered is correct and select the “Pay $62” button.
Step 14: Once the transaction is approved, the remaining balance on your account will appear. You will also have a “Payment Receipt” number, which will be sent to the email address you provided.
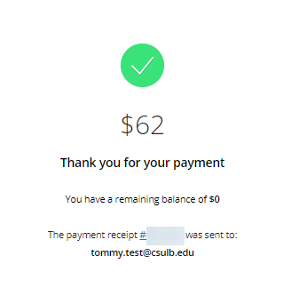
Step 15: Select the “Go to Overview” button to return to your payment portal. Return to your open MyCSULB window and select the “Next” button.
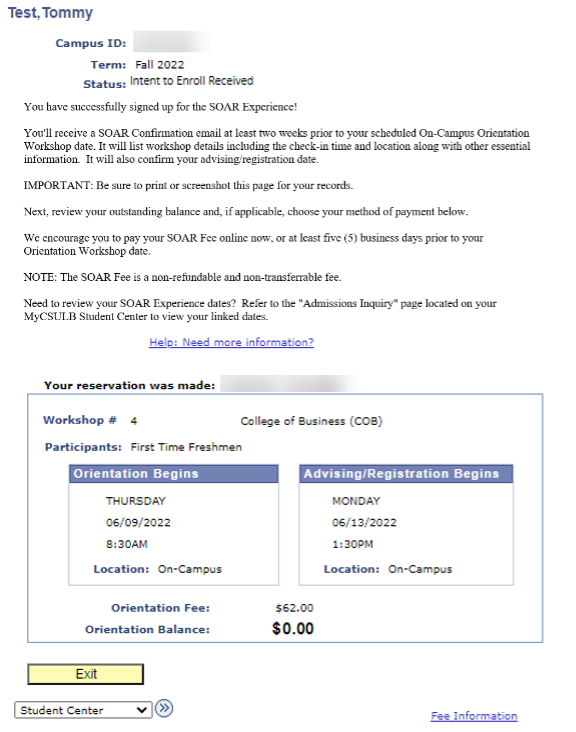
Step 16: Review your confirmed SOAR workshop reservation at any time by selecting the “SOAR Sign-Up” link in the Admissions section of MyCSULB Student Center.
