Using Academics
This guide covers the self-service functionality for students to register for classes, join class waitlists, modify classes, submit requests for enrollment exceptions, and more. MyCSULB Student Center provides an easy way to access, view, and update your registration information. Once you have logged into CSULB Single Sign-On, select the MyCSULB Student Center app.

MyCSULB Student Center was updated on December 1, 2023 with a brand new user interface! Visit the What's New with MyCSULB Student Center page to familiarize yourself with the new experience. Tutorial screenshots may reflect the classic experience, but most steps remain the same.
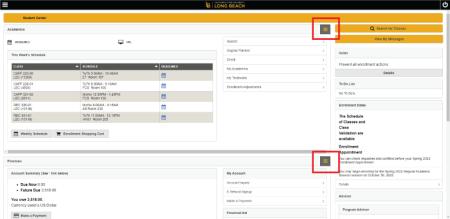
Please note that most links are now organized into expandable menus that you can find in the upper right corner of each section (see example below).
On this page:
- Search: information about how to search the class schedule in MyCSULB Student Center.
- Enroll: learn how to enroll in classes (including adding classes, swapping classes, joining class waitlists) and view your class schedule.
- Enrollment Adjustments: learn how to modify your classes (such as grading options), submit requests for enrollment exceptions to add classes late or exceed the maximum unit limit, or withdraw from classes.
- My Academics: information about how to review your mid-term progress reports.
- My Textbooks: learn how to find the required textbooks for your current and upcoming classes.
Browser requirements:
- To access all the functions necessary for navigating in MyCSULB Student Center, the web browser on your computer must meet minimum browser requirements.
- Be sure pop-ups are enabled for your browser. Some functions use pop-up windows to process your requests.
Search
You can get up to the minute, detailed information on course offerings by clicking on the “Search” link in the right-side featured menu within the Academics panel or via the yellow Search for Classes button in your Student Center. The Schedule of Classes allows you to search by subject area, course, instruction mode, GE area, day and time, courses with available seats and much more!
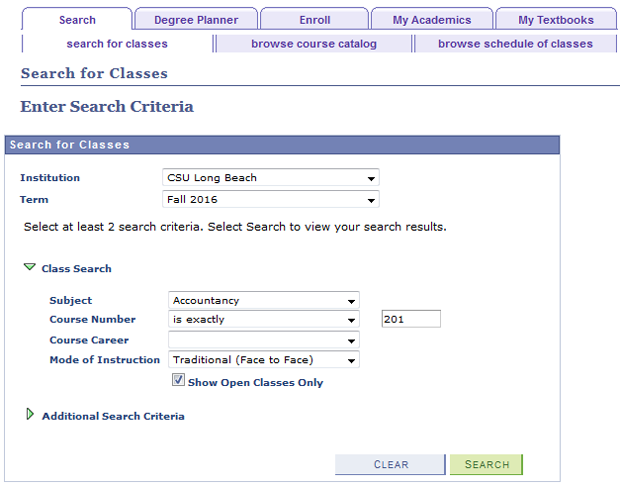
Class Search Criteria
Course Number Search Options
The drop down menu will allow you to specify the criteria when looking up a Course Number:
- contains: Enter a number to find a class that contains that value in the Course Number (e.g. 2 would yield any class with a 2: 102, 200, 220, 426)
- greater than or equal to: Enter a number to find a Course Number equal to or greater than that number (e.g. 200 would yield 200, 334, 426)
- is exactly: Enter the exact value of the Course Number (e.g. 200). This is the default selection.
- less than or equal to: Enter a number to find a Course Number equal to or less than that number (e.g. 200 would yield 200, 10, 114 )
Course Career
This field defaults to your current career, but it can be changed.
Mode of Instruction
This field allows you to narrow your search based on how the class is being taught - Traditional (Face to Face); Hybrid (Face to Face & Online); Online Only
Open Classes Only
Uncheck this box if you would like to include classes that are already full.
The Additional Search Criteria allows you to search using an expanded list of search options including day, time and instructor information. Based on your search criteria, a list of classes will be returned. You will be shown basic information about the class, including day and time, room, and instructor.
To search for GE classes being offered in a GE category, you must click on the Additional Search Criteria.
GE Search Options
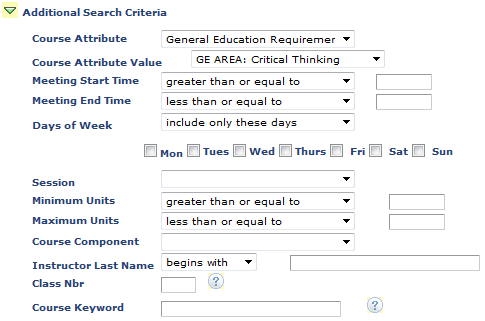
- Course Attribute: General Education Requirement
- Course Attribute Value: Select a GE category. The drop down menu displays a full list of GE areas.
- You may further narrow your search using other fields.
Class Search Results
In addition to displaying the classes that meet your search criteria, the Search Results page also displays classes that are in your class schedule at the top of the page. It also displays classes you have added to your shopping cart. This can be helpful when building your class schedule, so you can see what times you already have classes scheduled.
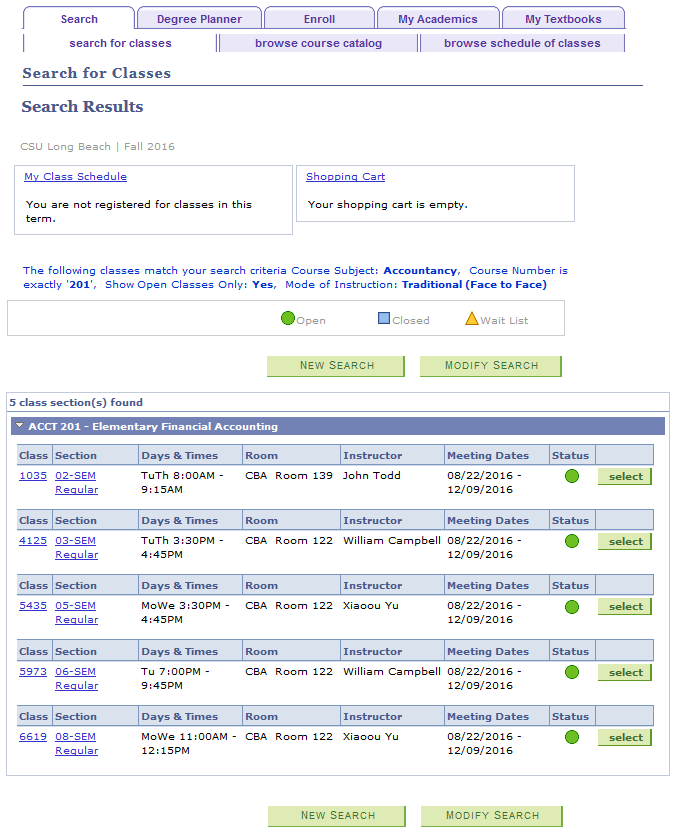
The search results icons indicate the enrollment status of the class.
-
---- Seats are AvailableImage

-
---- Class and Waitlist are fullImage

-
--- Class is full and Waitlist is AvailableImage

Note: The Waitlist icon will only display during the waitlist period. Once the Last Day to Waitlist has passed for the term, the class will display a status of Closed.
You can click on the section link for more detailed information on the class. The search results will initially display the first three sections of the course. Click on the “View All Sections” link to display all sections offered.
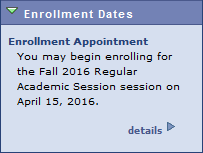
Your Enrollment Appointment(s) will determine when you can begin your registration activities for each term. You may view Enrollment Appointment(s) on the right side of your Student Center home page under the Enrollment Dates section. Select the "Details" link to view more information on enrollment dates and deadlines.
Important Reminder: Incoming first-year and transfer students must attend a Student Orientation Advising and Registration (SOAR) session in order to register for classes for their first semester. You should see a SOAR Sign-Up link under the Academics panel to register for a SOAR date and/or to see your current SOAR confirmation.
Degree Planner
Degree Planner is an online tool allowing undergraduate students to map their entire academic path to graduation. For video tutorials, FAQs, and more, visit the Degree Planner support page.
Class Schedule Planner
You can add classes to your shopping cart and plan your enrollment for the term, prior to your actual enrollment appointment.
Class Schedule Planner provides a variety of potential class schedules based on your class preferences and other time conflicts, such as work, sport, or family commitments. The Class Schedule Planner is only a tool to aid with the creation of your schedule and DOES NOT enroll you into actual classes. You will need to import your schedule into your shopping cart to begin the enrollment process.
Note: In order to use Class Schedule Planner, pop-ups must be enabled for your browser. To begin planning your classes, click on the “Schedule Planner” button from the Plan tab in your Student Center.
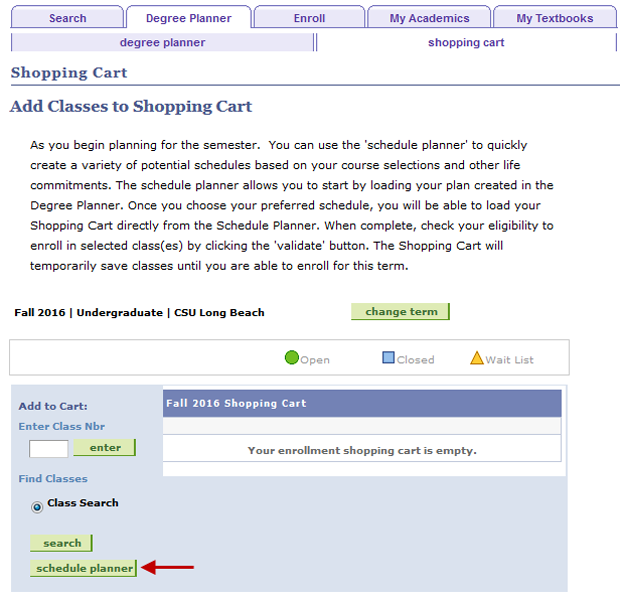
This will take you to a launch page:
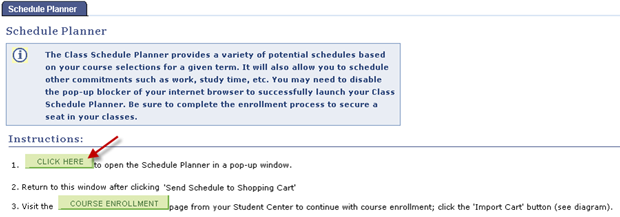
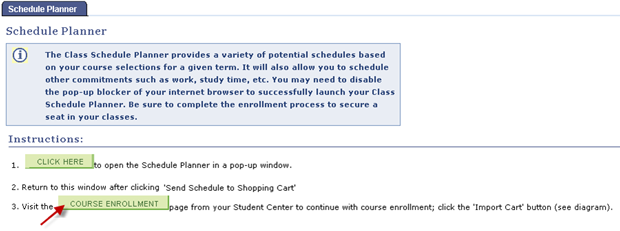
The “CLICK HERE” button in Step 1 will open up the Scheduler Planner in another browser window. Note: Be sure pop-ups are enabled for your browser. Clicking on “Text Only” will allow you to view a text-only version of the Schedule Planner, which provides the same options and is fully navigable by the keyboard.
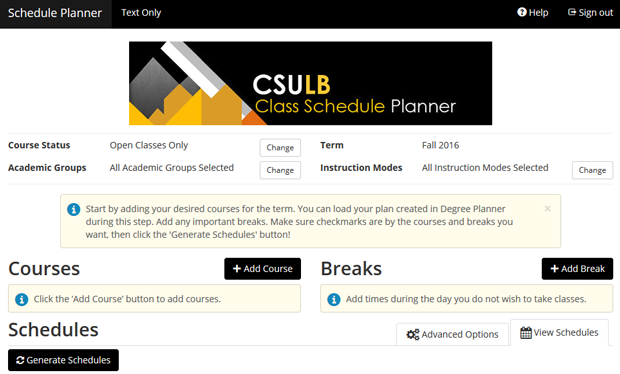
Course Status – indicates the seat availability of the class:
- Open Classes Only – only includes classes that have seats available
- Open & Waitlist Available – includes classes that have seats available, as well as classes that have space on the waitlist
- All Classes – includes all classes, even those where the class and waitlist are full
Academic Group – provides a way to narrow down course choices to a specific college and career.
Term – identifies term for enrollment
Instruction Mode – Indicates how the class is being taught: Traditional (Face to Face); Hybrid (Face to Face & Online); Online Only
Courses
Search for and select courses you are interested in taking in the selected term. In the Courses section, click on the “+Add Courses” button.
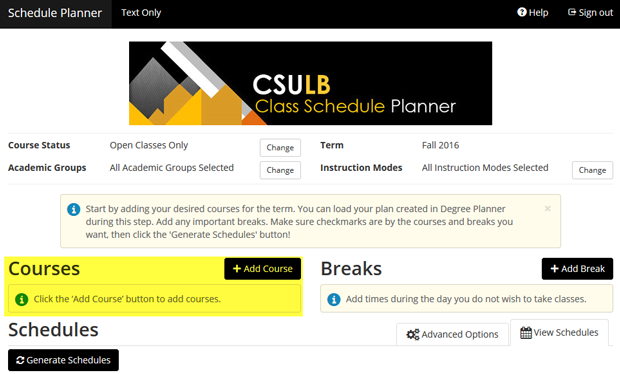
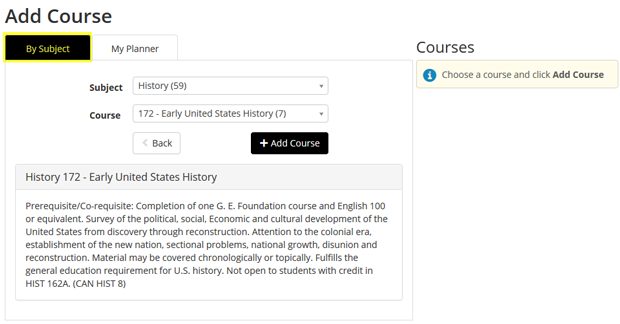
You can add desired courses individually or load your planned courses from your Degree Planner.
Select the Subject and Course.
- Number next to Subject indicates number of courses offered by that department
- Number next to Course indicates number of sections offered for the course.
- A description of the course from the university catalog will display.
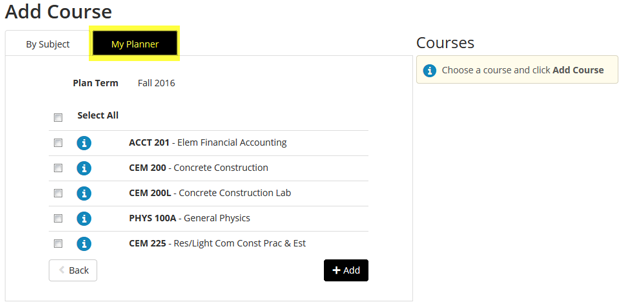
You can also select courses from your Planner. You will see that the courses from Degree Planner are available. Select the courses you wish to explore at this time and click 'Add' to move.
Once all desired courses have been added to the list, click on the “< Back” button to return to the Class Schedule Planner main page.
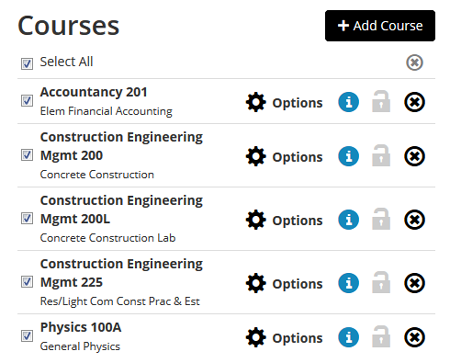
When viewing your list of selected courses, you can click the “Options” button to view available sections and decide which sections you want to include when generating potential schedules.
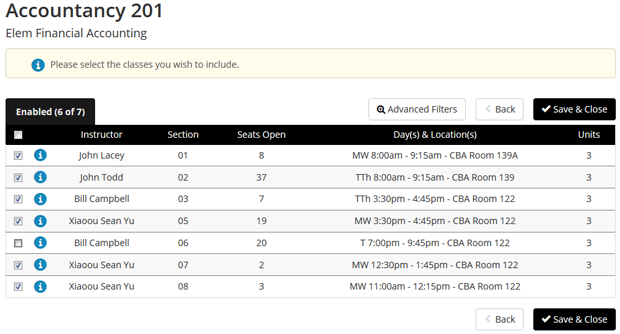
You can click on the information icon to view additional details on the course. You can also set additional filters to select specific instructors or section attributes.

Breaks
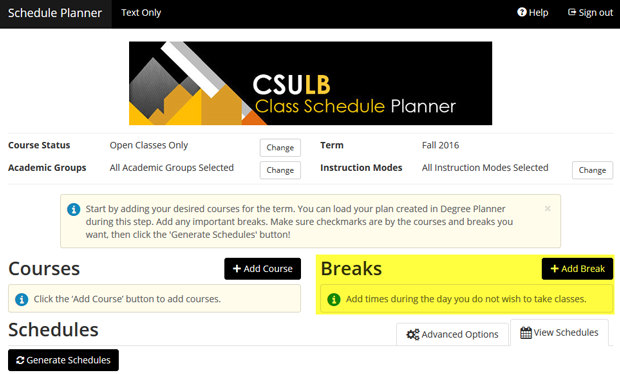
Create custom breaks for days and times you do not want to take classes. In the Breaks section, click the “+ Add Break” button.
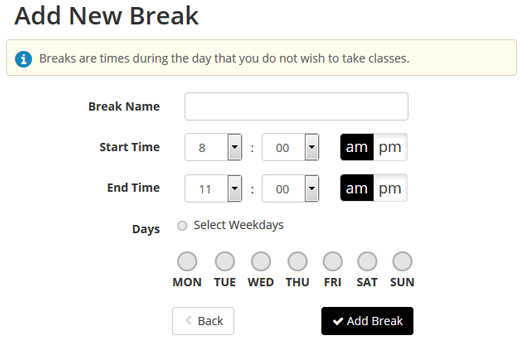
Enter a name for your break, select start/end times and days and click the “Save Break” button.
Generate
You can generate and view all possible class schedule combinations based on the selected courses and requested break times. Check the boxes to the left of the courses and breaks you wish to include when creating potential schedules and click on the “Generate Schedules” button in the Schedules section.
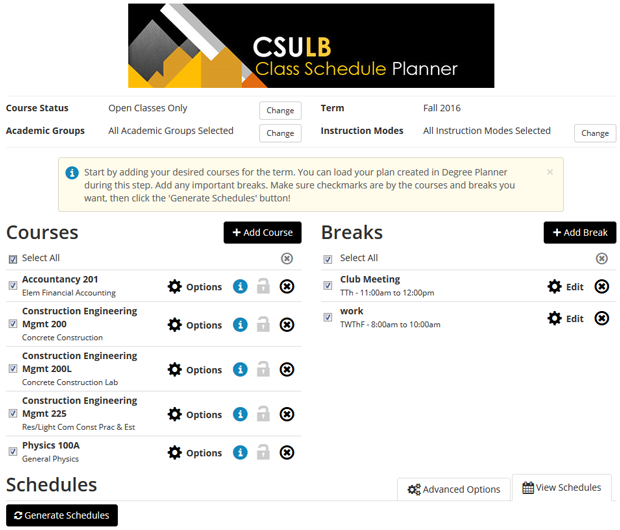
Hover over the magnifying glass to see a preview of what the potential schedule looks like.
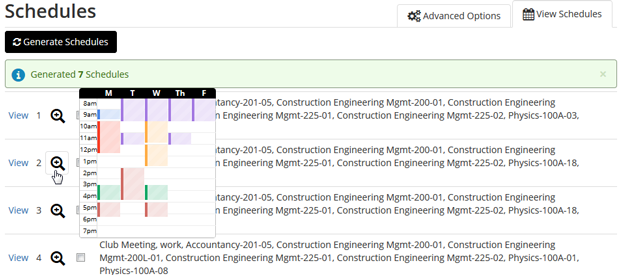
Check boxes and compare up to four different class schedule combinations. “Advanced Options” allows you to enter time needed between classes.
Click the “View” link to see the full weekly schedule view, as well as meeting information and updated class availability. Click on the arrows to scroll through different class schedule combinations. You can also save a potential schedule as a “Favorite” by clicking on the heart button. You can save as many favorites as you would like.
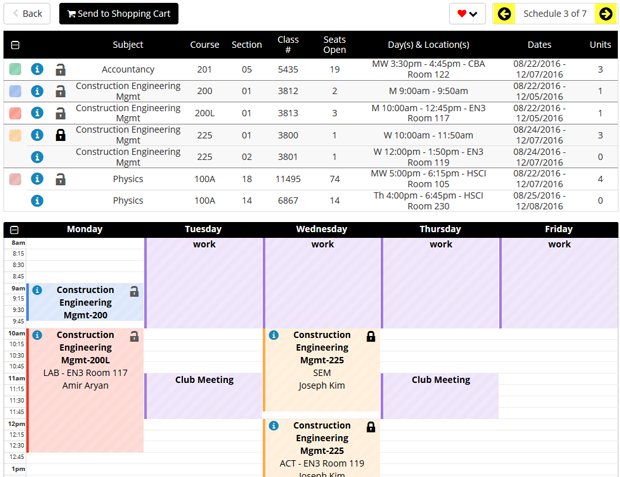
You can also lock in particular section(s) that meet your individual needs and re-generate a list of only those schedules that contain the locked section(s). Please note that this feature does not guarantee the preferred section. You must still complete the enrollment through MyCSULB.
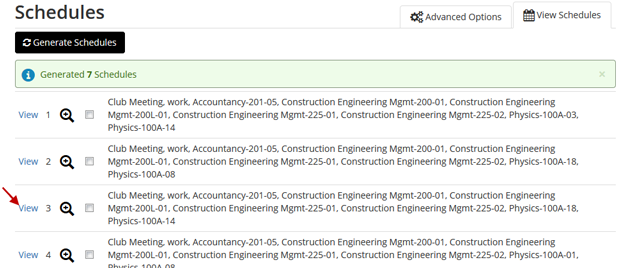
As you make changes to the Courses and/or Breaks, you can re-generate the listing of possible class schedules to meet your needs. Once you find the schedule that best fits your needs, click the “View” link next to the Class Schedule you want. Continue the process by clicking on the “Send Schedule to Shopping Cart”.
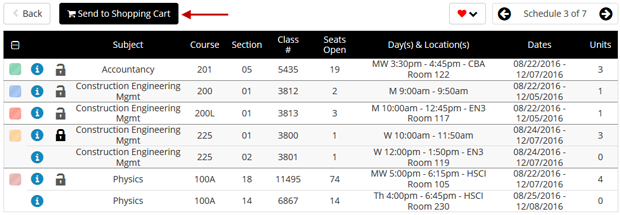
Verify that you would like to transfer the classes to your shopping cart by clicking OK.

This will take you back to the launch page. Click on the “Course Enrollment” button.
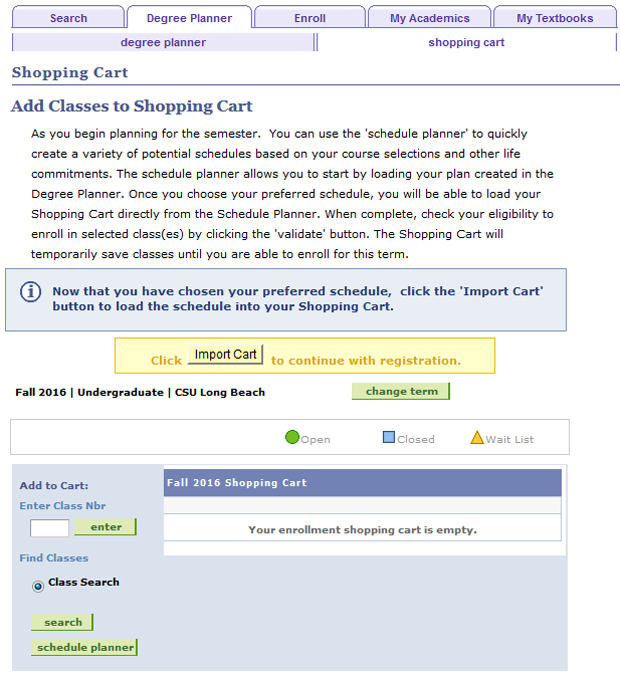
Click on the “Import Cart” button. This will take you to the Enrollment Preferences for each of the class sections, where you can review the class(es) and check the box for Waitlisting, if applicable.
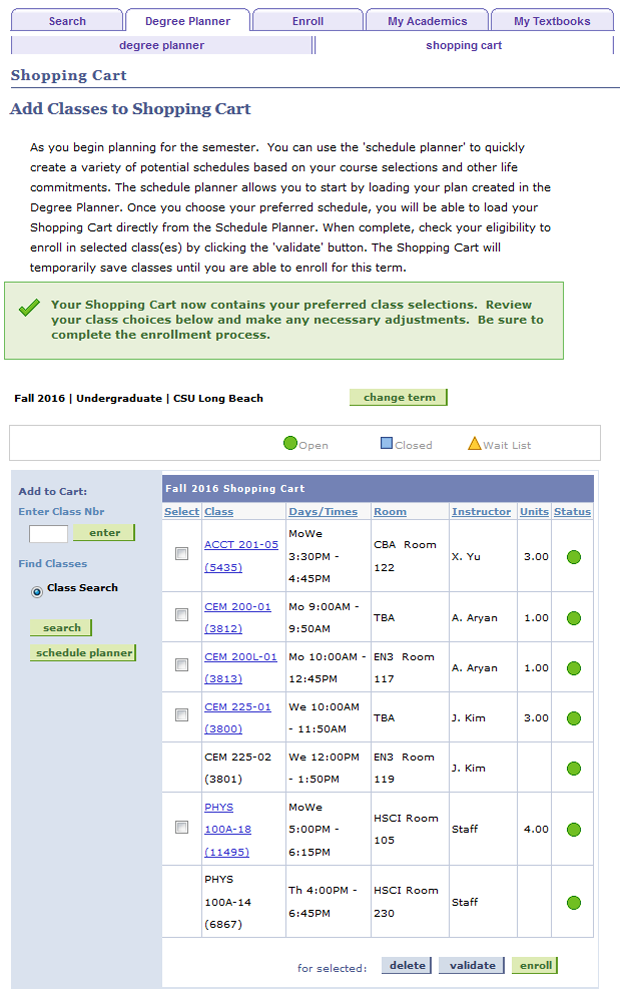
The classes are now in your shopping cart.
Validate Your Shopping Cart
Once the classes are in your shopping cart, you can validate some or all of your classes prior to submitting them for enrollment — the system will run a check for possible conflicts and eligibility, allowing you to ensure that you are eligible to enroll into the selected class(es). Check the box next to the class(es) you wish to validate. Make sure all registration holds have been cleared before validating your classes.
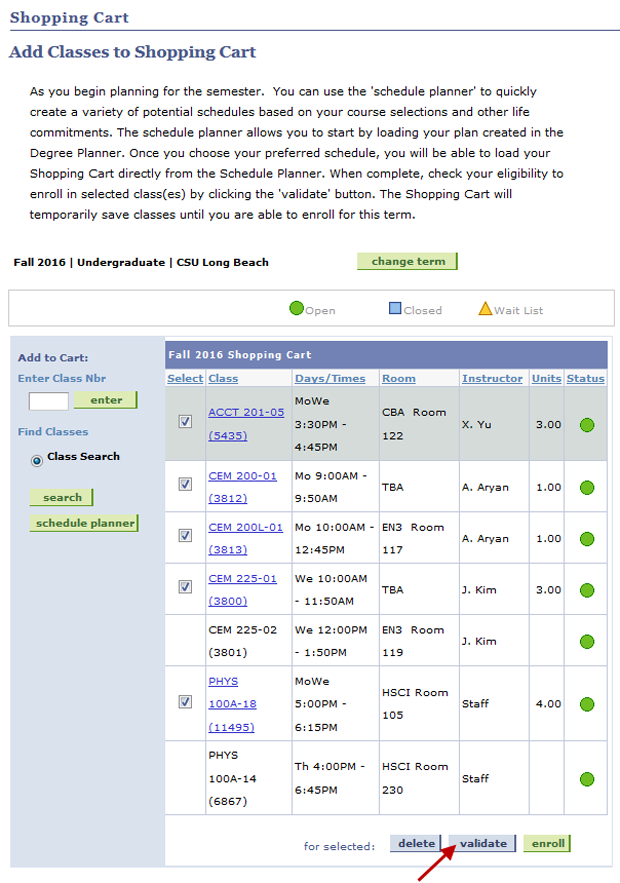
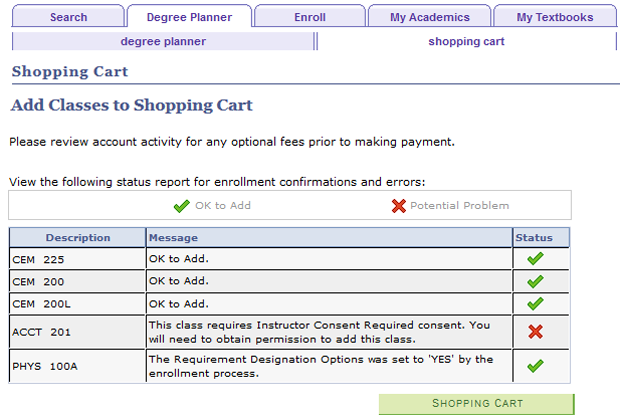
It is important to note that validating your classes does NOT result in enrollment. You will need to officially enroll in classes during your assigned appointment period. You will see a Status Report that will indicate which class(es) are OK to add and which ones may have potential problems when you attempt to officially enroll in the class. Be sure to read the message results to resolve any potential problems prior to enrollment.
Once your enrollment appointment period has begun, you can proceed with Enrollment by simply checking the boxes next to the classes you wish to process and clicking on the “Enroll” button. You can repeat the process to add additional courses as well.
The Enroll option under Academics in Student Center, you can view your current classes for the term, add a class, and place yourself on a waitlist.
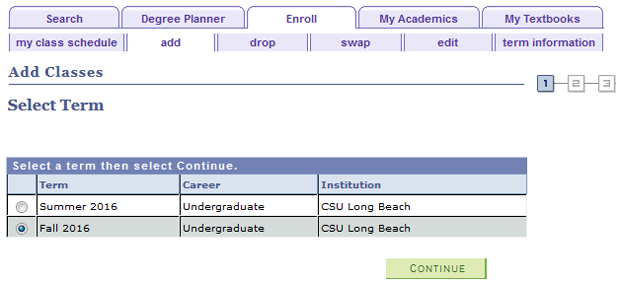
To begin registering for classes, click on the Enroll option in the right-side featured menu under the Academics panel. You will be prompted to select a term. Select the radio button for the corresponding term and click the “Continue” button.
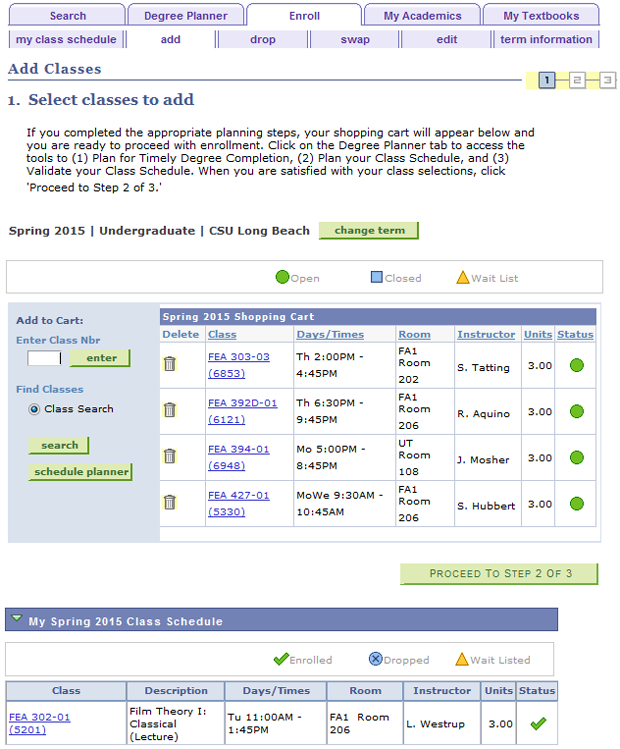
Your Class Schedule for the selected term will display. Icons indicate your enrollment status of the class:
-
--- You are officially enrolled in the class.Image

-
--- You have dropped the class from your schedule.Image

-
--- You are waitlisted for the class.Image

Search for Classes When Enrolling
You can search for classes by clicking on the “Search” button below the 'Class Search' option on the left side of your shopping cart. The basic search allows you to search using general class information. If you receive a “no matching values found” message, make your search less specific.
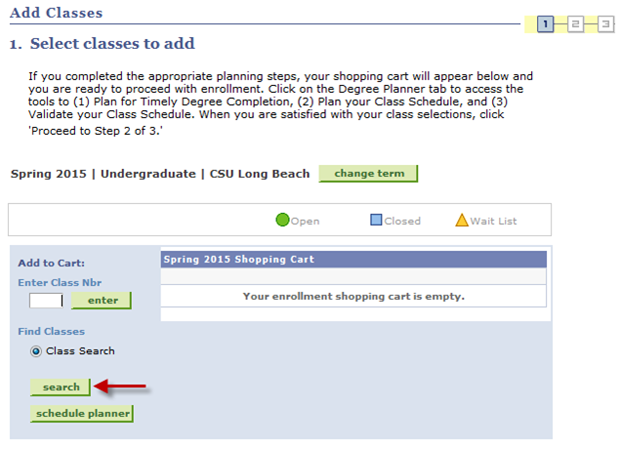
Note: When searching for classes during your enrollment period, you can click on the “Select Class” button on the Class Search Results page to add the class to your Enrollment Shopping Cart.

If you are already enrolled in a class, the “Select Class” button will not appear for the section you are enrolled in.
Class Enrollment Options
- Multiple Component Courses: For classes that require a related component (e.g. lab, activity, etc.), you must specify the related class section.
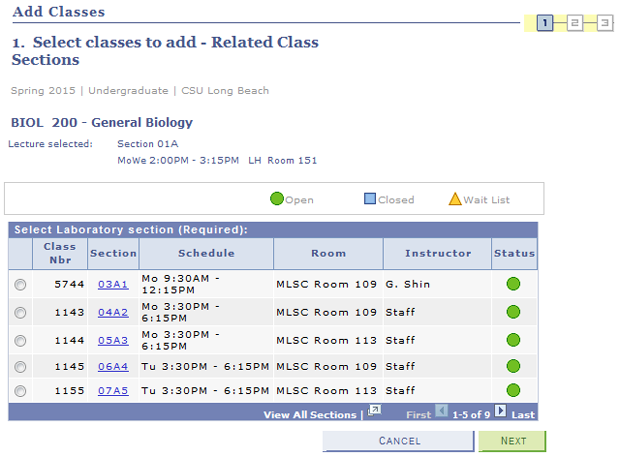
- Units: For classes with variable units, you may specify the number of units being taken.
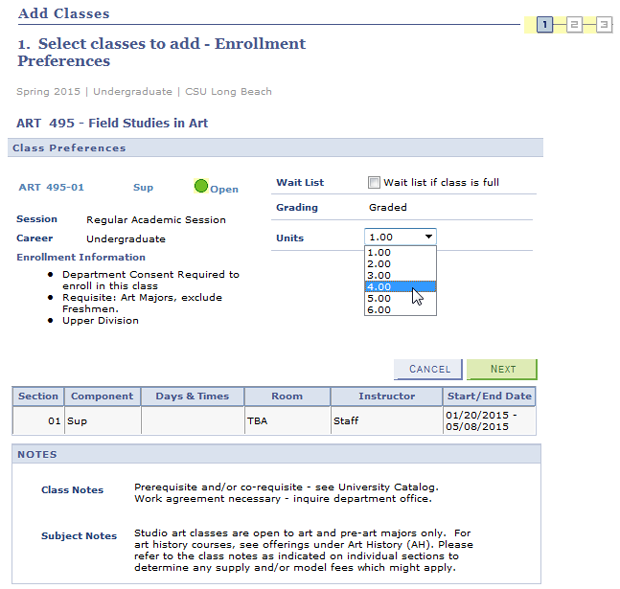
Continue selecting classes until you have entered all the classes in which you would like to register, and then click on the “Proceed to Step 2 of 3” button.
Note: If attempting to add a course in which you
a) currently have an incomplete grade;
b) received a grade of C, B, A or CR;
c) already repeated a course once at CSULB; or
d) reached the repeat limit, you will be prevented from enrolling and will receive an error message.
You will need to remove the course from your enrollment request in order to add other courses and complete your registration.
Confirm the classes you wish to add and click the “Finish Enrolling” button.
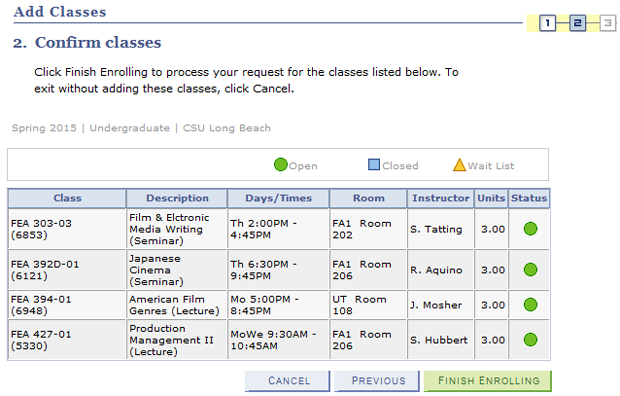
Icons indicate the enrollment status of the class.
-
---- Seats are AvailableImage

-
---- Class and Waitlist are fullImage

-
--- Class is full and Waitlist is AvailableImage

Note: The Waitlist icon will only display during the waitlist period. Once the Last Day to Waitlist has passed for the term, the class will display a status of Closed.
Undergraduate students are subject to limits of course repetitions allowed during their entire CSULB undergraduate career. If a student attempts to enroll in a class that goes beyond these limits, one of the following error messages will appear.
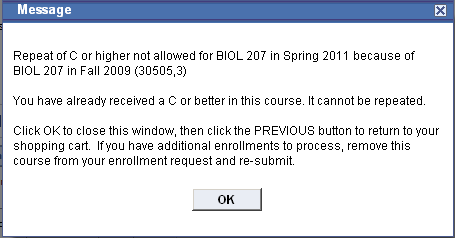
- Undergraduate students may repeat courses only if they earned grades lower than a C. The following message will appear if you are attempting to enroll in a class in which you have received a grade of C or higher.
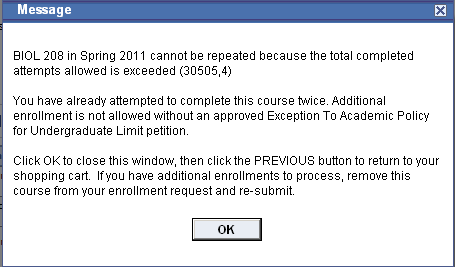
- Undergraduate students may take a course no more than two times. After the student has enrolled in the course for the 2nd time, the following message will appear:
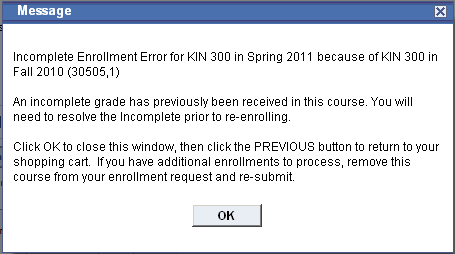
- Post-baccalaureate and undergraduate students may not re-enroll in a course for which they have received a grade of “I” (Incomplete) until that “I” has been converted to a grade other than “I” (e.g ., A-F, CR/NC). The following message will appear if you are attempting to enroll in a class in which you have received an “Incomplete” and it has not yet been resolved.
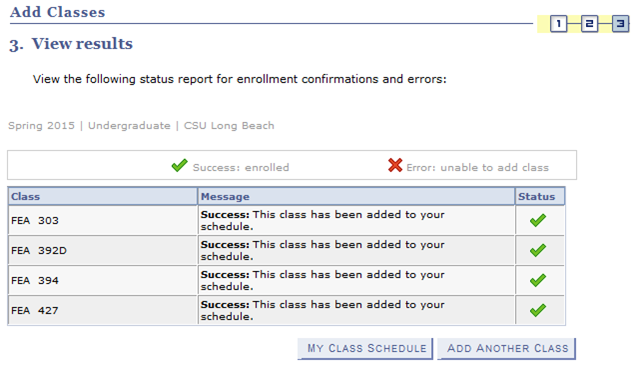
The system will display the status of each enrollment request. Be sure to review the errors and/or messages.
Possible Messages
-
The class is currently full. You may place yourself on the waitlist (see below for more information about waitlisting).
-
There is a time conflict between this class and one you are already enrolled in for this term.
-
A Requirement Designation (GE Indicator) was assigned; these are used to help the degree audit process and require no action on your part.
- You have not met the Pre-requisites or Co-requisites for this class. Refer to the message details to see what the requirements are for the course. For further information, refer to the University Catalog or contact the Department.
Waitlisted classes will count towards your maximum number of units allowed for registration, but you will only be charged for fees based on your number of units “enrolled". Additional charges, if any, will be assessed if you are successfully enrolled from the waitlist.
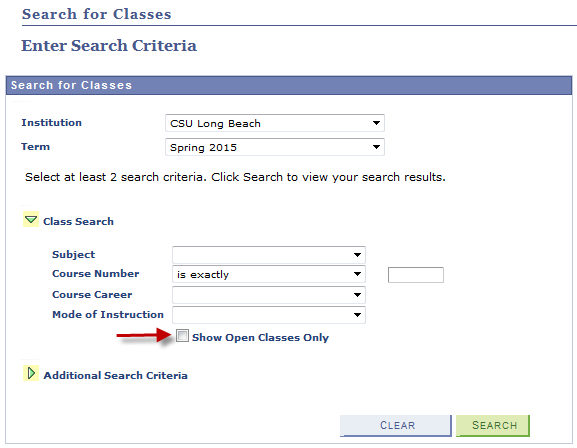
Note: To see classes that are currently full, uncheck the “Open Classes Only” checkbox. Then you will see all classes offered for a course and can choose to waitlist in ones that are currently full.
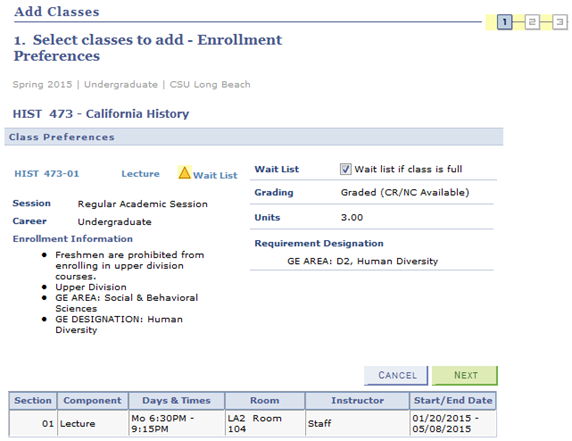
To place yourself on the waitlist of a class, check the “Waitlist if class is full” checkbox and then click the “Next” button. If there is no space available in the class, you will be placed on the waitlist unless the waitlist is already full.
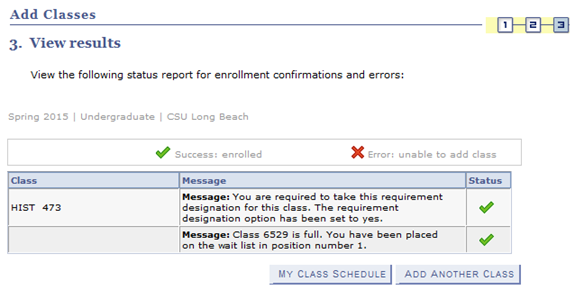
If you were placed on a waitlist, a message will be returned indicating your position on the list.
Note: Be sure to update your email address under the Personal Information panel. Communications regarding changes to your registration will be emailed to your “Preferred” email address, which is typically your CSULB student email address.

Under the "Enrollment: Drop" option located within the expandable menu within Academics (button is located in the upper right of the panel, illustrated with three stacked lines), you can drop a class, whether you are on the waitlist or officially enrolled in the class. Simply check the box next to the class(es) you wish to drop. After Self-Service registration has ended, drops must be submitted in-person with the appropriate approvals.
Once you have selected the class(es) you wish to drop, click the “Drop Selected Classes” button.
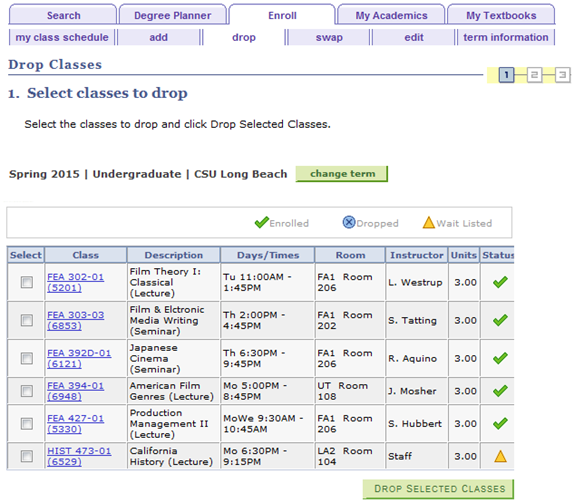
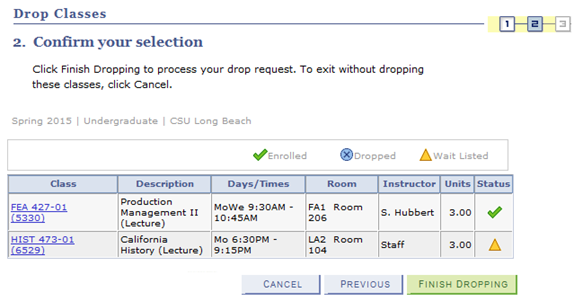
Confirm the class(es) you wish to drop and click the “Finish Dropping” button.
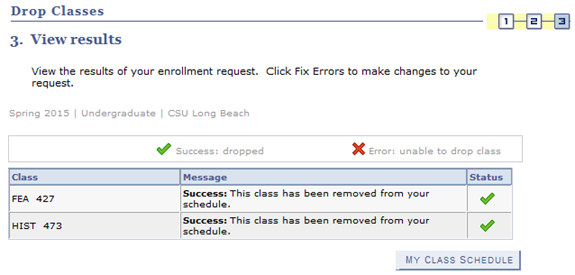
The View Results page will indicate if the change has been made, and show any errors or messages.
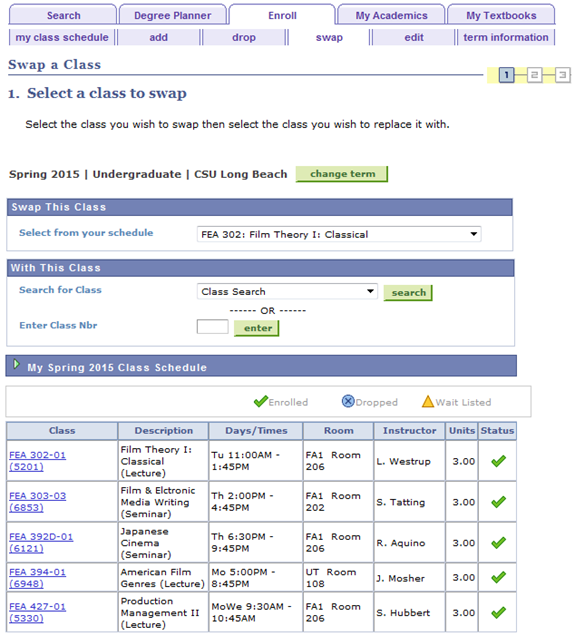
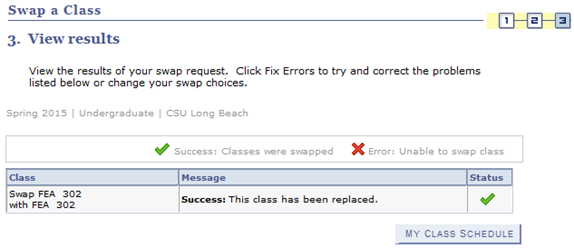
Under the "Enrollment: Swap" option located within the expandable menu within Academics (button is located in the upper right of the panel, illustrated with three stacked lines) you may switch between two different classes; these may be the same course (section change) or different courses.
If the class you are swapping into is not available or enrollment could not be completed, you will not be dropped from the class you want to swap out of. Specify the class you want to swap into by Searching for a Class, Selecting from your Shopping Cart, or Entering the Class Number.
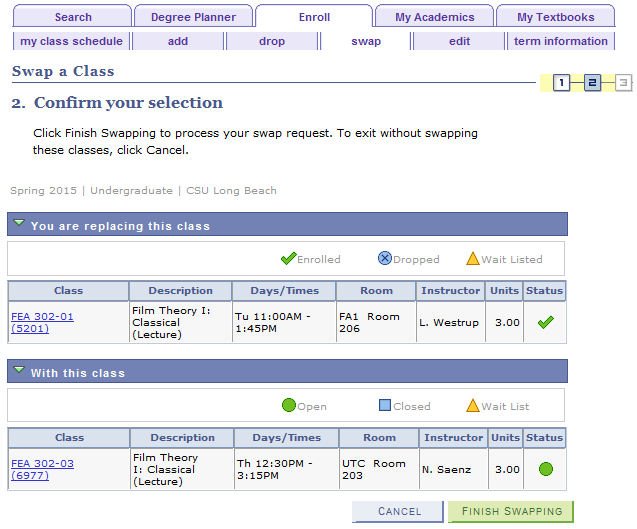
Once you have selected the classes you wish to swap, click the “Finish Swapping” button.
The View Results page will indicate if the change has been made, and show any errors or messages
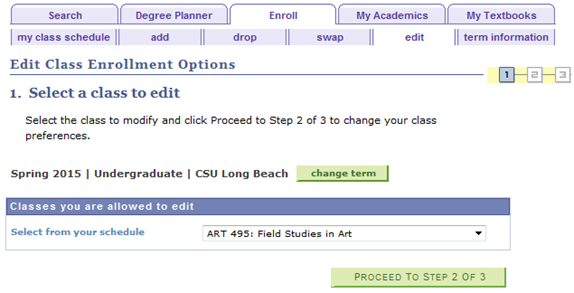
Under the "Enrollment: Edit" option located within the expandable menu within Academics (button is located in the upper right of the panel, illustrated with three stacked lines), you can:
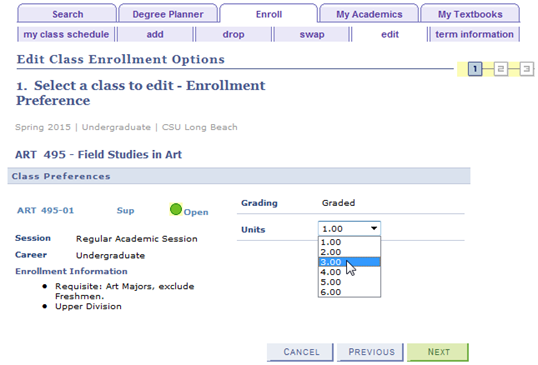
- Change the number of units for a variable unit course. If all of your classes are set at fixed units, you will receive a message indicating “None of your classes may be updated at this time.
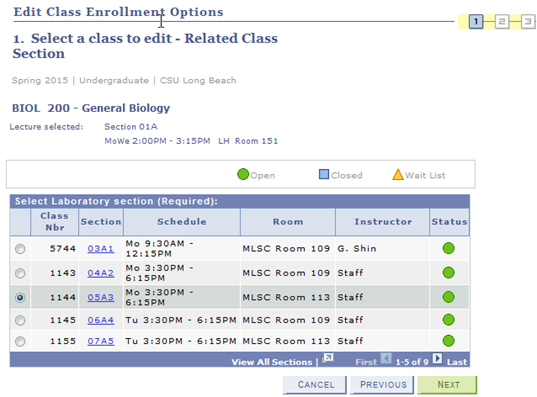
- Change sections of related components (e.g. labs, activities)
Specify the class you want to edit and click on the “Proceed to Step 2 of 3” button.
If you are changing the number of units for a variable unit classes, select how many units you would like to be enrolled in and click on the “Next” button.
If you are a changing a related component, select the new section you would like to be enrolled in and click on the “Next” button.
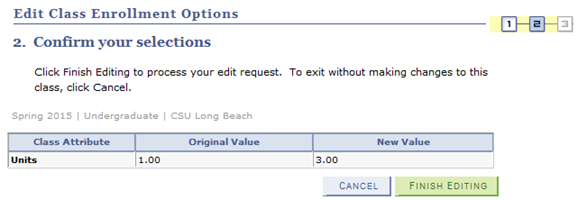
Confirm the class you wish to edit and click the “Finish Editing” button.
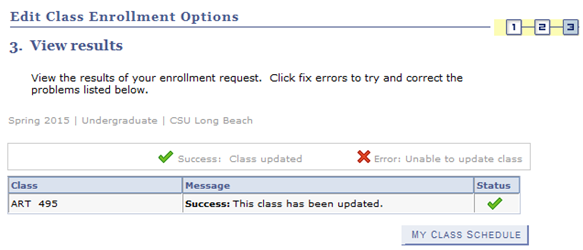
The View Results page will indicate if the change has been made and show any errors or messages.
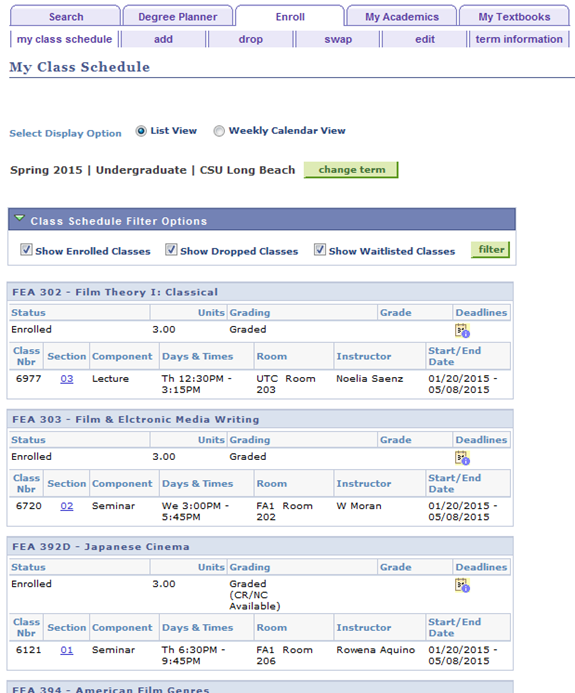
Once you are enrolled in classes or have made changes to your class schedule, you can view your current schedule and status. When you are on a waitlist, you will see a status of “Waiting” and your position on the waitlist. You will be able to see the day and time, room, date, and instructor information for all of your classes.
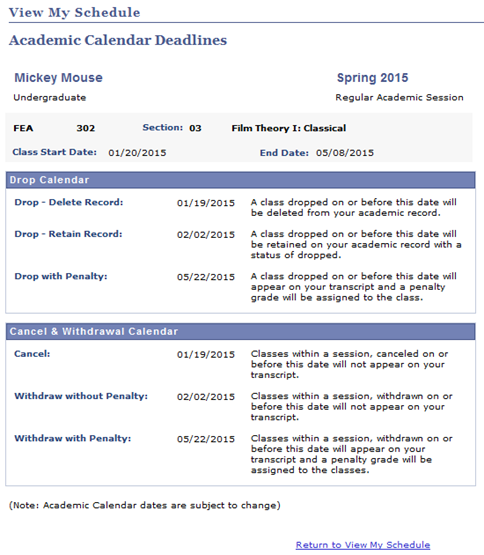
To see the Add / Drop / Withdrawal Deadlines for a class use the calendar button.
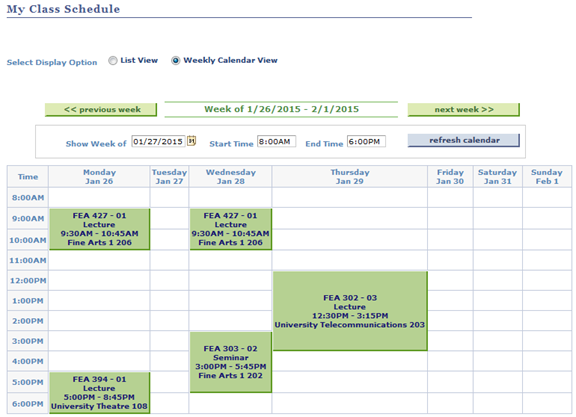
You can see a graphical schedule by clicking on the radio button next to “Weekly Calendar View” on the My Class Schedule page.
Confirm your Schedule and Pay Fees
Always recheck your schedule after processing enrollment requests! Also, remember that you must pay your fees by the established deadlines to confirm your enrollment requests. Failure to do so will result in the cancellation of your classes
Students may use self-service registration until the end of the second week of class (or proportionate for winter or summer terms). If you must add a class during the third or fourth week of class, you will need to use the Permission to Add request on MyCSULB Student Center. Class instructor and department approvals are required. All requests to add classes must be completed (including approvals) by the last day to enroll for the term, which can be found at Key Dates and Deadlines. For additional information, see Permission to Add.
Select Enrollment Adjustments from the right-side menu within the Academics panel.
Next, select Permission to Add from the right-side menu.
Select Create New Request to continue.

The instructor and the department that offers the class may choose to waive certain restrictions so that you may:
- Add a closed (or full) class
- Add a class that you met the requisites for by taking a class at another institution that isn't recorded on your transcript yet
- Add a class that requires instructor/departmental consent
- Swap to another section of the same course
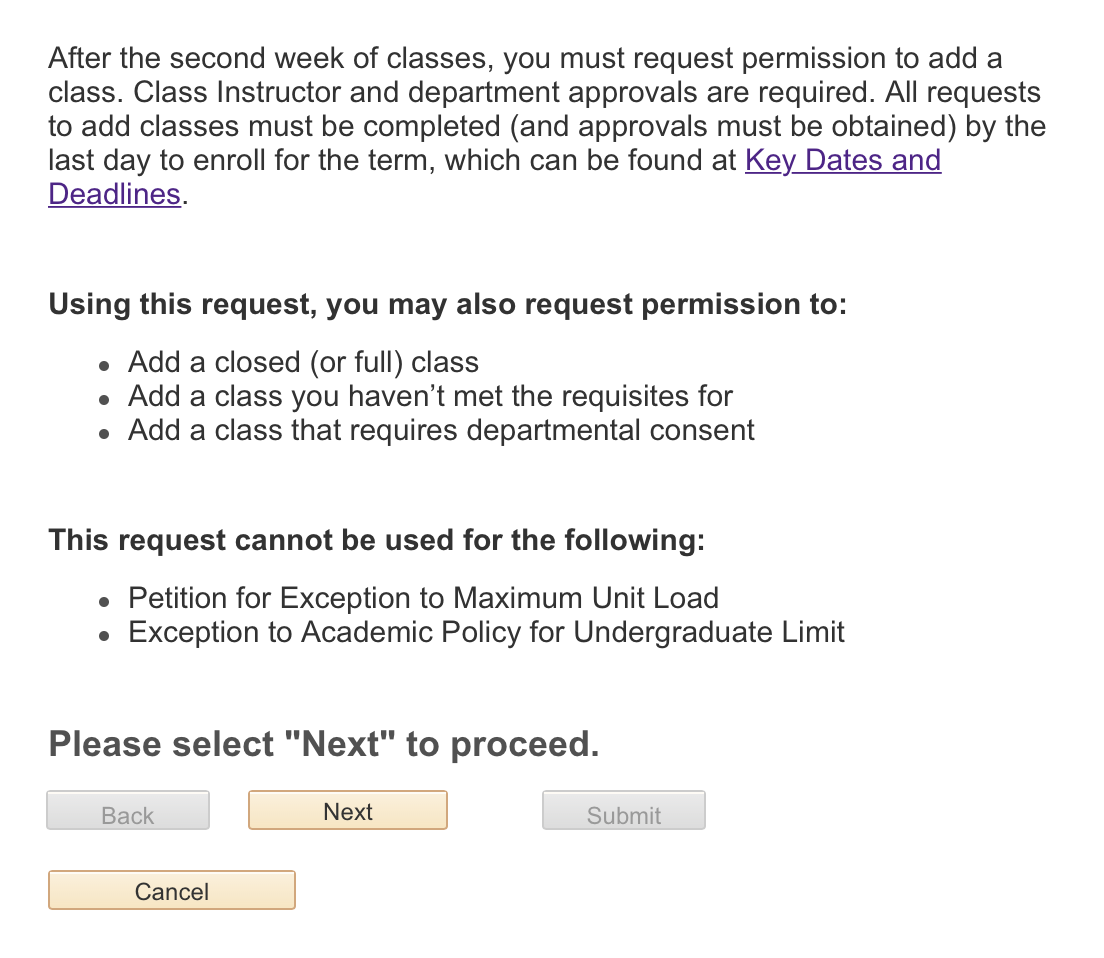
Select Next to continue.
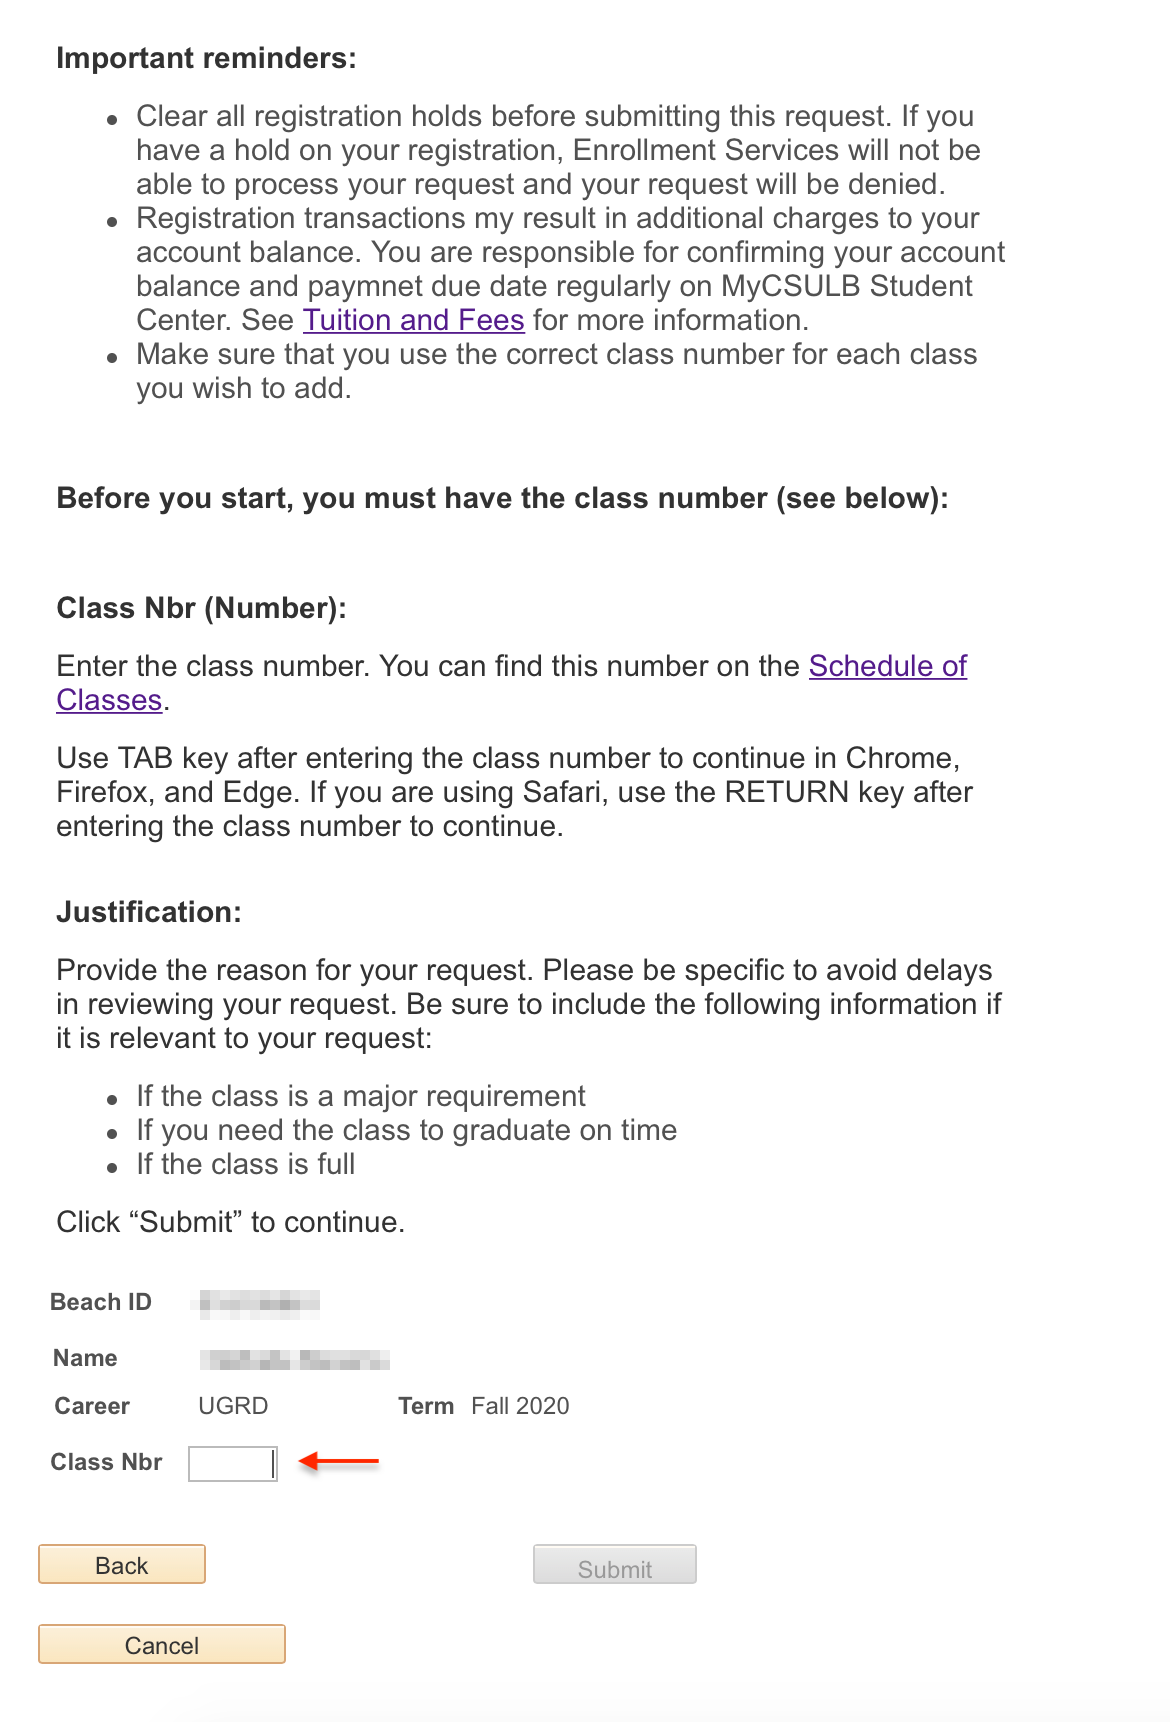
Enter the four- or five-digit class number for the class you wish to add in the Class Nbr field. You can use the Schedule of Classes to find this number.
Use the Tab key after entering the class number to continue in Chrome, Firefox, and Edge. If you are using Safari, use the Return key after entering the class number to continue. If the class you selected requires a corresponding lab, activity, or other co-requisite, an alert will appear and you will need to select the corresponding section before continuing.

The class units and a text box to enter your justification will appear if you entered a valid class number.
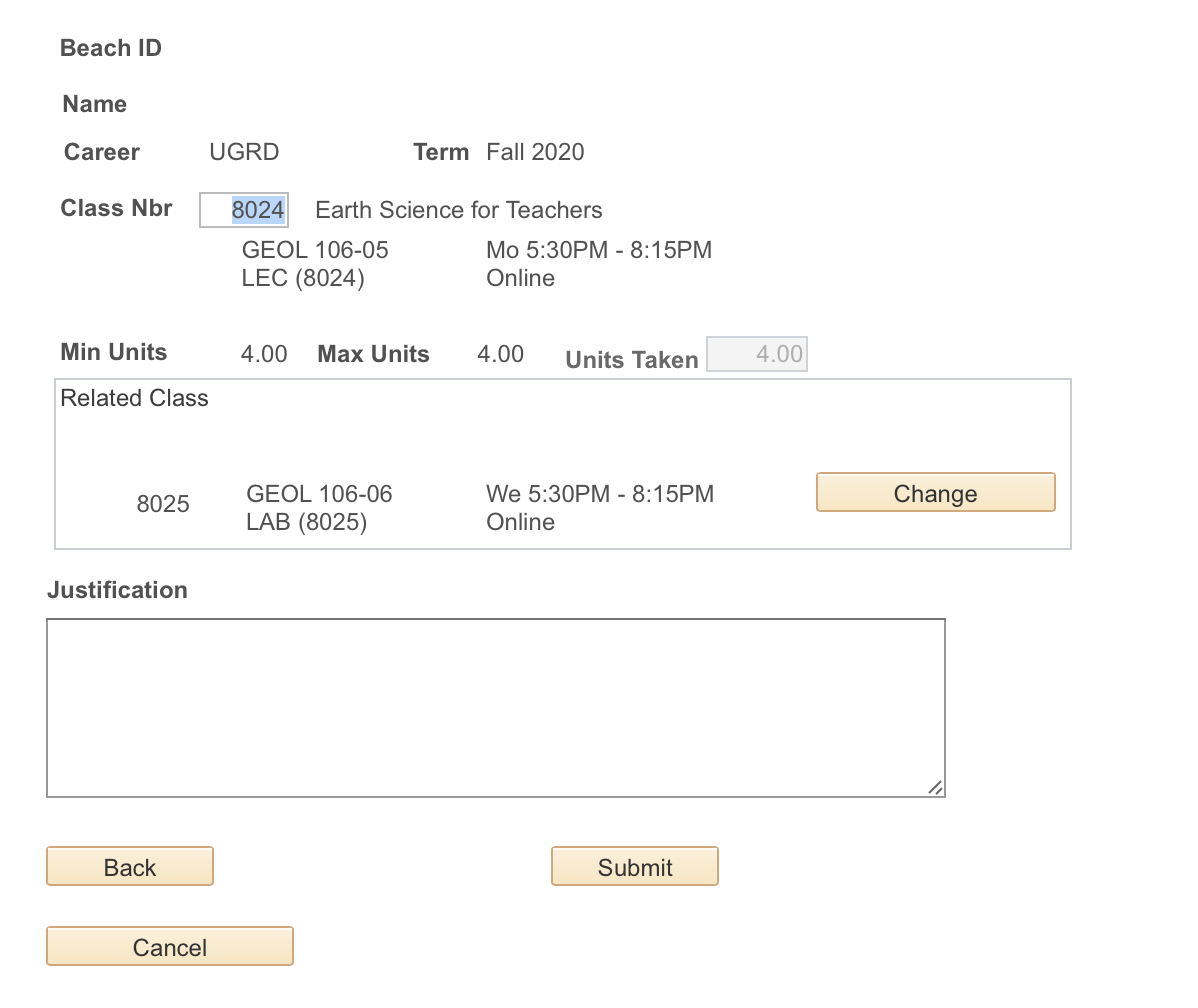
Double-check the number of units. If you are registering for a variable unit class, enter the number of units.
Note: You can request to change sections of a course that you are already enrolled in. This is called a swap. When you receive approval to swap sections of a course, you will be dropped from the old section and added to the new section at the same time.
To swap sections, enter the class number for the class you want to switch into and then use the Tab or Return key to load the class information. Select the "Swap a Class" checkbox. The "Swap From" box will appear with the section of the course you are already enrolled in. You'll need to select the checkbox for the section you want to drop.
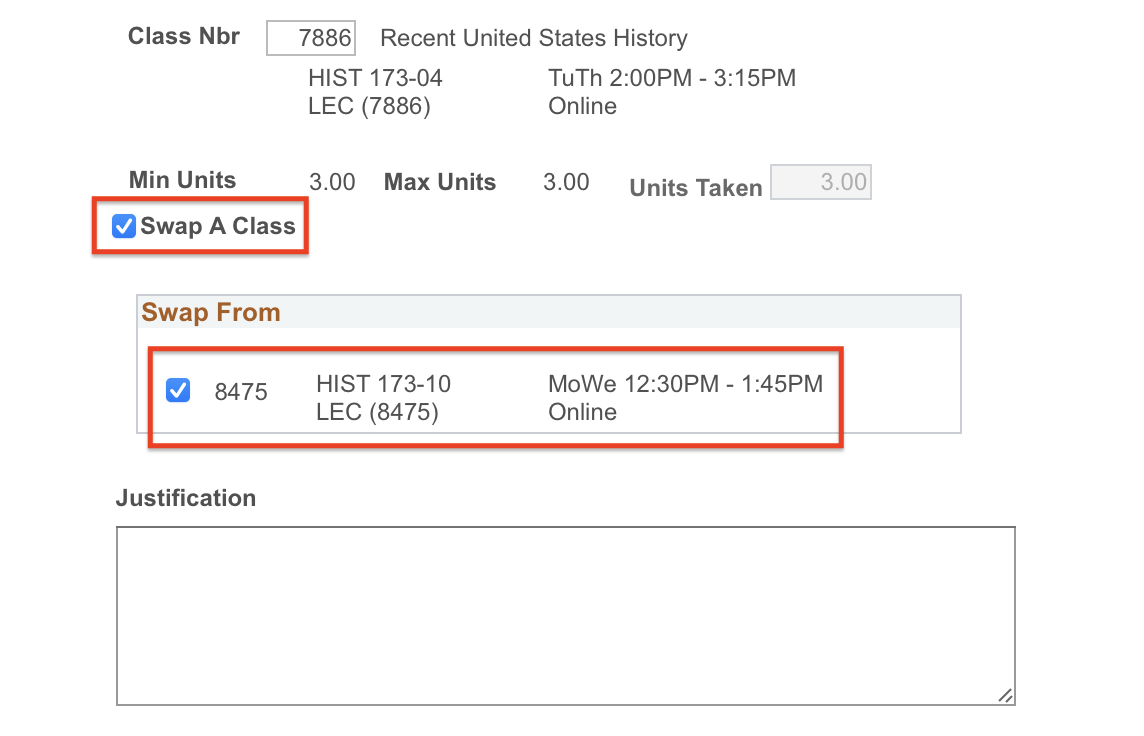
Provide the reason for your request in the Justification field. Please be specific to avoid delays in reviewing your request. Be sure to include the following information if it is relevant to your request:
- If the class is a major requirement
- If you need the class to graduate on time
- If the class is full
Select Submit. Your request will automatically go to the class instructor for review and approval. If the instructor approves, then the request will go to the department for review and approval.
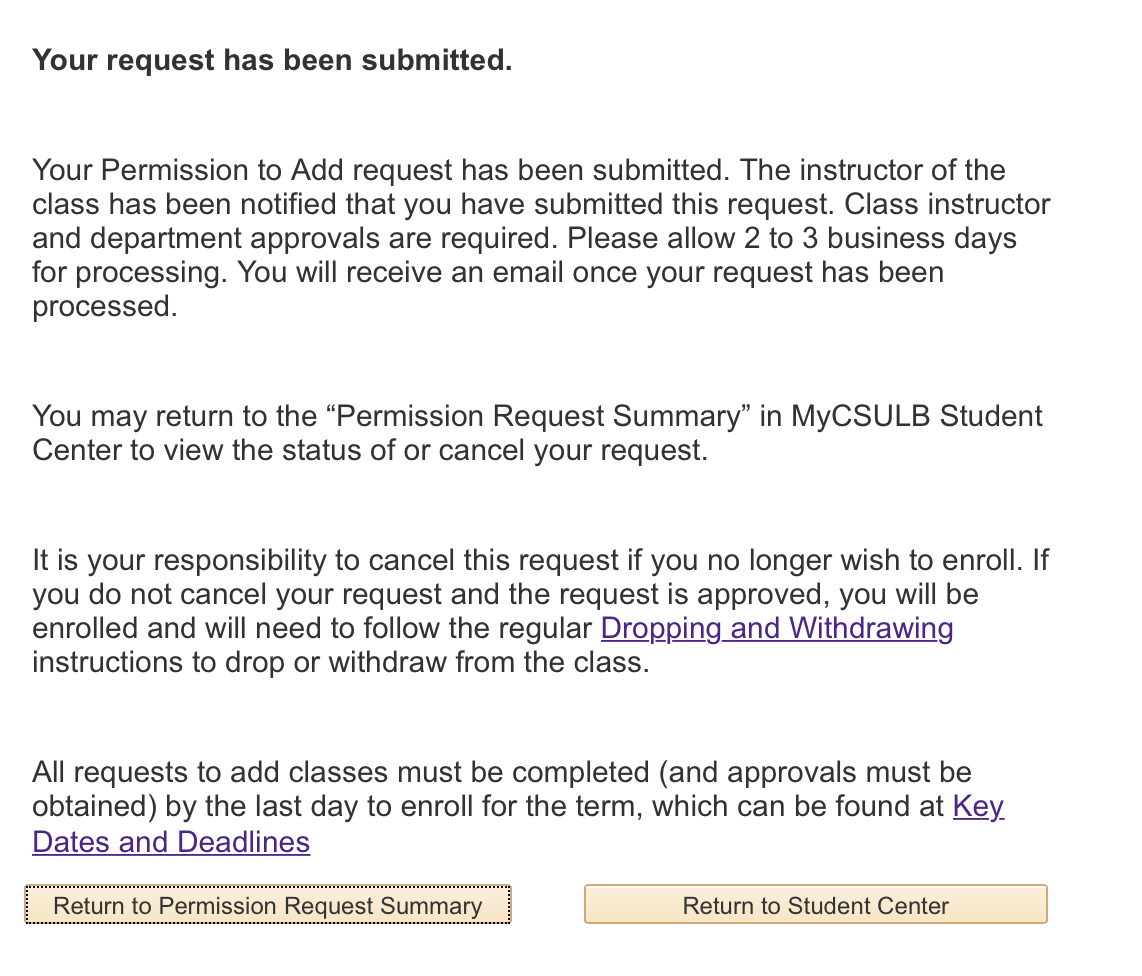
Once your request is approved or denied, you will receive an email notification. You are not officially registered in the class until you receive an email notification that your request was approved and processed. Please allow 2 to 3 business days for processing.
- Log in to MyCSULB Student Center. Under Academics, select Enrollment Adjustments.
- Next, select Enrollment Options from the right-side menu.
- Select Create New Request.
- Select Next.
- The classes you’re enrolled in will be listed. Choose “Change to CR/NC” or “Change to Audit” in the dropdown menu for the class you’d like to change options for. Then, select Next. (If the option doesn’t appear, it’s not allowed for that class.)
- Provide the justification for your request. Then, select Submit.
Your request will be automatically routed on your behalf to the correct approvers. Once processed, you’ll receive an email notification. If approved, the grading option will be changed.
- Log in to MyCSULB Student Center. Under Academics, select Enrollment Adjustments.
- Next, select Enrollment Options from the right-side menu.
- Select Create New Request.
- Select Next.
- The classes you’re enrolled in will be listed. Choose “Change related component” in the dropdown menu for the class you’d like to change related components for. Then, select Next. (If the option doesn’t appear, related components aren’t available for that class.)
- Select the section you want to switch to. Then, select OK.
- Provide the justification for your request. Then, select Submit.
Your request will be automatically routed on your behalf to the correct approvers. Once processed, you’ll receive an email notification. If approved, you’ll be switched to your new section.
Variable Unit Class Changes
- Log in to MyCSULB Student Center. Under Academics, select Enrollment Adjustments.
- Next, select Enrollment Options from the right-side menu..
- Select Create New Request.
- Select Next.
- The classes you’re enrolled in will be listed. Choose “Change variable units” in the dropdown menu for the class you’d like to change. Then, select Next. (If the option doesn’t appear, the class isn’t a variable unit class.)
- Enter the number of units you want to register for.
- Provide the justification for your request. Then, select Submit.
Your request will be automatically routed on your behalf to the correct approvers. Once processed, you’ll receive an email notification. If approved, the number of units you’re enrolled in for the class will be updated.
- Log in to MyCSULB Student Center. Under Academics, select Enrollment Adjustments.
- Next, select Repeat Limit Exception from the right-side menu.
- Select Create New Request to start a new request
- Review the information and then select Next.
- Choose the course you wish to repeat and then select Next to continue.
- Select the term you plan to repeat the course. If you’re repeating a class for which you received an A, B, C, or CR grade, you’ll need to choose the reason for your appeal. Then, select Next.
- Provide a personal statement that explains the reason for your request. Include why you want to repeat the course, evidence of changes in your academic behavior, and goals that will lead to academic success. When you’re finished, select Submit to send your request for approval.
Your request will automatically be sent to the required approvers. You’ll receive an email once your request has been processed. You can check the status of your request by returning to the Repeat Limit Exception page.
Maximum Unit Exception
- Log in to MyCSULB Student Center. Under Academics, select Enrollment Adjustments.
- Next, select Maximum Unit Exception from the right-side menu.
- Select Create New Request to start a new request.
- Select the term for which you’re requesting additional units.
- Provide the required information:
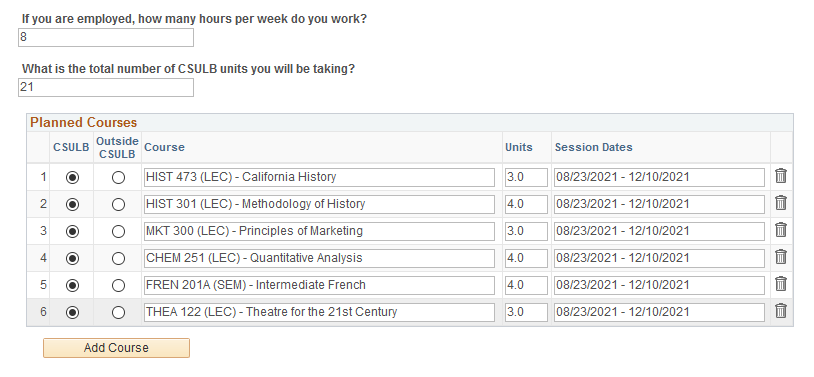
- Enter the number of hours per week that you plan to work (if you’re employed) and the total number of units you plan to enroll in at CSULB if your overload is approved.
- The classes you’re already enrolled in are listed in the Planned Courses section. Select Add Course to add each additional class you plan to enroll in for the term.
- Provide a personal statement that explains why the overload is necessary.
- You may also attach any supporting documents.
- When you’re finished, select Submit to send your request for approval.
Your request will automatically be sent to the required approvers. You’ll receive an email once your request has been processed. You can check the status of your request by returning to the Maximum Unit Exception page.
Leave of Absence - Learn more about Educational Leave and how to apply via the Educational Leave page.
All undergraduate students are subject to limits of Course Withdrawals and Course Repetitions. Withdrawals/Repeats Summaries allow students to monitor the allowable withdrawal and repeat limits. You may view your withdrawal and repeats summary on the ‘Student Center’ page by selecting Withdrawals/Repeats from the options under other academic dropdown list.
Select Withdrawals/Repeats from the expandable menu within the Academics panel (button is located in the upper right of the panel, illustrated with three stacked lines). This will take you to the Withdrawals/Repeats Summary page.
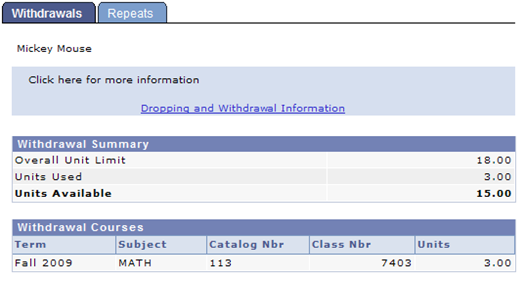
Viewing the Withdrawal Summary:
The summary default is the Withdrawals tab
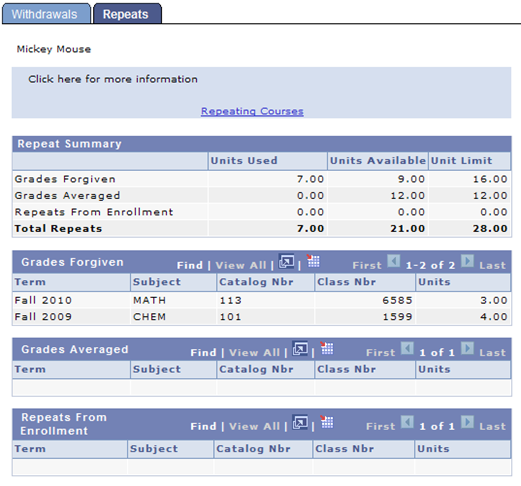
The top Repeat Summary consists of:
- Grades Forgiven (the grade in the initial attempt is not included in the GPA) displays total unit limit, units used, as well as units still available for grade forgiveness.
- Grades Averaged (the grades in all attempts are averaged into the GPA) displays total unit limit available, units used, as well as units still available for grade averaged.
- Repeats from Enrollment displays currently enrolled courses that may be subject to the repeat rules.
For detailed course information for each of the three categories of repeats, see the corresponding tables above. To view additional courses within the tables above, select View All.
For information on the requirements, see Repeating Courses.
Students not attending a class in which they are enrolled must drop or withdraw from the class; failure to do so will result in a failing grade on the student’s record (F or WU). Withdrawing occurs when you remove yourself from classes AFTER self-service registration ends for the term or session. Before withdrawing, you should consider the consequences of such an action and consult with your academic advisor since it will generally impact your progress towards your degree, future course enrollment and financial aid eligibility.
To begin, in the Academics section, click on Enrollment Adjustments.
Next, select Withdraw from the right-side menu.
To begin your withdrawal request, click on the “Create New Request” button.
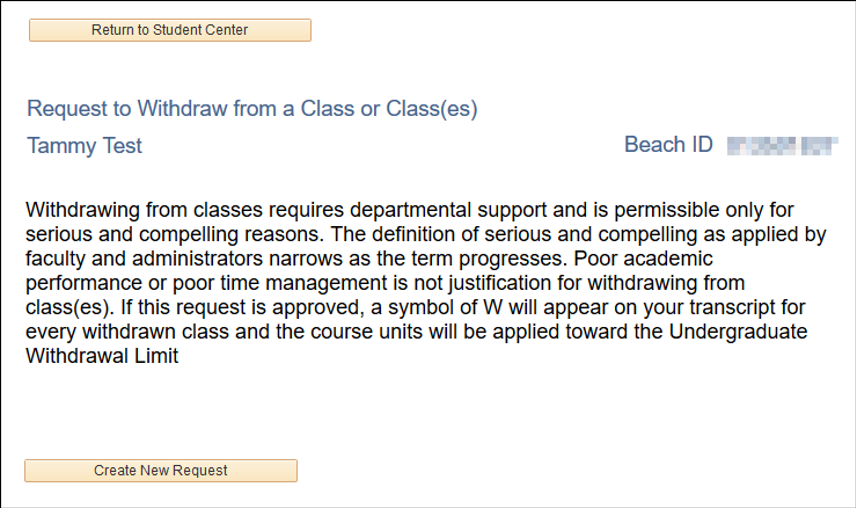
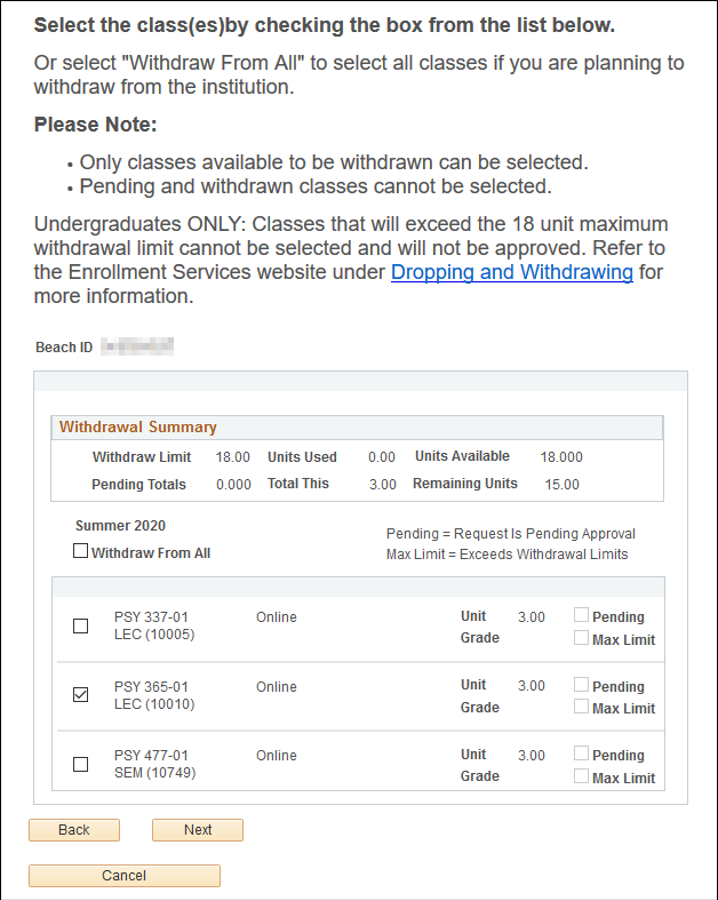
Check the box for the class(es) in which you wish to withdraw.
If you wish to withdraw from all of your classes, check the “Withdraw From All” checkbox.
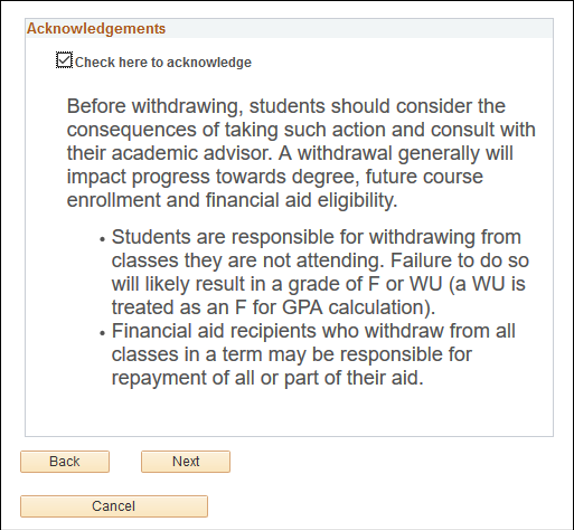
Read all applicable acknowledgements, check each box to acknowledge, and click on the “Next” button.
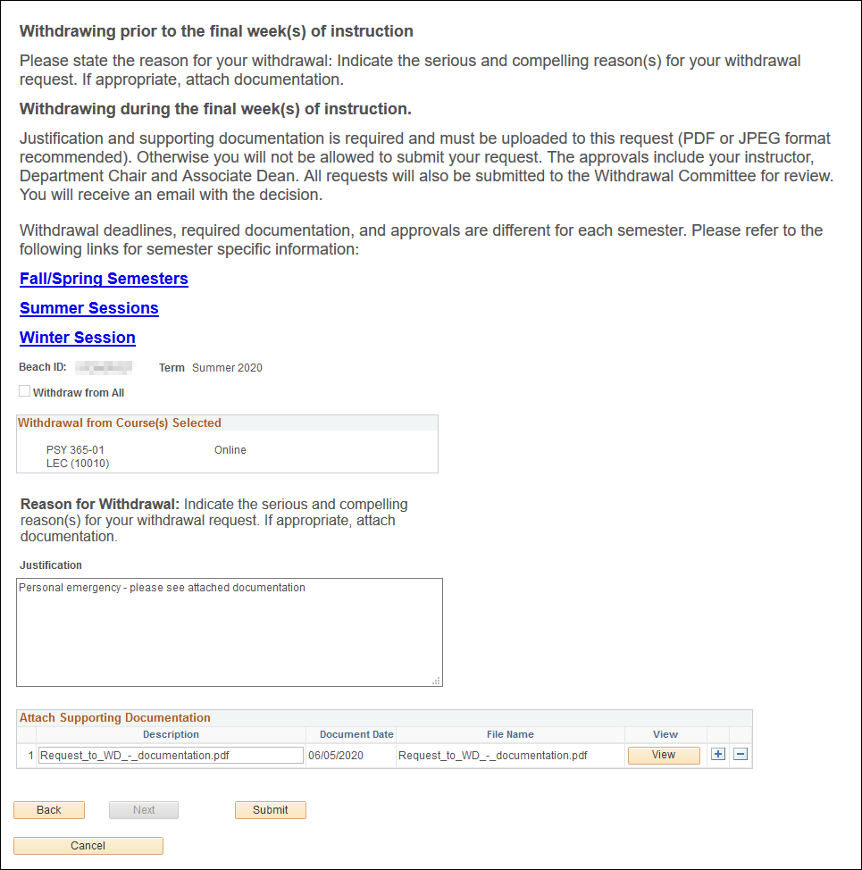
You will need to provide the reason(s) for your withdrawal request. Enter your justification for the withdrawal in the text box provided.
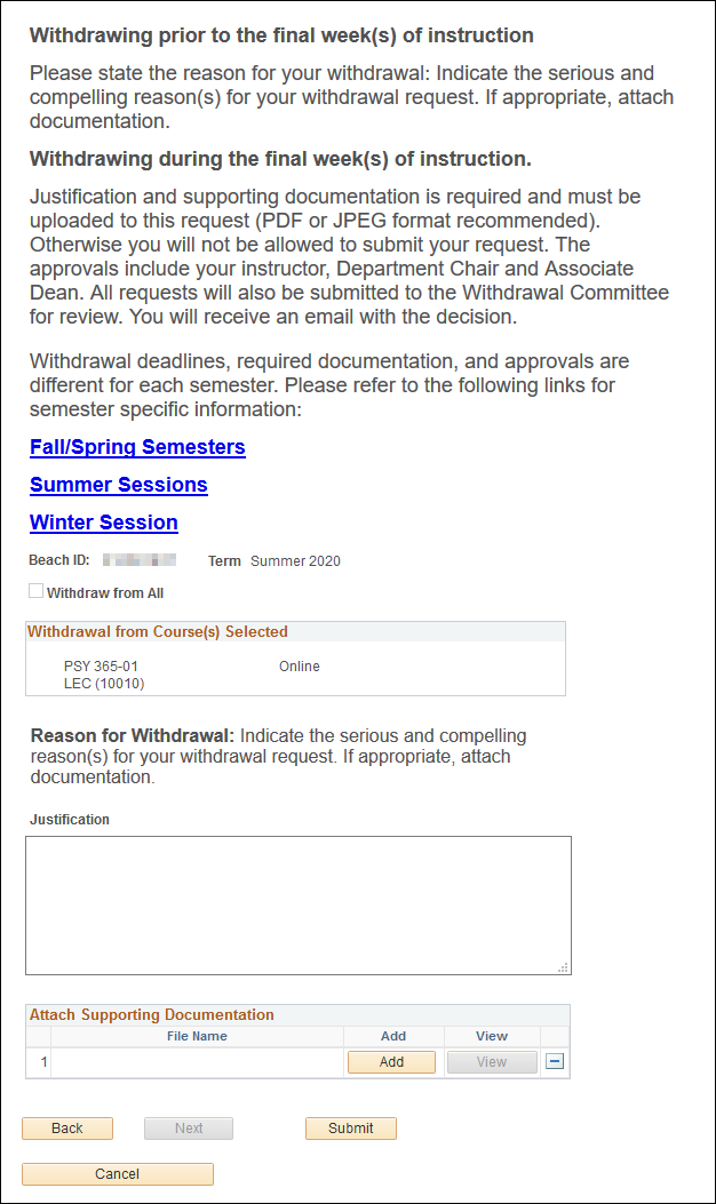
If you would like to provide supporting documentation for your request, click the Add button to upload your documents (PDF and JPEG formats preferred).
Note: Required documentation is different depending on when you decide to do so. Please refer to Dropping and Withdrawing for specific information.
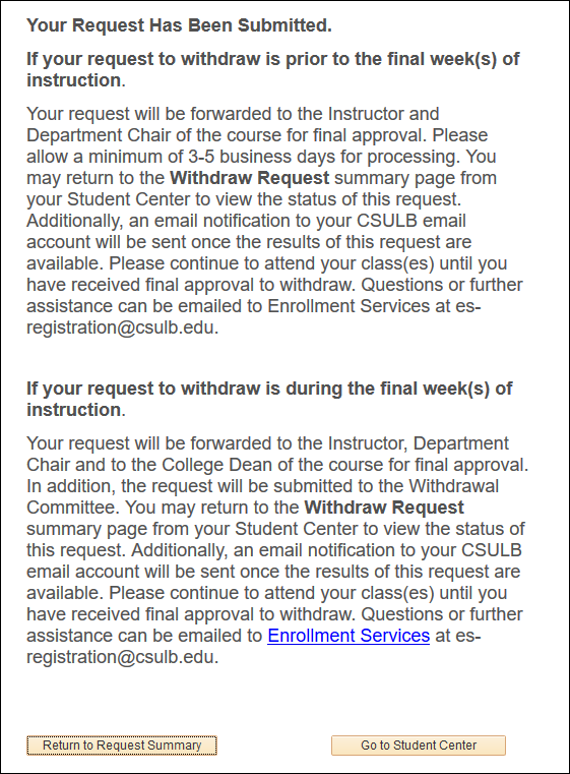
You will see a confirmation that your request to withdraw was submitted.
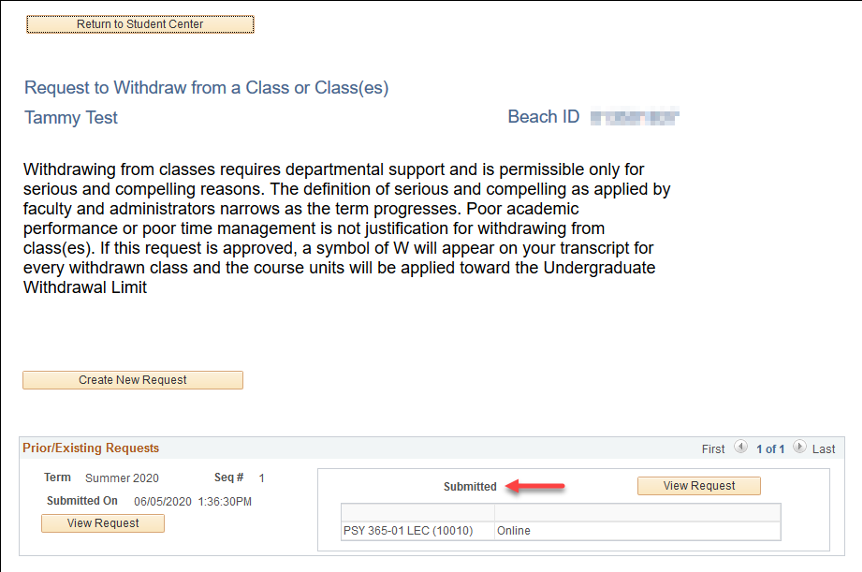
This request will be forwarded through the approval process: Instructor, Department Chair, and Associate Dean (if applicable).
You can return to the Withdraw Request Summary page to view the status of your request.
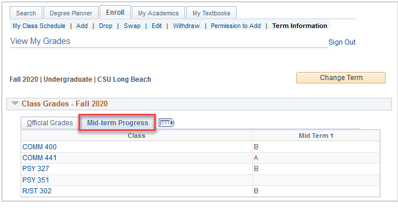
Instructors may provide mid-term progress reports to students at the midpoint of the term. These grades do not appear on students' transcripts or affect their GPAs. It can be beneficial for students to review their progress and develop plans to maintain or improve their performance in class.
Since mid-term progress reports are voluntary, you may not receive mid-term progress reports for your classes. If a mid-term progress report is not submitted for your class, your mid-term report may be NA (Not Available). Instructors can submit mid-term progress reports in the fall and spring semesters.
Step 1: Choose Grades from the expandable menu button within the Academics section in Student Center (button is located in the upper right of the panel, illustrated with three stacked lines).
Step 2: You may be prompted to select a term. Choose the radio button for the corresponding term and select the “Continue” button.
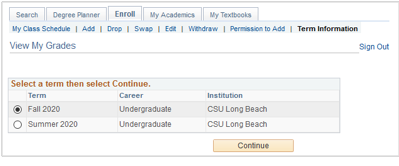
Step 3: Select the "Mid-Term Progress" subtab to view available mid-term progress grades.
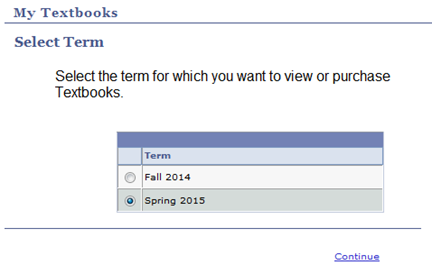
Through My Textbooks , you can view the required and optional textbook(s) and supplemental material requirements for each of your classes.
Note: In order to view the textbooks for your classes, pop-ups must be enabled for your browser. To view your textbooks, click on My Textbooks located within the featured right-side menu under Academics.
Select the radio button in the left column to select a current or upcoming term and click the 'Continue' button.
Select the classes that you wish to view and click on the View/Order Textbooks button. Note: The system automatically selects your enrolled classes. You may uncheck the box to the left of the class if you do not wish to view the textbook(s) for that class. You also have the option to view textbooks for your waitlisted classes. To select, check the box to the left of the class.
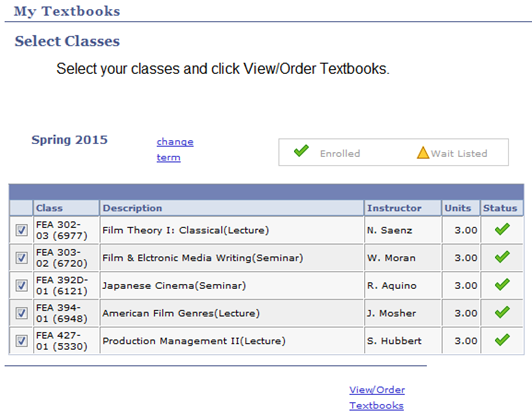
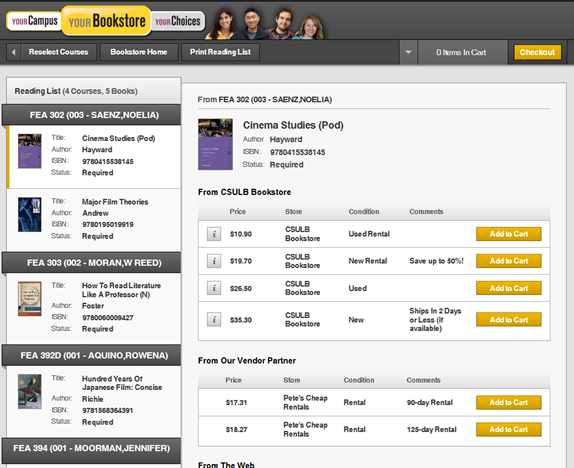
When you click on the ‘View/Order Textbooks’ button, a new window will open up for the University’s 49ers Shops Bookstore ‘Express Textbooks’ page, where you can view and purchase your textbooks. Note: In order to view the textbooks for your classes, pop-ups must be enabled for your browser. Below is an example of the page that displays the textbooks for the classes, as specified by the instructor.
